

Goodman Furnace Overview
Goodman furnaces are popular heating systems known for their reliability and efficiency. These furnaces come in various models with different specifications and components designed to provide consistent warmth for homes and buildings.
Models and Specifications
Goodman offers a range of furnace models to suit diverse heating needs. Their lineup includes single-stage, two-stage, and modulating gas furnaces. Single-stage furnaces operate at full capacity when running, while two-stage models can switch between low and high heat output.
Modulating furnaces provide the most precise temperature control by adjusting heat output in small increments. Goodman furnaces are available in different AFUE (Annual Fuel Utilization Efficiency) ratings, typically ranging from 80% to 98%.
Higher AFUE ratings indicate greater energy efficiency. The BTU (British Thermal Unit) output of Goodman furnaces varies by model, generally ranging from 40,000 to 120,000 BTUs.
System Components and Functions
Goodman furnaces consist of several key components that work together to heat homes efficiently. The heat exchanger is a crucial part that transfers heat from combustion gases to the air circulated through the home.
The burner ignites the fuel to generate heat, while the blower motor circulates warm air through the ductwork. A thermostat controls the furnace operation, signaling when to start and stop heating cycles.
Many Goodman models feature:
- Variable-speed blower motors for improved air circulation
- Hot surface ignitors for reliable startup
- Aluminized steel heat exchangers for durability
- Self-diagnostic control boards for easier troubleshooting
These components are designed to work seamlessly, providing consistent heating performance and energy efficiency throughout the cold season.
Pre-Troubleshooting Safety Guidelines
Don’t Overpay for HVAC Services – Call 888-894-0154 Now to Compare Local Quotes!
Before attempting any troubleshooting on a Goodman furnace, it’s crucial to prioritize safety. Always turn off the power to the furnace at the circuit breaker or fuse box. This prevents electrical shocks and accidental starts during inspection.
Ensure the gas supply is shut off at the main valve near the furnace. This precaution eliminates the risk of gas leaks or unintended ignition.
Allow the furnace to cool completely before starting any work. Hot components can cause severe burns, so patience is key for safe troubleshooting.
Proper ventilation is essential. Open windows or use fans to circulate air, especially when working with gas components.
Wear appropriate personal protective equipment (PPE):
- Safety glasses
- Work gloves
- Dust mask
Keep a fire extinguisher nearby as a precautionary measure. Familiarize yourself with its operation before starting any work.
Clear the area around the furnace of flammable materials. This includes papers, cleaning supplies, and other combustible items.
If you smell gas at any point, exit the area immediately and contact your gas company or emergency services. Do not attempt to locate or fix gas leaks yourself.
Initial Diagnostic Steps
Proper diagnosis is crucial for efficiently resolving Goodman furnace issues. These initial steps help identify common problems and narrow down potential causes.
Thermostat Checks
Start by examining the thermostat settings. Ensure it’s set to “Heat” mode and the temperature is higher than the current room temperature. Replace batteries if needed. Check for loose wires or connections at the thermostat base.
Verify the thermostat is level on the wall, as tilted units can provide inaccurate readings. Clean any dust or debris from inside the thermostat cover.
Test the thermostat by temporarily bypassing it. Connect the R and W wires directly at the furnace control board. If the furnace starts, the thermostat may be faulty.
Power Supply Verification
Confirm the furnace has proper electrical power. Check the main electrical panel for tripped breakers or blown fuses. Reset or replace as necessary.
Locate the furnace’s power switch, typically mounted on the unit or nearby wall. Ensure it’s in the “On” position. Inspect the wiring for any visible damage or loose connections.
Test the outlet supplying power to the furnace with a multimeter or by plugging in a known working device. If no power is detected, the issue may lie with the home’s electrical system.
Error Code Interpretation
Modern Goodman furnaces feature diagnostic systems that display error codes to indicate specific issues. These codes typically appear as flashing lights on the control board or display panel.
Common error codes include:
- E1: Ignition failure
- E2: Pressure switch problem
- E3: Blocked condensate drain
- E4: High limit switch tripped
To interpret the codes, consult the furnace’s manual or Goodman’s official documentation. Each code corresponds to a particular malfunction or safety concern.
Technicians use these codes to quickly diagnose problems and perform targeted repairs. Homeowners can also benefit from understanding basic code meanings to communicate issues more effectively with professionals.
Don’t Overpay for HVAC Services – Call 888-894-0154 Now to Compare Local Quotes!
Some Goodman models use LED flash patterns instead of alphanumeric codes. For example:
| Flash Pattern | Meaning |
|---|---|
| 1 flash | Normal operation |
| 2 flashes | System lockout |
| 3 flashes | Pressure switch error |
Correctly interpreting error codes can save time and money during troubleshooting. It allows for more precise identification of furnace problems and helps determine whether a simple fix or professional service is required.
Common Issues and Solutions
Goodman furnaces can experience several common problems that affect their performance and efficiency. Addressing these issues promptly helps maintain optimal heating and prevents costly repairs.
Ignition Failure
Ignition failure is a frequent issue in Goodman furnaces. Dirty or faulty ignitors often cause this problem. Clean the ignitor carefully with fine-grit sandpaper or replace it if damaged. Check the flame sensor for corrosion or buildup and clean it gently with steel wool.
Inspect gas valves and burners for obstructions or damage. Ensure proper gas pressure and flow. If the problem persists, the control board may need replacement.
Blower Motor Problems
Blower motor issues can lead to inadequate airflow and reduced heating efficiency. Listen for unusual noises like squealing or grinding, which may indicate worn bearings. Check the capacitor for signs of damage or swelling.
Clean the blower wheel and housing to remove dirt and debris. Lubricate motor bearings if applicable. If the motor fails to start or runs inconsistently, it may need replacement.
Heat Exchanger Troubles
Heat exchanger problems are serious and can lead to carbon monoxide leaks. Look for visible cracks, rust, or corrosion on the heat exchanger surface. Pay attention to unusual odors or soot around the furnace.
Use a carbon monoxide detector to check for leaks. If a problem is suspected, shut off the furnace immediately and contact a professional. Heat exchanger replacement is often necessary in these cases.
Airflow Obstructions
Restricted airflow can cause numerous issues, including overheating and reduced efficiency. Change or clean air filters regularly, typically every 1-3 months. Inspect return air ducts for blockages or damage.
Check supply vents throughout the home to ensure they’re open and unobstructed. Clean the evaporator coil if accessible. Consider professional duct cleaning if airflow problems persist.
Electrical Component Assessments
Proper evaluation of electrical components is crucial for effective furnace troubleshooting. Capacitors and control boards play vital roles in furnace operation and require careful inspection.
Testing the Capacitor
Capacitors store and release electrical energy, aiding in motor startup. To test a capacitor, first disconnect power to the furnace. Safely discharge the capacitor using a resistor.
Use a multimeter set to capacitance mode. Connect the probes to the capacitor terminals. Compare the reading to the capacitor’s rated value, typically printed on its side.
A significant difference between the measured and rated values indicates a faulty capacitor. Replace it if necessary. Always handle capacitors with caution, as they can retain charge even when disconnected.
Don’t Overpay for HVAC Services – Call 888-894-0154 Now to Compare Local Quotes!
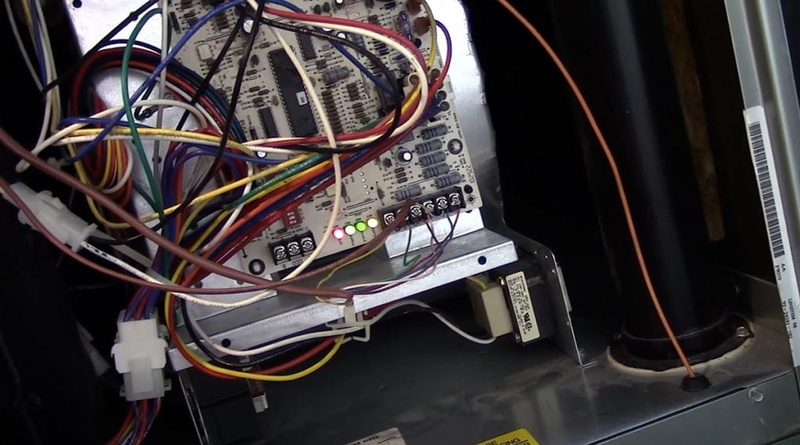
Inspecting the Control Board
The control board manages furnace operations and requires thorough examination. Start by visually inspecting the board for signs of damage, such as burnt components or swollen capacitors.
Check all connections for loose or corroded wires. Ensure the board is securely mounted and free from moisture or debris. Use a multimeter to test for continuity in fuses and verify proper voltage at key points.
Look for error codes on the board’s LED display. These codes often provide valuable diagnostic information. If issues persist after addressing visible problems, consider replacing the entire control board.
Gas Supply and Pressure Checks
Proper gas supply and pressure are crucial for a Goodman furnace to operate efficiently. Technicians should first verify that the gas valve is fully open and the supply line is free of leaks.
Using a manometer, measure the gas pressure at the inlet and manifold. Compare these readings to the manufacturer’s specifications listed on the furnace label.
Inlet pressure should typically fall between 5-10.5 inches of water column (WC) for natural gas, or 11-13 inches WC for propane. Manifold pressure is usually around 3.5 inches WC for natural gas or 10 inches WC for propane.
If pressures are incorrect, adjust the gas valve regulator. Low pressure can cause weak flames and poor heating, while high pressure may lead to overheating or safety shutoffs.
Check for proper gas flow by timing the gas meter. With all other gas appliances off, run the furnace and observe the meter for one minute. Calculate the BTU input using this formula:
BTU Input = (Cubic feet used x Heating value of gas) / Minutes run
Compare the result to the furnace’s rated input. A significant discrepancy may indicate a gas supply issue or a malfunctioning gas valve.
Always use caution when working with gas systems. If you smell gas or suspect a leak, shut off the main gas valve immediately and contact a professional.
Flame Sensor and Pilot Light Maintenance
Regular maintenance of the flame sensor and pilot light is crucial for optimal furnace performance. These components play a vital role in ensuring safe and efficient operation.
The flame sensor detects the presence of a flame during the ignition process. Over time, it can accumulate soot and debris, affecting its ability to function properly. Cleaning the flame sensor is a simple yet important task.
To clean the flame sensor:
- Turn off power to the furnace
- Remove the sensor from its mounting bracket
- Gently scrub with fine-grit sandpaper or steel wool
- Wipe clean with a soft cloth
- Reinstall the sensor
The pilot light ignites the main burner in older furnace models. If it goes out frequently or appears weak, it may need adjustment or cleaning. A properly functioning pilot light should have a steady blue flame.
Common pilot light issues include:
- Dirty orifice
- Faulty thermocouple
- Incorrect gas pressure
For pilot light maintenance:
- Clean the orifice with compressed air
- Adjust the flame if necessary
- Replace the thermocouple if damaged
Regular inspection of these components can prevent unexpected shutdowns and ensure efficient furnace operation. If problems persist after basic maintenance, consult a professional technician for further assistance.
Filter Inspection and Replacement
Regular filter inspection and replacement are crucial for maintaining a Goodman furnace’s efficiency and longevity. Dirty filters restrict airflow, forcing the system to work harder and potentially causing overheating.
Locate the filter compartment, typically found in the return air duct or blower compartment. Remove the existing filter and check its condition. A visibly dirty or clogged filter requires immediate replacement.
Most Goodman furnaces use standard 1-inch thick filters. Common sizes include:
- 16×20 inches
- 16×25 inches
- 20×25 inches
Always consult the furnace manual for the correct filter size and type.
Replace disposable filters every 1-3 months, depending on usage and air quality. Washable filters should be cleaned monthly and replaced annually. When installing a new filter, ensure the airflow arrow points toward the furnace.
For optimal performance, consider using high-efficiency filters with a MERV rating of 8-13. These capture more airborne particles but may require more frequent changes due to faster accumulation of debris.
Set reminders for regular filter checks to maintain consistent furnace performance and indoor air quality. This simple maintenance task can prevent many common furnace issues and extend the system’s lifespan.
Ductwork and Ventilation Evaluation
Proper ductwork and ventilation are crucial for a Goodman furnace to operate efficiently. Inspect all visible ducts for signs of damage, leaks, or disconnections. Seal any gaps with metal-backed tape or mastic sealant to prevent air loss.
Check supply and return vents in each room for obstructions. Ensure furniture, curtains, or other items are not blocking airflow. Clean dirty vents and registers to improve air circulation throughout the home.
Examine the furnace’s exhaust flue for proper installation and venting. Look for any cracks, corrosion, or separation in the flue pipe. A compromised flue can lead to dangerous carbon monoxide leaks.
Consider having a professional perform a duct leakage test. This assessment can identify hidden air leaks and inefficiencies in the ductwork system. Addressing these issues can significantly improve furnace performance and energy efficiency.
Inspect the air filter regularly and replace it as needed. A clogged filter restricts airflow, reducing furnace efficiency and potentially causing overheating. Most filters should be changed every 1-3 months, depending on usage and environmental factors.
Thermostat Calibration
Thermostat calibration is a crucial step in Goodman furnace troubleshooting. A properly calibrated thermostat ensures accurate temperature readings and efficient furnace operation.
To begin calibration, locate the thermostat and remove its cover. Inspect the interior for dust or debris, which can affect accuracy. Gently clean the components with a soft brush or compressed air.
Next, check the thermostat’s level using a spirit level. An unlevel thermostat can cause inaccurate readings. Adjust its position if necessary.
Many modern thermostats have a built-in calibration feature. Consult the user manual for specific instructions on accessing and using this function.
For older models, manual calibration may be required. This typically involves adjusting a small screw or dial inside the thermostat. Use a thermometer to compare the actual room temperature with the thermostat reading.
Make small adjustments and allow time for the thermostat to stabilize between each change. Repeat this process until the thermostat reading matches the actual room temperature.
If calibration proves difficult or ineffective, consider replacing the thermostat. A new, programmable model can improve energy efficiency and overall furnace performance.
Remember to test the furnace after calibration to ensure proper operation. If problems persist, consult a professional HVAC technician for further assistance.
Seasonal Maintenance Recommendations
Regular maintenance is crucial for optimal Goodman furnace performance. Twice-yearly checks, ideally in spring and fall, help prevent issues and extend equipment life.
Spring maintenance prepares the system for summer dormancy. Clean or replace air filters, check condensate drain lines, and inspect the outdoor unit. Remove debris from around the unit to ensure proper airflow.
Fall maintenance readies the furnace for winter use. Replace batteries in thermostats and carbon monoxide detectors. Clean burners and check the ignition system. Inspect heat exchangers for cracks or corrosion.
Lubricate moving parts and tighten electrical connections during both seasonal checks. Test safety controls and calibrate the thermostat for accurate temperature readings.
Professional HVAC technicians should perform a comprehensive inspection annually. They can identify potential problems early and ensure the system operates at peak efficiency.
Homeowners can contribute to furnace longevity with simple tasks:
- Change air filters monthly
- Keep vents and registers clear of obstructions
- Monitor for unusual noises or odors
- Maintain a clean area around the furnace
These routine maintenance steps help prevent breakdowns, improve energy efficiency, and ensure a comfortable home environment year-round.
How to Avoid Being Ripped Off and Get a Fair Repair Price
Finding the right furnace repair expert can be tricky—some companies offer rock-bottom prices because they’re inexperienced or have poor reputations, while others charge far too much for the same work. That’s why the smartest way to get quality repairs at a fair price is to compare estimates from top-rated local pros. Meet with each, learn about their history and the experience of the technicians that will do the work. Choose an experienced furnace repair contractor with reasonable rates. You can expedite this process by using our Free Local Estimates service.
When you fill out a quick form and submit it, you’ll soon be contacted by three of the top furnace repair and installation companies near you. They are prescreened for experience, and all are licensed and insured for your protection. Click below to get started and protect your home and wallet today.
Frequently Asked Questions
Goodman furnace owners often encounter common issues and have questions about troubleshooting their units. These FAQs address key concerns like resetting the furnace, finding manuals, interpreting error codes, and resolving specific problems.
How can I locate and use the reset button on a Goodman furnace?
The reset button on a Goodman furnace is typically located near the blower motor or on the control panel. It’s usually red and may be labeled “RESET” or “RESTART.”
To use it, press and hold the button for about 30 seconds. If the furnace doesn’t restart after resetting, wait 30 minutes before trying again.
Where can I find the Goodman furnace troubleshooting manual in PDF format?
Goodman furnace troubleshooting manuals in PDF format are available on the official Goodman website. Visit the “Literature” section and search for your specific model number.
Alternatively, third-party HVAC websites often host these manuals. Always ensure you’re downloading from a reputable source to avoid malware.
What do flashing error codes mean on a Goodman furnace?
Flashing error codes on a Goodman furnace indicate specific issues with the unit. The number of flashes corresponds to different problems.
For example, two flashes might indicate a faulty pressure switch, while three flashes could signal an issue with the limit circuit. Consult your furnace’s manual for a complete list of error codes and their meanings.
What steps should I take for troubleshooting a Goodman GMH95 furnace?
Start by checking the thermostat settings and ensuring the furnace has power. Inspect the air filter and replace if dirty.
Verify that all vents and returns are unobstructed. Check the ignitor for signs of wear or damage.
If these steps don’t resolve the issue, consult the error codes on the control board and refer to the manual for specific troubleshooting steps.
Why won’t my Goodman furnace start or initiate a heating cycle?
Several factors can prevent a Goodman furnace from starting. Check if the thermostat is set to “HEAT” and the temperature is set higher than the current room temperature.
Ensure the furnace’s power switch is on and the circuit breaker hasn’t tripped. Inspect the air filter and replace if clogged.
Verify that the gas supply is on and the pilot light is lit (for older models). If these checks don’t solve the problem, a professional inspection may be necessary.
How can one address a Goodman electric furnace that’s not heating properly?
First, check the thermostat settings and batteries. Inspect the air filter and replace if dirty.
Verify that all vents and returns are open and unobstructed. Check the circuit breaker and reset if tripped.
Inspect the heating elements for signs of damage or burning. If these steps don’t resolve the issue, consult a licensed HVAC technician for a thorough diagnosis and repair.

How to Get the Best HVAC Prices
- Firstly, keep in mind that installation quality is always the most important thing for residential HVAC project. So never sacrifice contractor quality for a lower price.
- Secondly, remember to look up the latest rebates as we talked above.
- Thirdly, ask for at least 3 bids before you make the decision. You can click here to get 3 free estimates from your local contractors, and this estimate already takes rebates and tax credit into consideration and filter unqualified contractors automatically.
Lastly, once you chose the right contractor, remember to use the tactics from this guide: Homeowners Tactics When Negotiating with HVAC Dealer to get the final best price.