
Carrier furnace error codes provide essential information for diagnosing and resolving issues with your heating system. These codes appear as flashing LED lights on the control board, indicating specific problems or malfunctions.
Common Carrier Furnace Error Codes List
When troubleshooting a Carrier furnace, it is essential to identify the error code to determine the underlying issue. The following list provides an overview of the most common Carrier furnace error codes and their potential causes:
LED Status
- LED off: No power. Continue to the Power diagnostic.
- LED on, not flashing: Normal operation, no call for heat. Continue to the Thermostat diagnostic.
- LED on, flashing rapidly: Normal operation, call for heat. Continue to the Secondary diagnostic.
Short and Long Flash Sequences
| Flash Sequence | Description |
|---|---|
| 1 short and 1, 2, or 3 long flashes | Continue to the Secondary diagnostic. |
| 1 short and 4 long flashes | Furnace locked out from heating attempts. Possible plugged filter or faulty flame sensor, high limit switch, or gas valve. Continue to the Secondary diagnostic. |
| 2 short and 1 long flashes | Gas heating lock out. Faulty flame sensor or gas valve. Book a professional repair or continue to the Flame sensor or Gas valve diagnostic. |
| 2 short and 2 long flashes | Low flame sensor signal. Dirty or faulty flame sensor. Book a professional repair or continue to the Flame sensor diagnostic. |
| 2 short and 3 long flashes | Pressure switch not opening. Blocked intake/exhaust or faulty pressure switch or inducer motor. Book a professional repair or continue to the Inducer motor or Intake and exhaust diagnostic. |
| 2 short and 4 long flashes | Fuse on board open. Faulty wiring or control board. Book a professional repair. |
| 3 short and 1 long flashes | Pressure switch did not close or reopened. Blocked intake/exhaust or faulty pressure switch or inducer motor. Book a professional repair or continue to the Inducer motor or Intake and exhaust diagnostic. |
| 3 short and 2 long flashes | Continue to the Secondary diagnostic. |
| 3 short and 3 long flashes | Limit circuit fault — high limit or rollout limit switch open. Blocked filter or secondary heat exchanger, or failed blower motor. Continue to the Secondary diagnostic. |
| 3 short and 4 long flashes | Ignition proving error. Faulty flame sensor, gas valve, or control board. Book a professional repair or continue to the Flame sensor or Gas valve diagnostic. |
| 4 short and 1 long flashes | Blower outside valid speed range. Faulty blower motor. Book a professional repair or continue to the Blower motor diagnostic. |
| 4 short and 2 long flashes | Inducer outside valid speed range. Faulty inducer motor or control board. Book a professional repair or continue to the Inducer motor diagnostic. |
| 4 short and 3 long flashes | Pressure switch calibration faulty. Blocked intake, exhaust, condensate trap, or faulty pressure switch. Book a professional repair or continue to the Condensate trap or Intake and exhaust diagnostic. |
| 4 short and 5 long flashes | Continue to the Secondary diagnostic. |
When encountering an error code, it is crucial not to turn off the power to the furnace while troubleshooting unless instructed otherwise, as turning off the power clears the current error code. Users should carefully observe the flashing LED sequence or display code, which may repeat in a loop, and match it with the corresponding code in the list above. If the issue persists or requires professional attention, it is recommended to book a repair with a qualified HVAC technician.
Initial Troubleshooting Steps
Before attempting to diagnose Carrier furnace error codes, it’s essential to follow proper safety protocols and gather the necessary tools. Correctly interpreting the error code is crucial for effective troubleshooting.
Safety Precautions
Turn off the furnace’s power supply at the circuit breaker before performing any diagnostics or repairs. Ensure the gas supply is shut off if dealing with a gas furnace. Wear protective gear such as gloves and safety glasses.
Allow the furnace to cool completely if it has been running recently. This prevents potential burns from hot components. Keep a fire extinguisher nearby as a precautionary measure.
Never attempt repairs beyond your skill level. If unsure, contact a licensed HVAC technician.
Tools and Equipment Needed
Gather essential tools for troubleshooting:
- Multimeter for electrical testing
- Flashlight for visibility in dark areas
- Screwdrivers (flathead and Phillips)
- Wrench set for loosening connections
- Digital thermometer to check temperature readings
Keep the furnace’s user manual handy for reference. A voltage tester can help verify power supply issues. For gas furnaces, a gas leak detector is crucial for safety checks.
Don’t Overpay for HVAC Services – Call 888-894-0154 Now to Compare Local Quotes!
Clean rags and a vacuum cleaner may be needed for removing dust and debris during inspection.
Assessing the Error Code
Locate the furnace’s control board, typically behind the front panel. Look for a blinking LED light that indicates the error code. Count the number of blinks to determine the specific code.
Refer to the furnace’s manual to interpret the error code’s meaning. Common codes often relate to flame sensor issues, pressure switch problems, or ignition failures.
Record the exact error code for reference. Some Carrier models display alphanumeric codes on a digital readout instead of blink patterns. Check if the error persists after resetting the furnace by turning the power off and on.
Power-Related Issues
Power problems can prevent your Carrier furnace from operating properly. Checking the electrical supply and resetting the system are key troubleshooting steps.
Circuit Breaker and Power Supply Checks
Check the circuit breaker for the furnace in your home’s electrical panel. If it has tripped, reset it and see if that resolves the issue. Ensure the furnace’s power switch is in the “On” position.
Examine the wiring connections to the furnace for any signs of damage or loose connections. Tighten any loose wires carefully. If you notice frayed or damaged wires, contact a professional electrician for repairs.
Test the outlet the furnace is plugged into with a voltage tester or by plugging in a working appliance. If there’s no power, the issue may be with your home’s electrical system rather than the furnace itself.
Resetting the Furnace
Locate the furnace’s reset button, typically a red button near the blower motor or on the control panel. Press and hold it for about 30 seconds, then release.
Wait 5 minutes for the furnace to reset completely. If the furnace doesn’t start after this time, try the process once more.
For some Carrier models, you may need to turn off the power to the furnace at the circuit breaker, wait 30 seconds, then turn it back on to perform a hard reset.
If multiple reset attempts fail to resolve the issue, consult a professional HVAC technician. Persistent power problems may indicate a more serious electrical or mechanical issue with your Carrier furnace.
Thermostat Problems
Thermostat issues can cause various carrier furnace errors. Diagnosing and fixing these problems is crucial for proper furnace operation.
Thermostat Diagnosis
Check the thermostat display for error codes or blank screens. Replace batteries if the display is dim or unresponsive. Ensure the thermostat is set to “Heat” mode and the temperature is set higher than the current room temperature.
Verify that the thermostat is level on the wall. An unlevel thermostat can cause inaccurate temperature readings. Clean the thermostat’s interior gently with compressed air to remove dust and debris.
Test the thermostat by setting it to different temperatures and listening for the furnace to respond. If the furnace doesn’t activate, the thermostat may be faulty or improperly connected.
Wiring and Connection Fixes
Inspect the wiring between the thermostat and furnace for damage or loose connections. Turn off power to the furnace before examining wires. Tighten any loose terminal screws and replace frayed or damaged wires.
Ensure correct wire connections at both the thermostat and furnace control board. Common wiring issues include reversed R and C wires or disconnected W wires. Refer to the furnace’s wiring diagram to verify proper connections.
Consider upgrading to a programmable or smart thermostat for improved temperature control and energy efficiency. Follow manufacturer instructions for installation and programming to avoid compatibility issues with the carrier furnace.
Airflow Complications
Proper airflow is crucial for optimal furnace performance. Issues with airflow can lead to inefficient heating and potential system malfunctions.
Don’t Overpay for HVAC Services – Call 888-894-0154 Now to Compare Local Quotes!
Filter Maintenance
Dirty or clogged air filters significantly impede airflow in Carrier furnaces. Regularly inspect and replace filters every 1-3 months, depending on usage and environmental factors. Choose high-quality filters that match your furnace’s specifications.
Signs of a clogged filter include:
- Reduced heating efficiency
- Increased energy bills
- Uneven temperature distribution
- Frequent cycling of the furnace
To replace the filter, locate the filter compartment, typically near the blower fan. Slide out the old filter and insert the new one, ensuring the airflow arrow points towards the furnace.
Ductwork and Vent Inspection
Faulty ductwork can restrict airflow and decrease heating efficiency. Inspect ducts for leaks, gaps, or disconnections. Seal any leaks with metal-backed tape or mastic sealant.
Common ductwork issues include:
- Loose connections
- Holes or cracks
- Collapsed or crushed sections
- Improper sizing
Check vents and registers for obstructions like furniture, curtains, or debris. Ensure all vents are open and unblocked to maintain proper airflow throughout the home.
Consider professional duct cleaning if you notice excessive dust or debris buildup. This service can improve air quality and furnace efficiency.
Ignition and Flame Issues
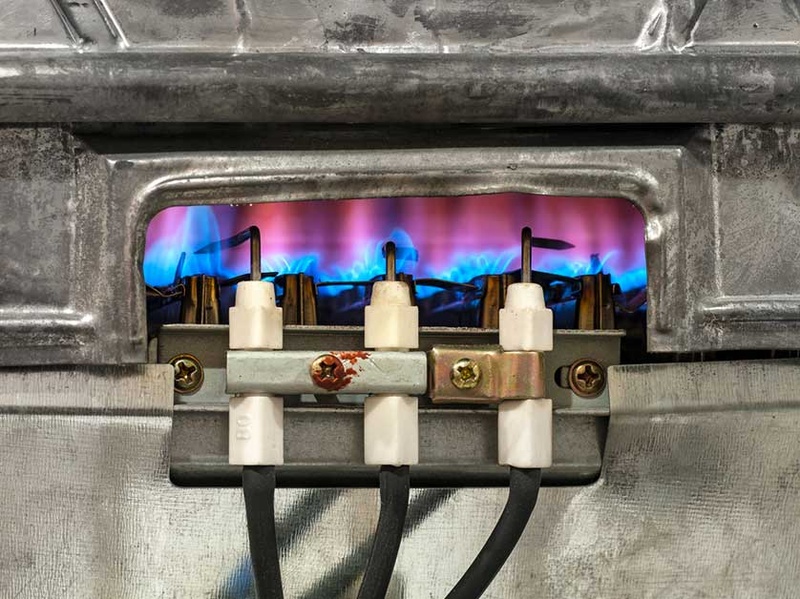
Proper ignition and flame detection are crucial for a Carrier furnace to operate safely and efficiently. Issues in these areas can prevent the furnace from starting or cause it to shut down unexpectedly.
Pilot Light and Ignitor Troubleshooting
For older Carrier furnaces with standing pilot lights, a dirty or faulty thermocouple can prevent ignition. Clean the thermocouple with fine sandpaper or replace it if damaged. Ensure the pilot light stays lit and burns with a steady blue flame.
In newer models with electronic ignition, a defective hot surface ignitor or spark ignitor may fail to light the gas. Test the ignitor for continuity using a multimeter. Replace it if no continuity is detected.
Check for proper gas pressure and flow to the burners. Low gas pressure can cause weak or intermittent flames. Adjust the gas valve if necessary or contact a professional for assistance.
Flame Sensor Cleaning and Repair
A dirty or faulty flame sensor can cause the furnace to shut off shortly after ignition. Locate the flame sensor, typically a small metal rod near the burners. Gently clean it with fine-grit sandpaper to remove any buildup.
If cleaning doesn’t solve the issue, test the flame sensor’s microamp output. A reading below 3-4 microamps indicates a need for replacement. Ensure proper positioning of the sensor in relation to the flame.
Check for loose or corroded wiring connections to the flame sensor. Tighten any loose connections and clean corroded terminals. Replace damaged wires to maintain reliable flame detection.
Heat Exchanger and Burner Concerns
Proper maintenance of the heat exchanger and burners is crucial for the safe and efficient operation of a Carrier furnace. Regular inspections can prevent potential hazards and ensure optimal performance.
Don’t Overpay for HVAC Services – Call 888-894-0154 Now to Compare Local Quotes!
Inspecting Burners for Blockages
Burner blockages can lead to inefficient heating and potential safety risks. Check for debris, dust, or rust accumulation on the burners. Clean the burners using a soft brush or vacuum cleaner with a brush attachment.
Examine the flame color during operation. A blue flame indicates proper combustion, while yellow flames suggest incomplete burning. Adjust the air-to-fuel ratio if necessary.
Inspect the gas valve and manifold for any signs of damage or corrosion. Ensure all connections are tight and free from leaks. If you detect a gas odor, shut off the furnace immediately and contact a professional.
Heat Exchanger Integrity Check
A cracked heat exchanger can release harmful gases into your home. Visually inspect the heat exchanger for cracks, holes, or corrosion. Use a flashlight to examine hard-to-reach areas.
Perform a carbon monoxide test near the furnace and throughout your home. Install CO detectors on each floor for continuous monitoring.
Check for soot buildup around the heat exchanger, which may indicate incomplete combustion. Clean any accumulated debris carefully.
Listen for unusual noises during furnace operation, such as rattling or banging sounds. These may signal a damaged heat exchanger.
If you suspect any issues with the heat exchanger, consult a certified HVAC technician for a thorough inspection and potential replacement.
Blower Motor and Fan Problems
Carrier furnace blower motors and fans can experience several issues that affect heating performance. Proper assessment and troubleshooting are essential for maintaining optimal airflow and system efficiency.
Blower Motor Assessment
Blower motor problems often manifest as weak airflow or no air circulation. Check for unusual noises like humming or squealing, which may indicate bearing failure or motor damage. Inspect the motor visually for signs of overheating or burnt wiring.
Test the motor’s electrical connections and voltage with a multimeter. Loose wires or incorrect voltage can cause motor malfunction. Clean any dust or debris from the motor housing and blower wheel to prevent overheating and reduced efficiency.
If the motor fails to start or runs intermittently, the capacitor may be faulty. Replace the capacitor if it shows signs of bulging or leaking.
Fan Operation and Troubleshooting
Fan issues can result in poor air distribution and reduced heating effectiveness. Check the fan blades for damage, debris, or misalignment. Clean the blades thoroughly and ensure they spin freely without obstruction.
Inspect the fan belt for wear, cracks, or looseness. A properly tensioned belt should deflect about 1/2 inch when pressed. Replace worn belts to maintain optimal fan performance.
Lubricate fan bearings according to manufacturer specifications. Squealing or grinding noises often indicate dry bearings. If lubrication doesn’t resolve the issue, bearing replacement may be necessary.
Verify that the fan speed settings match the furnace requirements. Incorrect speed settings can lead to inadequate airflow or excessive energy consumption.
Sensor Malfunctions
Carrier furnaces rely on various sensors to ensure safe and efficient operation. When these sensors malfunction, they can trigger error codes and disrupt heating performance.
Pressure Switch Issues
Pressure switches monitor airflow and combustion in Carrier furnaces. A faulty pressure switch may cause error codes 31 or 32 to appear. These issues often stem from blocked flue pipes or cracked hoses.
To troubleshoot, inspect the flue pipe for obstructions and clear any debris. Check hoses for cracks or loose connections. If problems persist, the pressure switch may need replacement.
Regular maintenance can prevent pressure switch failures. Clean or replace air filters monthly to maintain proper airflow.
Limit Switch Malfunctions
Limit switches protect against overheating in Carrier furnaces. A malfunctioning limit switch typically triggers error code 33. This can result from restricted airflow or a faulty blower motor.
Check and clean the air filter if it’s clogged. Inspect the blower wheel for dirt buildup and clean if necessary. Ensure all vents and registers are open and unobstructed.
If the error persists, the limit switch may be defective. A qualified technician should test the switch and replace it if needed. Proper maintenance of the blower system can help prevent limit switch issues.
Control Board Failures
Control board failures can cause various issues in Carrier furnaces. Diagnosing and addressing these problems is crucial for restoring proper furnace operation.
Control Board Diagnostics
Control boards in Carrier furnaces have built-in diagnostic features to help identify issues. LED lights on the board flash in specific patterns to indicate different error codes. Technicians can interpret these codes using the furnace’s manual or diagnostic charts.
Common control board problems include:
- Faulty relays
- Damaged circuits
- Loose connections
- Corrosion on electrical components
To diagnose control board issues, technicians may use multimeters to test voltage outputs and continuity. They also inspect the board visually for signs of physical damage or burn marks.
Replacing or Repairing the Control Board
In some cases, control boards can be repaired by replacing individual components. This may involve soldering new parts or cleaning corroded connections. However, full board replacement is often necessary for severe damage or multiple component failures.
Steps for replacing a control board:
- Turn off power to the furnace
- Remove the old board
- Transfer any jumper settings to the new board
- Install the new board
- Reconnect all wires
- Test the furnace for proper operation
When replacing a control board, it’s essential to use the correct model compatible with the specific Carrier furnace. Improper installation can lead to further issues or safety hazards.
Condensate Drainage Issues
Proper condensate drainage is crucial for maintaining your Carrier furnace’s efficiency and preventing water damage. Addressing drainage problems promptly can help avoid more serious issues down the line.
Checking and Cleaning the Condensate Line
The condensate line carries water away from the furnace. Regular inspection and cleaning are essential to prevent clogs.
Steps to check and clean the condensate line:
- Locate the line near the indoor unit
- Look for visible blockages or kinks
- Use a wet/dry vacuum to clear minor clogs
- Flush the line with a mixture of warm water and vinegar
For stubborn blockages, a plumber’s snake may be necessary. Ensure the line has a slight downward slope to promote proper drainage.
Drain Pan and Pump Inspection
The drain pan collects condensate before it enters the drainage system. A malfunctioning pump can lead to overflow issues.
Key points for drain pan and pump maintenance:
- Check the pan regularly for cracks or leaks
- Clean the pan to prevent algae growth
- Verify the float switch is functioning correctly
- Test the pump by pouring water into the pan
If the pump fails to activate or the pan shows signs of damage, replacement may be necessary. Keep the area around the drain pan clean and free of debris to ensure optimal performance.
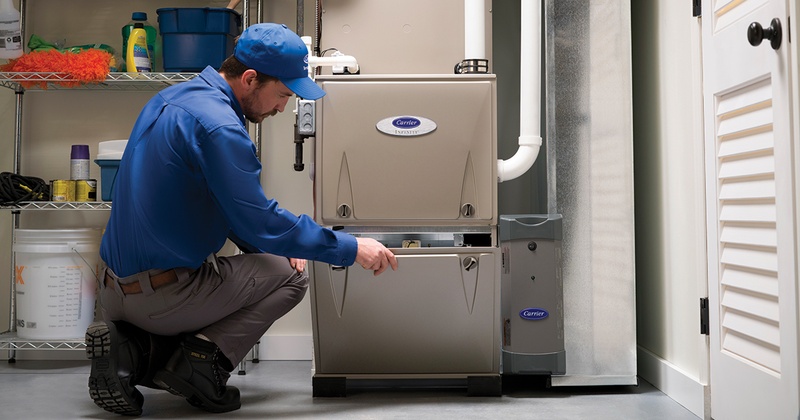
Professional Services and Support
Professional technicians provide expert diagnosis and repairs for complex furnace issues. Warranty coverage and service contracts offer financial protection and ongoing maintenance.
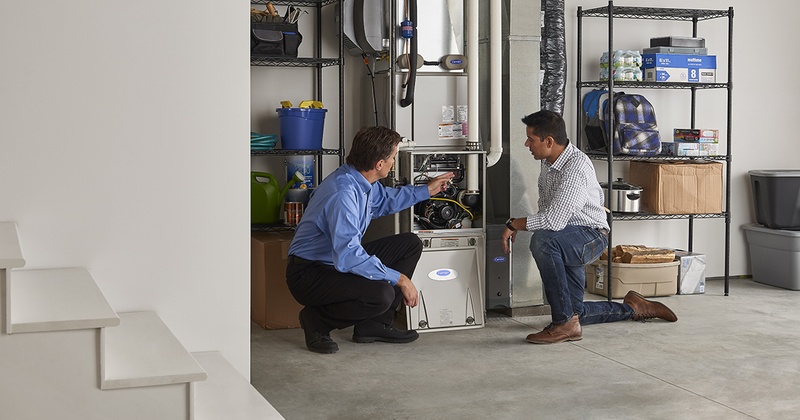
When to Call a Professional
Certain furnace problems require professional attention. Call an HVAC technician if you encounter:
• Persistent error codes that don’t resolve with basic troubleshooting
• Unusual noises like banging, screeching, or rumbling
• Gas odors or carbon monoxide detector alarms
• Complete system failure or no heat output
Certified technicians have specialized tools and training to safely diagnose and repair furnace issues. They can perform in-depth diagnostics, replace faulty components, and ensure your system operates efficiently and safely.
Warranty and Service Contracts
Carrier furnaces typically come with limited warranties covering parts for 5-10 years. Extended warranties may offer additional coverage. Key warranty details:
• Register your furnace within 90 days of installation to maximize coverage
• Keep maintenance records to validate warranty claims
• Labor costs are often not included in standard warranties
Service contracts provide regular maintenance and priority service. Benefits include:
• Annual tune-ups to keep your furnace running efficiently
• Discounted repairs and parts
• Priority scheduling during peak seasons
Review contract terms carefully to understand covered services and any exclusions.
How to Avoid Being Ripped Off and Get a Fair Repair Price
Finding the right furnace repair expert can be tricky—some companies offer rock-bottom prices because they’re inexperienced or have poor reputations, while others charge far too much for the same work. That’s why the smartest way to get quality repairs at a fair price is to compare estimates from top-rated local pros. Meet with each, learn about their history and the experience of the technicians that will do the work. Choose an experienced furnace repair contractor with reasonable rates. You can expedite this process by using our Free Local Estimates service.
When you fill out a quick form and
Lastly, once you chose the right contractor, remember to use the tactics from this guide: Homeowners Tactics When Negotiating with HVAC Dealer to get the final best price.
How to Get the Best HVAC Prices