
Understanding Furnace Limit Switches
Furnace limit switches play a crucial role in maintaining safe operation of heating systems. These safety devices monitor temperature and airflow to prevent overheating and other hazardous conditions.
Purpose and Function
Limit switches act as temperature-sensitive safeguards in furnaces. They monitor the heat exchanger and shut off the burner if temperatures exceed safe levels. This prevents damage to components and reduces fire risks.
Most limit switches are set to trip between 170-200°F. When activated, they cut power to the gas valve and blower motor. The switch resets automatically once temperatures return to normal range.
Some limit switches also monitor airflow. They ensure proper air circulation before allowing the burner to ignite. This prevents combustion issues and carbon monoxide buildup.
Types of Limit Switches
Furnaces commonly use two main types of limit switches:
- Fan limit switch: Controls the blower fan operation based on plenum temperature.
- Rollout switch: Detects flame escaping the combustion chamber.
Fan limit switches have adjustable settings for fan on/off temperatures. Rollout switches are typically non-adjustable, one-time-use devices that require replacement if tripped.
Newer furnaces may use electronic limit switches with more precise temperature sensing. These often integrate with the furnace control board for enhanced diagnostics and safety features.
Symptoms of a Faulty Limit Switch
A faulty limit switch can cause various issues with your furnace’s operation. The two main symptoms are startup problems and frequent cycling.
Don’t Overpay for HVAC Services – Call 888-894-0154 Now to Compare Local Quotes!
Furnace Fails to Start
When the limit switch malfunctions, it may prevent the furnace from igniting. The blower motor might run, but no heat is produced. This occurs because the switch falsely detects an overheating condition, even when the furnace is cold.
In some cases, the furnace may attempt to start multiple times before giving up. This results in a series of clicking sounds as the system tries to ignite. If the problem persists, the furnace will eventually lock out completely.
A stuck-open limit switch can also cause startup failures. The furnace control board won’t receive the signal to begin the heating cycle, leaving the system unresponsive.
Furnace Starts and Stops Frequently
Short cycling is another common symptom of a faulty limit switch. The furnace starts normally but shuts off prematurely before reaching the desired temperature. This occurs when the switch incorrectly senses that the furnace has overheated.
The system may restart after a short cooling period, only to shut down again quickly. This constant on-off cycling puts unnecessary strain on furnace components and wastes energy.
In some instances, the blower may continue running even after the burners shut off. This happens when the limit switch fails to reset properly, leaving the fan relay engaged.
Frequent cycling can also stem from a limit switch that’s too sensitive. It may trip at lower temperatures than intended, causing premature shutdowns.
Safety Considerations Before Troubleshooting
Before attempting to troubleshoot a furnace limit switch, it’s crucial to prioritize safety. Proper power shutdown and using the right tools are essential steps to protect yourself and your equipment.
Power Shut Down Procedure
Turn off the furnace’s main power supply at the circuit breaker or fuse box. Locate the furnace’s dedicated circuit and switch it to the “Off” position. Double-check that power is cut by testing the furnace controls.
Place a piece of tape over the circuit breaker to prevent accidental reactivation. Inform other household members about the ongoing maintenance to avoid unexpected power restoration.
Wait at least 30 minutes after shutdown before starting work. This allows capacitors to discharge and hot components to cool down, reducing the risk of electrical shock or burns.
Tools and Equipment
Gather the necessary tools before beginning troubleshooting:
- Multimeter for voltage and continuity testing
- Insulated screwdrivers (flathead and Phillips)
- Needle-nose pliers
- Flashlight for better visibility
- Safety goggles to protect eyes from debris
- Protective gloves to guard against sharp edges
Ensure all tools are in good condition and properly insulated. Use a non-contact voltage tester to verify power is off before touching any wires or components.
Keep a fire extinguisher nearby as a precaution. Have the furnace’s manual on hand for reference during troubleshooting. If uncertain about any step, consult a licensed HVAC professional.
Locating the Limit Switch
The limit switch is a crucial safety component in furnaces. Finding it requires accessing the furnace interior and knowing what to look for.
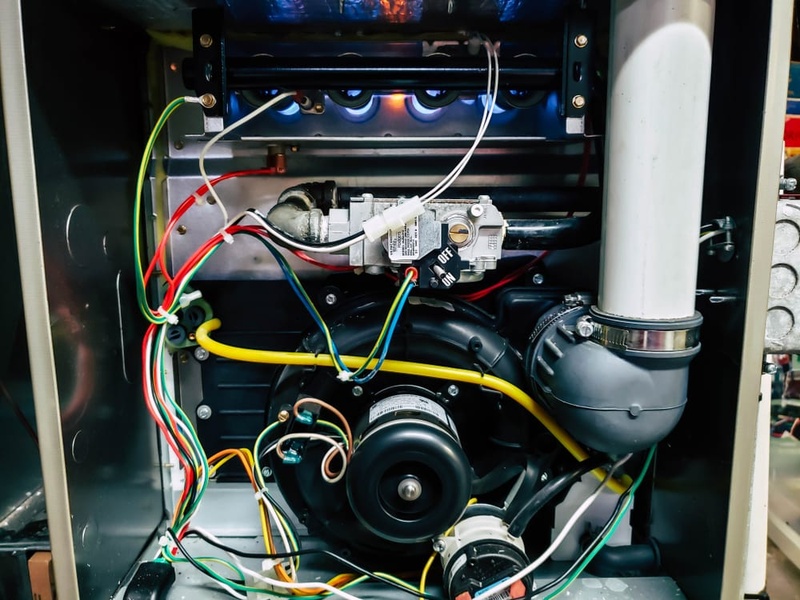
Accessing the Furnace Interior
Turn off the furnace power at the circuit breaker before opening any panels. Remove the front access panel, which is typically secured with screws or clips. Some models may require removing multiple panels to reach the limit switch.
Set aside any insulation carefully. Take note of wiring and components to avoid damaging them. Use a flashlight to illuminate the interior if needed.
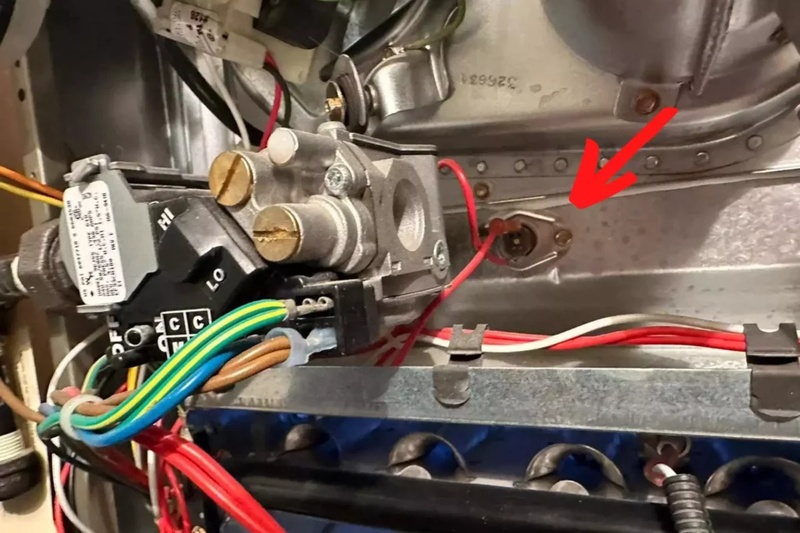
Identifying the Switch
The limit switch is usually located near the heat exchanger or blower compartment. It often resembles a small metal box with wire connections. Look for a component labeled “limit switch” or “high limit switch.”
On some furnaces, it may be a disc-shaped device mounted directly on the heat exchanger. Check the furnace manual for the exact location and appearance if unsure.
Don’t Overpay for HVAC Services – Call 888-894-0154 Now to Compare Local Quotes!
The switch typically has 2-3 wire connections. Note its position and connections before removal for testing or replacement.
Testing the Limit Switch with a Multimeter
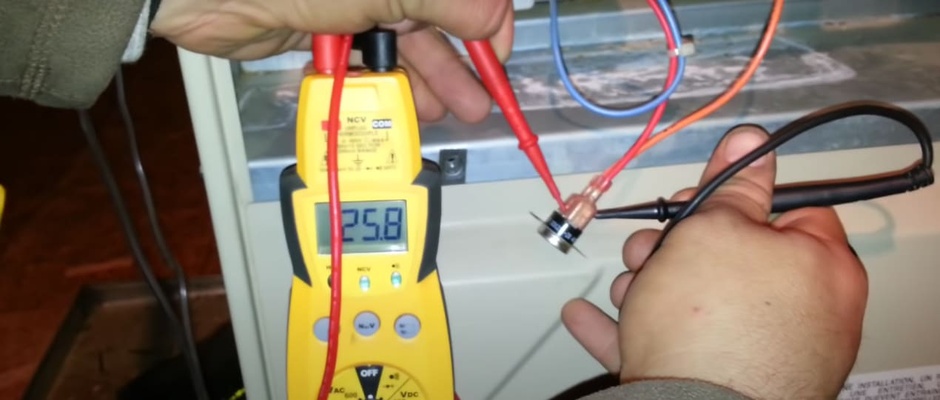
A multimeter is an essential tool for accurately diagnosing issues with a furnace limit switch. This section covers the proper setup and interpretation of multimeter readings when testing a limit switch.
Setting Up the Multimeter
Set the multimeter to measure resistance (ohms). Turn off power to the furnace before testing. Locate the limit switch and disconnect its wires. Connect the multimeter probes to the switch terminals.
For a normally closed switch, set the furnace to its normal operating temperature. The switch should show continuity (near zero ohms). At high temperatures, it should read infinite resistance.
For normally open switches, the opposite applies. They should show infinite resistance at normal temperatures and continuity when hot.
Interpreting the Results
A properly functioning limit switch will show a clear change in resistance as temperatures shift. If readings remain constant regardless of temperature, the switch is likely faulty.
No continuity at any temperature indicates an open circuit, suggesting a broken switch. Continuous continuity may mean the switch is stuck closed.
Compare results to manufacturer specifications. Slight deviations can be normal, but significant differences point to a malfunctioning switch.
Record all measurements for future reference or when consulting a professional technician.
Resetting a Tripped Limit Switch
Resetting a tripped furnace limit switch is a crucial step in restoring proper furnace operation. The process varies depending on whether the switch has a manual or automatic reset mechanism.
Manual Reset Procedure
To manually reset a tripped limit switch, first locate the switch on your furnace. It’s typically a small button or switch near the blower compartment. Ensure the furnace is powered off before proceeding.
Press the reset button firmly until you hear a click. This action resets the switch and allows the furnace to operate again. If the switch doesn’t reset or trips immediately after resetting, there may be an underlying issue requiring professional attention.
Always consult your furnace’s user manual for specific instructions, as reset procedures can vary between models.
Automatic Reset Process
Automatic reset limit switches don’t require manual intervention. These switches will reset themselves once the furnace has cooled down to a safe temperature.
To initiate the automatic reset process, turn off the furnace and wait for 30 minutes to an hour. This cooling period allows the switch to reset on its own. After waiting, turn the furnace back on and check if it operates normally.
Don’t Overpay for HVAC Services – Call 888-894-0154 Now to Compare Local Quotes!
If the furnace fails to start or the limit switch trips again quickly, it may indicate a more serious problem. In such cases, it’s best to contact a qualified HVAC technician for a thorough inspection and diagnosis.
Cleaning and Maintenance
Regular cleaning and maintenance of your furnace limit switch are crucial for its proper functioning and longevity. These practices help prevent issues and ensure optimal performance.
Removing Dirt and Debris
Turn off the furnace and allow it to cool completely before cleaning. Remove the access panel to access the limit switch. Use a soft brush or compressed air to gently remove dust and debris from the switch and surrounding area. Be careful not to damage any components or wiring.
For stubborn dirt, use a clean, dry cloth to wipe the switch. Avoid using water or cleaning solutions, as they can damage the electrical components. Pay special attention to the sensor area, ensuring it’s free from any obstructions.
After cleaning, inspect the switch for any visible damage or wear. If you notice any issues, consider replacing the switch.
Checking for Corrosion and Wear
Examine the limit switch for signs of corrosion, such as rust or discoloration. Check the terminals and connections for any oxidation or loose fittings. Tighten any loose connections carefully, using the appropriate tools.
Inspect the switch’s moving parts for wear or sticking. Gently press the reset button, if present, to ensure smooth operation. Look for any cracks, chips, or other physical damage to the switch housing.
If you discover significant corrosion or wear, it’s best to replace the limit switch. Attempting to clean heavily corroded parts may cause further damage. Always use manufacturer-approved replacement parts for optimal performance and safety.
Replacing a Defective Limit Switch
Replacing a faulty limit switch requires careful selection of the correct replacement part and proper installation techniques. These steps ensure the furnace operates safely and efficiently after the repair.
Selecting the Correct Replacement
When choosing a new limit switch, it’s crucial to match the specifications of the original part. The replacement should have the same temperature rating, physical dimensions, and electrical connections. Technicians can find this information on the existing switch or in the furnace manual.
Manufacturers often produce model-specific limit switches. Using the furnace’s make and model number helps identify the exact replacement part. Some universal limit switches may work, but they must meet all required specifications.
Installation Steps
Proper installation of the new limit switch is essential for safe furnace operation. The process begins with turning off power to the furnace at the circuit breaker. This step prevents electrical shock during the repair.
Next, the technician removes the furnace access panel to expose the limit switch. They carefully disconnect the wires, noting their positions for correct reattachment later. The old switch is then unscrewed or unclipped from its mounting bracket.
The new limit switch is secured in the same position as the old one. Wires are reconnected to the appropriate terminals, ensuring tight connections. After replacing the access panel, power is restored to test the furnace’s operation.
Calibrating the Limit Switch
Proper calibration of a furnace limit switch ensures optimal performance and safety. This process involves adjusting temperature settings and verifying the calibration accuracy.
Adjusting Temperature Settings
To calibrate the limit switch, locate the adjustment screws on the switch housing. Use a flathead screwdriver to carefully turn the screws clockwise to increase the temperature setting or counterclockwise to decrease it. Make small adjustments, typically 5°F at a time.
Refer to the manufacturer’s specifications for the recommended temperature range. Most residential furnaces have limit switch settings between 160°F and 200°F.
Always wear protective gloves when handling the switch, as it may be hot. Allow the furnace to cool before making adjustments.
Verifying Calibration
After adjusting the settings, it’s crucial to verify the calibration. Use a digital thermometer to measure the air temperature near the limit switch when the furnace is running.
Compare the thermometer reading to the limit switch setting. The furnace should shut off when the temperature reaches the set point.
Run the furnace through several heating cycles to ensure consistent operation. If discrepancies persist, repeat the adjustment process or consult a professional technician.
Keep a log of calibration dates and readings for future reference. Regular verification helps maintain furnace efficiency and prolongs its lifespan.
When to Call a Professional
Professional HVAC technicians have specialized knowledge and tools to address complex furnace issues safely and effectively. They can handle warranty-related repairs properly.
Complex Electrical Issues
Furnace limit switches are part of intricate electrical systems. If basic troubleshooting doesn’t resolve the problem, it’s time to call a pro. Technicians use multimeters and other diagnostic tools to pinpoint electrical faults accurately.
They can safely test voltage levels and identify wiring issues that may be causing limit switch failures. HVAC professionals also have access to manufacturer-specific diagnostic codes and procedures.
For intermittent problems that are hard to replicate, extended testing by a technician may be necessary. They can monitor the system over time to catch elusive issues.
Warranty Concerns
Many furnaces have manufacturer warranties covering parts and labor. Attempting DIY repairs could void this coverage. Always check warranty terms before working on the unit yourself.
Professional technicians authorized by the manufacturer can perform repairs that maintain warranty validity. They use approved replacement parts and follow proper procedures.
For furnaces still under warranty, calling a pro ensures you don’t accidentally forfeit valuable coverage. Authorized technicians also document all work performed, which may be required for future warranty claims.
If unsure about your warranty status, contact the manufacturer or a local authorized dealer. They can verify coverage and advise on the best course of action for limit switch issues.
How to Avoid Being Ripped Off and Get a Fair Repair Price
Finding the right furnace repair expert can be tricky—some companies offer rock-bottom prices because they’re inexperienced or have poor reputations, while others charge far too much for the same work. That’s why the smartest way to get quality repairs at a fair price is to compare estimates from top-rated local pros. Meet with each, learn about their history and the experience of the technicians that will do the work. Choose an experienced furnace repair contractor with reasonable rates. You can expedite this process by using our Free Local Estimates service.
When you fill out a quick form and submit it, you’ll soon be contacted by three of the top furnace repair and installation companies near you. They are prescreened for experience, and all are licensed and insured for your protection. Click below to get started and protect your home and wallet today.
Additional Resources for Troubleshooting
HVAC professionals recommend several valuable resources for furnace limit switch troubleshooting. Online forums like HVAC-Talk and ContractorTalk provide platforms for discussing specific issues with experienced technicians.
YouTube channels such as AC Service Tech and HVAC School offer detailed video tutorials on limit switch testing and replacement. These visual guides can be especially helpful for visual learners.
Many furnace manufacturers publish technical manuals and service bulletins on their websites. These documents often contain model-specific troubleshooting steps and diagnostic codes.
Local HVAC supply stores frequently offer workshops or training sessions on furnace maintenance and repair. These hands-on learning opportunities can enhance troubleshooting skills.
For those seeking in-depth knowledge, HVAC certification courses cover limit switch operation and diagnostics as part of their curriculum. Community colleges and trade schools typically offer these programs.
Smartphone apps like HVAC Buddy and HVAC Troubleshooter provide quick reference guides and calculators for on-the-job diagnostics. These tools can be particularly useful for field technicians.
Professional HVAC associations such as ACCA and ASHRAE publish technical papers and best practice guides. Members can access these resources to stay updated on the latest troubleshooting techniques.

How to Get the Best HVAC Prices
- Firstly, keep in mind that installation quality is always the most important thing for residential HVAC project. So never sacrifice contractor quality for a lower price.
- Secondly, remember to look up the latest rebates as we talked above.
- Thirdly, ask for at least 3 bids before you make the decision. You can click here to get 3 free estimates from your local contractors, and this estimate already takes rebates and tax credit into consideration and filter unqualified contractors automatically.
Lastly, once you chose the right contractor, remember to use the tactics from this guide: Homeowners Tactics When Negotiating with HVAC Dealer to get the final best price.