

Understanding Your Furnace Pilot Light
The furnace pilot light plays a crucial role in igniting the main burner and ensuring your heating system operates efficiently. Proper knowledge of its components and types can help with maintenance and troubleshooting.
Components and Function
A furnace pilot light consists of several key parts. The pilot tube delivers a small amount of gas to the pilot light assembly. The thermocouple acts as a safety device, sensing the pilot flame’s heat and allowing gas flow to continue. The pilot orifice controls the gas flow rate for the pilot flame.
The pilot light’s primary function is to ignite the main burner when heat is needed. When the thermostat signals for heat, the gas valve opens, allowing fuel to flow to the main burner. The pilot light then ignites this gas, starting the heating process.
Regular cleaning and maintenance of these components ensure optimal performance and safety.
Types of Pilot Lights
Two main types of pilot lights exist in furnaces: standing pilot lights and electronic ignition systems.
Standing pilot lights burn continuously, providing an always-ready ignition source. They’re common in older furnaces and are easy to relight manually if extinguished.
Electronic ignition systems, found in newer furnaces, use electricity to create a spark or heat a surface to ignite the gas. These systems are more energy-efficient as they only operate when the furnace needs to run.
Intermittent pilot systems combine features of both, using an electronic spark to light a pilot only when heat is called for. This design balances reliability with energy efficiency.
Safety First
Don’t Overpay for HVAC Services – Call 888-894-0154 Now to Compare Local Quotes!
Working with gas furnaces requires caution and adherence to safety protocols. Proper precautions can prevent accidents and ensure a secure troubleshooting process.
Pre-Troubleshooting Precautions
Before attempting to troubleshoot a furnace pilot light, turn off the gas supply to the furnace. Locate the gas shut-off valve near the unit and rotate it to the closed position. Allow sufficient time for any residual gas to dissipate.
Ensure proper ventilation in the area. Open windows and doors to create airflow, reducing the risk of gas accumulation.
Gather necessary safety equipment:
- Safety glasses
- Work gloves
- Flashlight
- Gas leak detector
Inspect the area around the furnace for flammable materials. Remove any items that could pose a fire hazard.
If you detect a strong gas odor, evacuate the premises immediately and contact your gas company or emergency services. Do not attempt to troubleshoot in this situation.
Familiarize yourself with the furnace manual and manufacturer’s instructions. This knowledge will guide you through safe troubleshooting procedures specific to your model.
Pre-Troubleshooting Checks
Before diving into specific troubleshooting steps, it’s crucial to perform some basic checks. These initial inspections can often reveal simple issues that are easy to fix.
Power Supply and Gas Flow
Check if the furnace is receiving power. Verify that the circuit breaker hasn’t tripped and the power switch is in the “on” position. Look for any blown fuses in the furnace’s control panel.
Ensure the gas valve is open. Locate the main gas shutoff valve near the furnace or on the gas line. It should be parallel to the pipe when open.
Inspect the gas line for any visible damage or leaks. If you smell gas, evacuate immediately and call your gas company or emergency services.
Thermostat Settings
Examine the thermostat display. If it’s blank, replace the batteries. Make sure the thermostat is set to “heat” mode and the temperature is set higher than the current room temperature.
Check for loose wires at the thermostat base. Gently remove the cover and tighten any loose connections.
Clean the thermostat’s interior. Dust and debris can interfere with its sensors. Use a soft brush or compressed air to remove any buildup.
Test the thermostat by raising the temperature setting by 5 degrees. Listen for the furnace to start up. If it doesn’t, the issue may lie with the thermostat or furnace components.
Initial Pilot Light Inspection
Proper inspection of your furnace’s pilot light is crucial for identifying and resolving potential issues. This process involves carefully examining the pilot light area and determining its current operational status.
Visual Inspection
Begin by locating the pilot light assembly in your furnace. Remove the access panel to gain a clear view. Inspect the area for any signs of debris, dust, or corrosion that could interfere with proper operation. Check the gas tube leading to the pilot light for any visible damage or blockages.
Examine the thermocouple or thermopile near the pilot light. These safety devices should be clean and properly positioned. Look for any bent or damaged components that might need replacement.
Ensure the pilot light orifice is clear of obstructions. A clogged orifice can prevent gas flow and cause ignition problems.
Don’t Overpay for HVAC Services – Call 888-894-0154 Now to Compare Local Quotes!
Pilot Light Status
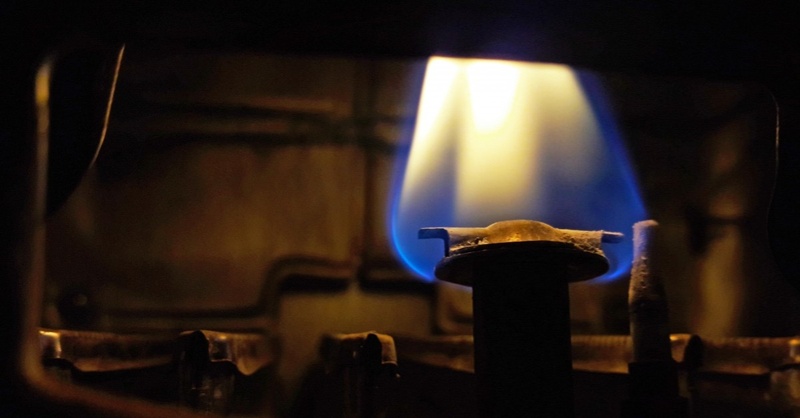
Observe the pilot light flame if it’s lit. A healthy flame should be steady and blue with a slight yellow tip. If the flame appears weak, flickering, or has an unusual color (like orange or yellow), it may indicate a problem.
If the pilot light is out, attempt to relight it following the manufacturer’s instructions. Listen for the sound of gas flow when attempting ignition. If you don’t hear gas or smell gas but the pilot won’t light, there might be a gas supply issue.
Note how long the pilot stays lit after ignition. If it goes out immediately or shortly after lighting, this could point to a faulty thermocouple or gas valve problem.
Relighting the Pilot Light
Relighting a furnace pilot light requires careful attention to safety and proper technique. Following the correct steps can help restore heat to your home quickly and efficiently.
Step-by-Step Relighting Procedure
-
Locate the pilot light assembly near the base of the furnace.
-
Turn the gas valve to the “Off” position and wait 5 minutes for any residual gas to dissipate.
-
Set the thermostat to its lowest setting.
-
Remove the access panel to expose the pilot light.
-
Turn the gas valve to “Pilot” and press down on the reset button.
-
Use a long lighter or match to ignite the pilot while holding down the reset button.
-
Continue holding the reset button for 30-60 seconds after the pilot ignites.
-
Release the button and check if the pilot stays lit.
-
If successful, turn the gas valve to “On” and replace the access panel.
-
Set the thermostat to the desired temperature.
Troubleshooting After Unsuccessful Attempts
If the pilot light fails to stay lit, several issues may be at play. Check for a faulty thermocouple, which acts as a safety device. It may need cleaning or replacement.
Ensure the gas supply is adequate and the valve is fully open. A clogged pilot orifice can prevent proper gas flow. Clean it gently with compressed air or a thin wire.
Drafts near the furnace can extinguish the pilot. Inspect for air leaks or open windows. If problems persist, the gas control valve might be defective, requiring professional intervention.
For stubborn cases, consult a licensed HVAC technician to diagnose and resolve complex issues safely.
Cleaning and Maintenance

Regular cleaning and maintenance are essential for keeping your furnace pilot light functioning properly. These tasks help prevent common issues and extend the lifespan of your heating system.
Cleaning the Pilot Light Assembly
Turn off the gas supply and allow the pilot light assembly to cool completely before cleaning. Remove any debris or dust using a soft brush or compressed air. Clean the thermocouple and thermopile with fine-grit sandpaper to remove any buildup.
Inspect the pilot light orifice for clogs. Use a thin wire to gently clear any obstructions. Clean the surrounding area with a vacuum to remove loose particles.
Check for signs of corrosion or damage on the assembly components. Replace any worn or damaged parts to ensure proper operation.
Regular Maintenance Schedule
Perform a visual inspection of the pilot light monthly during the heating season. Look for a steady blue flame and ensure it’s not flickering or yellow.
Clean the pilot light assembly every 6-12 months, depending on usage and environmental factors. Schedule professional maintenance annually before the start of the heating season.
Replace the thermocouple every 3-5 years or as recommended by the manufacturer. Check and clean the furnace filter monthly, replacing it as needed.
Don’t Overpay for HVAC Services – Call 888-894-0154 Now to Compare Local Quotes!
Inspect gas connections and lines annually for leaks or damage. Test the furnace’s safety features, including the flame sensor and limit switch, during each maintenance session.
Common Pilot Light Issues
Pilot light problems can disrupt furnace operation and heating in your home. Two frequent issues are pilot lights going out repeatedly and weak or discolored flames.
Frequent Pilot Light Outages
Pilot lights that keep extinguishing can be frustrating and leave you without heat. Common causes include:
- Drafts: Wind or air currents near the furnace can blow out the flame.
- Dirty pilot orifice: Debris can block gas flow, leading to an unstable flame.
- Faulty thermocouple: This safety device may shut off gas if it’s not sensing the flame properly.
- Gas supply issues: Low pressure or interruptions in the gas line can cause outages.
To troubleshoot, check for nearby drafts and clean the pilot orifice carefully. If problems persist, a professional should inspect the thermocouple and gas supply.
Weak or Yellow Pilot Flame
A healthy pilot light burns bright blue. A weak or yellow flame indicates problems:
- Insufficient gas flow: The gas valve may need adjustment.
- Dirty burner: Buildup can affect flame color and strength.
- Air-to-fuel ratio imbalance: Too much air or not enough gas can weaken the flame.
- Contaminated gas: Impurities in the gas supply can alter flame color.
Clean the pilot assembly and adjust the gas valve if possible. If the flame remains weak or yellow, contact a technician to assess the gas supply and burner condition.
Electrical Components and Sensors
Electrical components and sensors play a crucial role in maintaining a safe and efficient furnace pilot light. These elements monitor and control the flame, ensuring proper ignition and operation.
Thermocouple and Thermopile
The thermocouple is a safety device that detects the presence of a pilot flame. It consists of two dissimilar metals that generate a small electrical current when heated by the flame. This current keeps the gas valve open, allowing fuel to flow to the pilot light.
If the pilot flame goes out, the thermocouple cools and stops producing electricity, causing the gas valve to close. This prevents gas from accumulating in the furnace.
A thermopile is similar to a thermocouple but generates more electricity. It can power additional components like electronic ignition systems or gas valves.
Flame Sensors and Ignition Systems
Flame sensors are electronic devices that detect the presence of a flame in modern furnaces. They use the flame’s ability to conduct electricity to verify its presence. If no flame is detected, the sensor signals the control board to shut off the gas supply.
Ignition systems have evolved from standing pilot lights to more efficient electronic ignition methods. These include:
- Intermittent pilot ignition
- Direct spark ignition
- Hot surface ignition
Electronic ignition systems reduce gas consumption by only activating when heat is needed. They use either a spark or a heated element to ignite the gas, eliminating the need for a constantly burning pilot light.
Regular cleaning and maintenance of flame sensors and ignition components ensure reliable furnace operation and prevent unnecessary shutdowns.
Advanced Troubleshooting Techniques
Effective diagnosis and analysis are crucial for resolving complex furnace pilot light issues. Proper use of diagnostic tools and careful examination of symptoms can pinpoint elusive problems.
Diagnostic Tools and Techniques
A multimeter is essential for testing electrical components. It measures voltage, resistance, and continuity in thermocouples, ignition systems, and wiring. Gas pressure gauges help verify proper fuel pressure to the pilot.
Infrared thermometers detect hot spots or cold areas, revealing potential heat exchanger cracks. Combustion analyzers measure exhaust gases, indicating incomplete combustion or ventilation issues.
Leak detection fluid applied to gas connections reveals tiny leaks through bubbling. Digital manometers measure air pressure differentials, useful for checking proper venting.
Analyzing Patterns and Symptoms
Intermittent pilot light failures often indicate drafts or thermocouple issues. Frequent cycling may point to a faulty flame sensor or gas valve. Yellow or orange pilot flames suggest incomplete combustion, possibly due to a clogged orifice.
Loud ignition noises might indicate excessive gas pressure or delayed ignition. Soot buildup around the pilot assembly can signify improper air-to-fuel ratio.
Pilot lights that won’t stay lit after releasing the control knob typically involve thermocouple problems. Slow or hesitant ignition may result from weak gas pressure or partially clogged pilot tubes.
When to Call a Professional
Certain furnace issues require expert assistance for safety and proper repair. Knowing when to seek professional help can prevent further damage and ensure optimal functioning.
Recognizing When DIY Won’t Cut It
Complex electrical problems or gas leaks demand immediate professional attention. If you smell gas, evacuate the area and contact your gas company immediately. Unusual noises like loud banging or persistent squealing indicate potential mechanical failures beyond DIY fixes.
Repeated pilot light outages or difficulty relighting may signal underlying issues with the thermocouple or gas valve. These components require specialized knowledge and tools to repair or replace safely.
Inconsistent heating throughout the home or sudden spikes in energy bills could point to system-wide problems. A professional can diagnose and address these efficiency issues effectively.
Finding Qualified Furnace Technicians
Finding the right furnace repair expert can be tricky—some companies offer rock-bottom prices because they’re inexperienced or have poor reputations, while others charge far too much for the same work. That’s why the smartest way to get quality repairs at a fair price is to compare estimates from top-rated local pros. Meet with each, learn about their history and the experience of the technicians that will do the work. Choose an experienced furnace repair contractor with reasonable rates. You can expedite this process by using our Free Local Estimates service.
When you fill out a quick form and submit it, you’ll soon be contacted by three of the top furnace repair and installation companies near you. They are prescreened for experience, and all are licensed and insured for your protection. Click below to get started and protect your home and wallet today.
Preventive Measures and Best Practices
Regular maintenance and proper usage can significantly extend the life of your furnace’s pilot light and improve its efficiency.
Avoiding Common Pilot Light Issues
Clean the pilot light assembly regularly to prevent debris buildup. Use a small brush or compressed air to remove dust and particles. Check the thermocouple annually for signs of wear or damage.
Replace the thermocouple every 3-5 years, even if it appears functional. This proactive approach can prevent unexpected failures. Ensure proper ventilation around the furnace to maintain optimal air-fuel mixture.
Inspect gas lines and connections periodically for leaks or corrosion. Apply a soap-water solution to fittings and look for bubbles. If detected, contact a professional immediately.
Keep the area around your furnace clear of flammable materials. This reduces fire hazards and improves airflow.
Energy Efficiency and Pilot Lights
Consider upgrading to an electronic ignition system. These modern alternatives eliminate the need for a constantly burning pilot light, reducing gas consumption.
Adjust the pilot light flame to the appropriate size. A flame that’s too large wastes fuel, while one that’s too small may not ignite the burner effectively.
Install a programmable thermostat to optimize heating cycles. This can reduce the workload on your furnace and extend the life of its components, including the pilot light.
Seal air leaks in your home to minimize heat loss. This reduces strain on your furnace and its pilot light system. Use weatherstripping, caulk, and insulation to improve energy efficiency.
Legal and Warranty Considerations
Navigating legal aspects and warranty terms is crucial when troubleshooting furnace pilot lights. Homeowners must be aware of their rights and responsibilities to ensure safe and compliant repairs.
Understanding Warranty Terms
Furnace warranties typically cover specific parts and labor for a set period. Many manufacturers offer limited warranties ranging from 5 to 10 years. These often exclude pilot light issues caused by improper maintenance or user error.
Homeowners should carefully review their warranty documentation. It’s important to note which components are covered and for how long. Some warranties require annual professional maintenance to remain valid.
Unauthorized repairs may void the warranty. Always consult the warranty terms before attempting DIY fixes on pilot lights or other furnace components.
Compliance With Local Codes and Regulations
Local building codes and regulations govern furnace installation and maintenance. These codes ensure safety and efficiency standards are met. Homeowners must adhere to these regulations when troubleshooting or repairing pilot lights.
Many jurisdictions require licensed professionals for certain furnace repairs. This includes work involving gas lines or major component replacements. Failure to comply can result in fines or insurance claim denials.
Carbon monoxide detectors are often mandatory near furnaces. Homeowners should check local requirements and install these devices as needed. Regular inspections by certified technicians may also be required to maintain compliance.
Frequently Asked Questions
Pilot lights are a crucial component of many gas furnaces. Understanding common issues can help homeowners safely troubleshoot and maintain their heating systems.
Is it dangerous if the pilot light goes out on my furnace?
A pilot light that goes out isn’t immediately dangerous, but it can lead to gas buildup if not addressed promptly. Modern furnaces have safety features that shut off gas flow when the pilot light extinguishes.
It’s important to ventilate the area and avoid using any electrical devices or open flames until the issue is resolved. If you smell gas, evacuate immediately and contact your gas company or emergency services.
How can I safely relight the pilot light on my furnace?
Turn off the gas supply to the furnace and wait at least 5 minutes for any residual gas to dissipate. Locate the pilot light assembly and follow the manufacturer’s instructions for relighting.
Use a long lighter or match to ignite the pilot while holding down the reset button. Once lit, continue holding the button for about a minute before releasing it. If the pilot doesn’t stay lit, repeat the process or consult a professional.
What could be causing my furnace’s pilot light to not stay lit?
Several factors can prevent a pilot light from staying lit. A dirty or faulty thermocouple may not detect the flame and shut off the gas supply. Drafts can blow out the flame, while a clogged pilot orifice can restrict gas flow.
Worn-out components, such as the gas valve or control board, may also be responsible. Regular maintenance can prevent many of these issues.
How do I reset the pilot light on my furnace?
To reset the pilot light, turn off the furnace’s gas valve and wait for 5 minutes. Find the pilot light assembly and switch it to the “pilot” position.
Press and hold the reset button while lighting the pilot with a long lighter. Keep holding the button for about a minute after the flame ignites, then release it slowly.
Should the pilot light always be on in a gas furnace?
In older furnaces, the pilot light typically remains lit continuously. However, many modern furnaces use electronic ignition systems that only light the gas when heat is needed.
These systems are more energy-efficient and don’t require a constantly burning pilot light. Check your furnace’s manual to determine which type of ignition system it uses.
Why does my furnace turn on but fail to ignite?
A furnace that turns on but doesn’t ignite may have several issues. The gas supply might be interrupted, or the ignition system could be faulty. Dirty flame sensors can prevent proper ignition.
Blocked air intakes or exhaust vents can also cause ignition failures. If the problem persists, it’s best to consult a professional HVAC technician for diagnosis and repair.

How to Get the Best HVAC Prices
- Firstly, keep in mind that installation quality is always the most important thing for residential HVAC project. So never sacrifice contractor quality for a lower price.
- Secondly, remember to look up the latest rebates as we talked above.
- Thirdly, ask for at least 3 bids before you make the decision. You can click here to get 3 free estimates from your local contractors, and this estimate already takes rebates and tax credit into consideration and filter unqualified contractors automatically.
Lastly, once you chose the right contractor, remember to use the tactics from this guide: Homeowners Tactics When Negotiating with HVAC Dealer to get the final best price.