
")
A home can be hot and uncomfortable when a central air conditioner refuses to turn on. This manual deals with non-functioning or non-starting central AC systems. It gives some of the most common causes why a central AC may fail to turn on and offers troubleshooting steps.
Thermostat and Control Issues (AC Won’t Turn On)
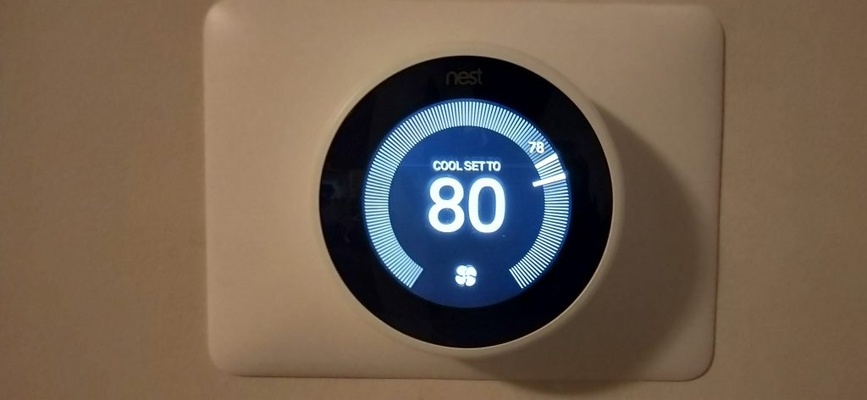
The thermostat settings and power are one of the first things to look at when a central AC is not turning on. The cooling system is controlled by the thermostat, and in case it is not working or is not properly adjusted, the AC will not get the signal to turn on. Make sure that the thermostat is turned on, in the mode of Cool and the desired temperature is a few degrees below the actual room temperature. The display of many thermostats is easy to read; in case the screen is blank or not illuminated, it might only require new batteries or power loss. Change the batteries where possible and re-check any breakers or fuses that feed the thermostat (some thermostats are hard-wired and are powered by the low-voltage circuit of the HVAC system).
DIY Fixes:
Homeowners can change thermostat batteries and check settings without any problem.
They may also ensure that thermostat wires are well attached to the terminals (with power to the HVAC system switched off first to be safe) provided they are comfortable working with low-voltage electronics. In case of a bad thermostat, it is a DIY job to replace the thermostat with a new one provided the person knows how to read a wiring diagram; otherwise, it is a job that can be done by an HVAC technician or an electrician.
Professional Help:
In case the thermostat has been confirmed to be good but the AC refuses to turn on, there may be a more serious problem in the control system.
The HVAC control board (in the furnace or air handler) or the 24V transformer which supplies power to the thermostat may have failed.
These elements are to be diagnosed professionally. And in case any thermostat wiring is broken in walls or in the unit (in some cases rodents may chew low-voltage wires), a professional must repair or replace the wiring harness. In short, eliminate thermostat and control problems early on, it is usually an easy solution, otherwise an expert can make sure that the control circuitry of the AC is working correctly.
Electrical Power Supply Problems (No Power to AC Unit)
When the thermostat is calling to cool and nothing is occurring such as fan not running, no noise in the outdoor unit, the next place to check is the electrical power supply. There are a few electrical parts in the central AC systems and all these parts should be in the right state in order to turn the unit on. Any loss of power will mean that the AC will not turn on.
1. Tripped Circuit Breaker or Blown Fuse:
Don’t Overpay for HVAC Services – Call 888-894-0154 Now to Compare Local Quotes!
The most frequent power problem is a tripped circuit breaker in the main electrical panel.
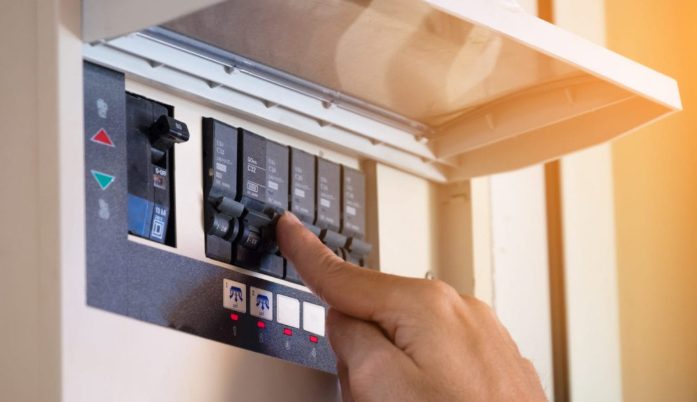
Central air conditioners usually have two breakers; one to the outdoor condensing unit (usually a 240V breaker) and one to the indoor furnace/air handler blower. When one of the breakers is tripped to the neutral position, then the related portion of the AC will not operate. Look at the electrical panel of the home to see whether there are any breakers that have switched to the Off or center position. Restore a tripped breaker by switching it completely off and then on to On. Once you have reset, check whether the AC unit is starting. Never keep switching a breaker that keeps tripping back on again and again, this is a sign of a constant fault or overload. A breaker that does not remain on is an indication to quit and call an expert, since trying to force it might lead to electrical harm or fire.
Older houses or certain installations may not have breakers but fuses. In case the AC fails to switch on and your system is fused, then a blown fuse might be the reason. Fuses may blow as a result of overloads or ageing. The fuse can be visually checked by a homeowner, a blown fuse may be discoloured or have a melted link. Use the same amperage rating of blown fuses. But, like breakers, when a new fuse blows shortly after being put in, do not keep putting in new ones. Fuse failure repeatedly indicates a problem in the electrical system (short circuit, motor problem, etc.) that should be professionally investigated.
2. Outdoor Disconnect Switch:
The outdoor unit of a Central AC, the condenser, usually has a local disconnect switch on an outside wall close to the unit. This is a safety switch that enables shutting down of power during servicing of the AC. It can be a pull-out fuse block, or a lever switch in a grey or metal box. When the disconnect is turned off (or the pull-out plug is inserted upside down), the outdoor unit will not be receiving power.
Occasionally, homeowners switch this off during winter or when they are doing maintenance and forget to switch it back on. Make sure that the disconnect is inserted completely and in the On position. In case you have had any work done recently or landscaping, make sure that the switch has not been moved accidentally. Caution: Do not fiddle with this yourself beyond resetting the handle in case you suspect the disconnect fuses are blown or the box is damaged, call an electrician or HVAC tech. The disconnect has high voltage lines.
3. Indoor Power Switch (Furnace Switch):
Most indoor units (furnaces or air handlers) have a light-switch-like power switch on or near the unit. This is exactly similar to a normal wall switch and is usually installed on the side of the furnace or a wall or ceiling near the closet/attic. It is to enable the power to be switched off to the furnace/indoor unit to service. When this furnace switch is off, the blower and the control system will not be powered, thus the AC will not start at all. This switch can be turned off accidentally very easily, someone can think that it is a light switch. It is always a good idea to ensure that this indoor disconnect switch is on when the AC is not responding. Similarly, make sure that the front panel doors of the furnace are firmly closed, most furnaces have a safety switch that shuts down the power when the blower panel is removed.
DIY Fixes:
A homeowner can safely reset tripped breakers or the outdoor disconnect (be sure hands are dry and you are not standing in water when doing so).
In addition, it is easy to ensure that the furnace switch is on and the thermostat is powered. When a breaker keeps tripping or a fuse keeps blowing, do not bypass or oversize it, this is a very important safety device informing you that something is amiss. At that point, resort to professional assistance.
Professional Help:
Contact an HVAC technician or a licensed electrician in case the AC does not come back with basic power resets. Recurrent electrical problems (frequent breaker trips, blown fuses, visible wiring damage, or no power even though everything is on) should be diagnosed by an expert.
Multimeters and special tools can be used by professionals to follow the electrical path, locate shorts or failed components (such as a shorted compressor can cause the breaker to trip), and repair or replace failed components. They will also make sure that all connections are safe and secure before reconnection of power. Electric problems may be dangerous in terms of fire and electrocution, and in case of doubt, consult a specialist.
Condensate Drain Pan and Float Switch (Water Safety Shutoff)
Air conditioners do not only cool the air, they dehumidify it. The humidity that is extracted out of the air inside a building condenses on the evaporator coil and drains into a condensate drain pan. When this water is unable to drain, due to something, then the pan may fill up.
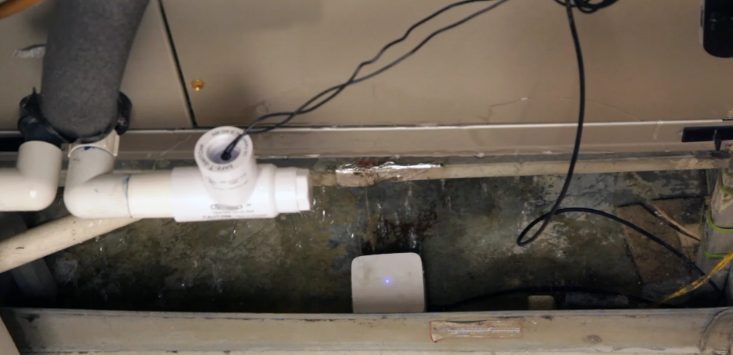
Most central AC systems have a safety float switch that is designed to sense a full drain pan to prevent water overflowing and damaging your home. Once activated, this float switch will turn off the AC system so that it does not turn on until the water drains. Therefore, a central AC which fails to start up might in fact be a deliberate safety shutdown caused by a drainage problem.
Signs of a Full Drain Pan: If you discover that your AC does not run at all, then you can check the condensate drain pan (which is normally found below the indoor evaporator coil unit). This may be in an attic, basement or closet depending on how your system is set up. Check the pan to see whether there is standing water or signs of water overflow (water stains or wetness around the unit). A float switch that is tripped in the condensate pan may be easily detected in case you observe it: it is a small device, which may be attached to the edge of the pan, with wires attached. When the water rises to lift the float, the circuit is opened to enable the AC to operate.
Clogged Drain Line: The most common reason of a full drain pan is a clogged condensate drain line. The drain pipe may be clogged over time with algae, mold, or mineral deposits, particularly in humid climates. When the line is blocked, water will be pushed back into the pan. The AC can turn off and even fail to turn on as a self-protective measure. When the AC is on, homeowners can look at the end of the drain line (where the line goes outside the house) and see whether it is dripping steadily or not; when it is not dripping on a humid day, there is a possibility of the line being clogged.
DIY Fixes:
When you think that the drain pan is full, turn off the power to the HVAC system (at the thermostat and breaker) and then deal with the water.
Carefully drain the water out of the pan either with a wet/dry vacuum, a pump or by soaking up with towels to reduce the height of the float switch. After the water level has been lowered, the float switch is supposed to reset and enable the AC to turn on once again (you might need to reset the thermostat after getting the water out). Nevertheless, the root cause of the clog is still present and needs to be removed or the pan will soon be filled again. The condensate drain line may be cleared by applying a wet/dry vacuum to the drain pipe outlet, to vacuum out the obstruction, or by feeding a flexible brush or thin plumbing snake into the line. The other popular DIY technique is to pour a weak solution of bleach or vinegar into the drain line at the inlet (which is usually a T-shaped vent with a cap close to the indoor unit) to dissolve algae. Make sure that the line is clear by ensuring that water flows freely through the line.
Once the clog is removed and the pan is emptied, the AC ought to work normally in case this was the only problem.
Professional Help:
In case you do not feel like clearing the drain or the float switch is still on after draining, contact an HVAC technician.
Don’t Overpay for HVAC Services – Call 888-894-0154 Now to Compare Local Quotes!
With the help of such tools as an air compressor or CO 2 blast, professionals will blow out the line, and they will be able to flush the system completely. They will also test to see whether the float switch itself is working properly, sometimes these switches may fail or become stuck, and incorrectly keep the AC off.
In case of faulty float or wet switch, a technician can replace them. Also, a technician will make sure that there is no more serious problem like a second clog, a drain line that is not pitched properly, or microbial growth that needs to be treated.
Airflow Problems and Frozen Coils (AC Shuts Off or Won’t Start)
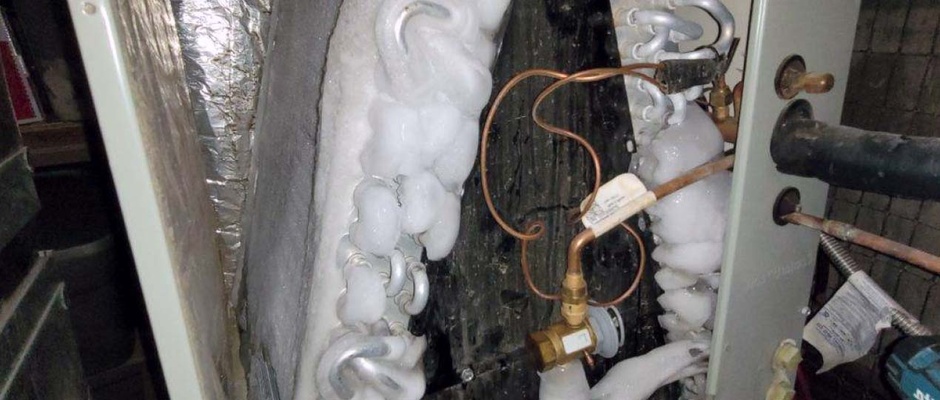
The central AC requires sufficient airflow to work. When airflow is seriously limited, the system may overheat or the evaporator coil may turn into a block of ice. Both scenarios may lead to the AC failing to start or keep turning itself off as a precaution. The two biggest offenders in this category are a dirty air filter and frozen evaporator coils, which are usually connected.
Dirty or Clogged Air Filter:
A clogged air filter in the HVAC system may result in a wide variety of problems, one of which is the inability of the AC to turn on.
The air filter is typically found at the return air grille or the inside of the furnace/air handler cabinet. It is supposed to collect dust and other debris, however, when it has not been replaced recently it can get very clogged. A blocked filter suffocates the air into the system. Airflow being cut can cause the HVAC system to overheat (in the case of the blower motor working too hard) or the absence of warm air passing over the coil can cause the coil to become too cold and freeze. To avoid damage, some modern HVAC systems have safety limit switches that will literally shut down the compressor when the airflow is inadequate. As an example, a clogged filter may lead to freezing of the evaporator coil and the AC may switch off until it melts. In case the AC does not turn on, particularly when it has been on recently, then a frozen coil may be the cause (and the freeze could be caused by a clogged filter).
Indications of a clogged filter are low airflow through vents, a lot of dust in the home, or the furnace/air handler being extremely hot to the touch.
The simplest method to test is to examine the filter itself. When the filter media appears gray, brown or dusty, it is well overdue to change it. Change the air filter to a new one and wait approximately 30 minutes in case the coil was frozen (you might observe water dripping as the ice is melting). Wait a bit to allow any ice to thaw then attempt to turn the AC back on.
In many cases, a very dirty filter just needs to be replaced to enable the AC to resume operation and work normally, since the airflow is restored. It is a fast DIY repair that needs to be carried out after every 1-3 months as a routine.
Frozen Evaporator Coil:
The evaporator coil (which is inside the indoor unit) will be covered with ice and this will not allow the AC to work. When the coil is frozen solid, the system can turn off due to a low pressure of the refrigerant (most systems have a low-pressure cutout switch) or due to the ice causing the condensate pan to overflow. You may find frost on the copper refrigerant lines or the outside of the inside unit or you may see water dripping long after the system has been shut off (melted ice).
A frozen coil is normally caused by either a lack of airflow (dirty filter, blocked vents, failing blower) or a lack of refrigerant. A leak results in low refrigerant, which makes the coil temperature too low, and moisture is frozen on it.
In case you find a frozen coil, switch off the AC and allow it to thaw before restarting it. Operation of an AC with a frozen coil may destroy the compressor.
Put towels to absorb falling water. Do not break the ice in pieces; leave it to melt. Once thawed, deal with the cause: ensure the filter is clean and all supply vents are open and unblocked (closed vents can cause the airflow to be too low). Then switch on the AC again. In case it runs and cools normally, monitor it, in case it freezes again, then there is probably another problem like a leak in the refrigerant or a broken blower fan.
DIY vs Professional for Frozen Coils:
Thawing a coil and changing filters are DIY actions. Nevertheless, when the evaporator continues to freeze even after simple repair, contact a specialist. Constant freezing may be a sign of low refrigerant, which implies that there is a leak that should be detected and fixed by a certified HVAC technician. Refrigerant charging and leak repair can only be undertaken by certified professionals. The freezing may also be caused by a faulty blower motor or an expansion valve problem, which cannot be fixed by a DIY. A very dirty evaporator coil can also be cleaned provided that it has become covered with dust and grime over the years, dirty coils may cause freeze-ups and are cleaned using special chemicals and procedures.
Don’t Overpay for HVAC Services – Call 888-894-0154 Now to Compare Local Quotes!
In short, make sure that your AC has a free airflow path: change the clogged filters, open all the vents, and do not allow dust accumulation around the indoor unit. This will not only assist the AC to turn on and remain on, but also enhance efficiency and life span.
One of the easiest measures to avoid most of the no-cool problems is to change the filters regularly.
Internal Component Failures (Capacitors, Motors, Compressor)
The typical component failures that prevent an AC to turn on are a bad capacitor, a burned fan motor, a failed compressor or other electrical control failures.
Bad Capacitor:
The start capacitor (and run capacitor) in the outdoor unit gives the required torque to start the compressor and the fan motor. When a capacitor fails the AC might come on and not start, or it might come on and not turn the fan on, it may even sound like a humming noise. In other cases, the fan may come on when prodded with a stick (this is a sure indication of a weak capacitor, but such manual starts are a temporary solution and should not be used unless absolutely necessary).
A totally dead capacitor may leave the outdoor unit not running at all (no compressor hum, no fan spin) although the indoor blower may still turn on when the thermostat calls for cooling. A visually bad capacitor may occasionally be detected by a bulged or swollen top, or leaking electrolyte.
DIY Considerations:
Replacing a capacitor is a fairly cheap fix, however is usually not a job to be done by an amateur as there is a risk of electrical shock.
Capacitors are energy storing devices and may provide a hazardous shock even when the power is switched off. This is not a job that you should do yourself unless you are familiar with HVAC electrical work and have the right tools to safely discharge and replace a capacitor. A technician in HVAC will test the microfarad readings of the capacitor and change it in case it is out of spec. This usually solves the problem of humming but not running in a short period of time. Luckily, one of the most frequent AC repairs is capacitors and technicians usually have the correct replacement parts in their possession.
Fan Motor or Blower Motor Failure:
Failure of the fan motor (outdoor condenser fan) may inhibit the AC to start effectively.
When the outdoor fan fails, the compressor may overheat and turn off, so the system will not operate.
In most cases, when the compressor attempts to run without the fan, you will hear the compressor hum and then maybe a click as an overload protector turns it off. Likewise, failure of an indoor blower motor means no air movement; some systems will not even activate the outdoor unit when the indoor blower is not running (to avoid coil freeze or other problems). Motor failure signs are the absence of sound or movement of the motor, a buzzing sound (in case the motor is seized) or a burning smell of the unit. These motors may burn out after years of use or under stress of other problems (such as a capacitor failure or overheating).
It is complicated to replace a motor and it should be done by a professional. It entails fitting the specifications of the motor (horsepower, speed, capacitor size, frame etc.) and wiring it properly. In the case of a blower motor it may also include the control board or belt (in case of an older belt-driven system). In case a technician discovers that a motor has failed, he or she will also determine the reason why it failed e.g. is it a bigger problem such as a bad capacitor, dirty coil that has caused overheating or just age.
Compressor Issues:
The compressor is the core of the AC system and when it stops the AC will not work or cool.
A burned out or seized compressor will tend to take a large amount of electrical current, and will often trip the circuit breaker each time it attempts to start. Therefore, a tripping breaker each time the AC tries to turn on is one of the symptoms of a bad compressor. Or the compressor can just not run at all (silent) and the condenser fan continues to run thus the AC only blows warm air. When it comes to the problem of AC not turning on, a fully failed compressor may imply that the outdoor unit fails to turn on. Before the AC ceased to work, loud sounds (clattering or hard starts) may indicate a warning of compressor problems. Unluckily, a broken compressor is a significant problem that normally needs the replacement of the compressor or the whole outdoor unit. This is surely a task that should be left to a licensed HVAC professional since this is a job that deals with the refrigerant system.
Low Refrigerant / Pressure Switch:
This is not really a component failure, but very low refrigerant because of a leak can cause a low-pressure safety switch to be activated that will not allow the AC to come on.
In case the pressure in the system is less than a safe level, the compressor will not be permitted to operate, which is the same as turning off the AC.
In this situation, you may observe that the AC tried to start and turned off immediately or it does not run at all when the pressure is extremely low. Continuous refrigerant leakages are also likely to be accompanied by poor cooling and even ice on the coils. Refrigerant problems should be addressed by a professional person, he or she will detect and repair the leak and recharge the system. Do not even try to add refrigerant yourself (it is illegal without certification and may be hazardous).
Electrical Controls and Wiring:
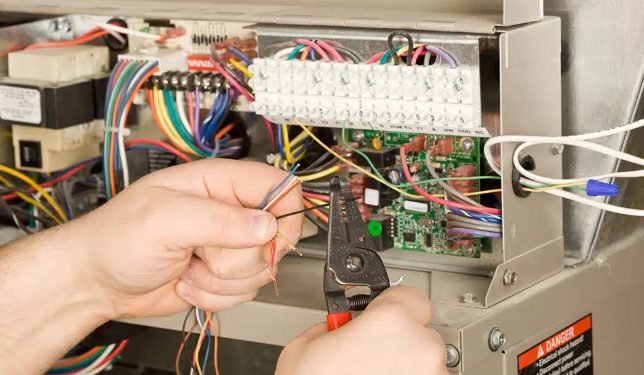
In addition to the major parts, many electrical controls may fail and lead to an AC no-start.
An electrical relay in the outdoor unit that switches on the compressor and fan is called a contactor; a burnt-out coil or bad contacts will prevent the outdoor unit to run. Likewise, the control board or relays of the indoor unit may fail or the transformer which supplies low-voltage power may blow a fuse. In case the 24V control fuse (typically a small 3-5 amp car-type fuse on the circuit board) is blown, usually caused by a short in thermostat wires or contactor coil, the entire AC system will not get the turn on signal. These can only be troubleshot with a multimeter and HVAC schematics. A householder may look to see whether the small fuse on the board is actually blown but replacing it will not help unless the cause of the problem is also addressed.
A technician should address any recurring fuse blow or electrical control problem, and he or she can isolate the cause (such as a shorted contactor or a wire shorted to ground).
When Components Fail – Repair or Replace?
A professional of HVAC will diagnose the faulty component. Contactors and capacitors are rather cheap repairs. Fan motors and blower motors are not expensive and in most cases it is worth replacing them to prolong the life of the system.
A compressor failure is worse still; in case the unit is old (10-15+ years), it may be more economical to replace the entire condensing unit (or the entire AC system) than to replace the compressor. The technician will be able to give options and prices.
These replacements should always be done by a qualified HVAC technician because they will make sure that the system is well calibrated and safe to use after repair.

How to Get the Best HVAC Prices
- Firstly, keep in mind that installation quality is always the most important thing for residential HVAC project. So never sacrifice contractor quality for a lower price.
- Secondly, remember to look up the latest rebates as we talked above.
- Thirdly, ask for at least 3 bids before you make the decision. You can click here to get 3 free estimates from your local contractors, and this estimate already takes rebates and tax credit into consideration and filter unqualified contractors automatically.
Lastly, once you chose the right contractor, remember to use the tactics from this guide: Homeowners Tactics When Negotiating with HVAC Dealer to get the final best price.