

A portable air conditioner removes water content in the air and gathers water. This water has to be drained. Failure to drain it will cause the unit to stop functioning or become damaged. A hose can be attached to the drain port to drain water easily and fast.
The following steps demonstrate how you can drain a portable AC using a hose, provide safety precautions, and provide trouble shooting tips.
Fast guide on how to drain a portable AC using a hose:
| Step | Action |
|---|---|
| 1. Switch off and disconnect | During draining, shut the AC and disconnect power |
| 2. Install the unit | Locate the AC close to a floor drain or place a container (bucket/tray) under the drain port; the unit should be placed on a stable platform so that the water could flow into the drain target |
| 3. Hose connection | Attach an appropriate hose to the drain outlet of the AC securely such that no water escapes |
| 4. Remove drain plug | To begin the water flow through the hose, take off the drain cap or plug carefully |
| 5. Remove the water | Drain or pour all the water into the drain or container; tilt the unit a little bit, when necessary |
| 6. Safe and continue use | Re-seal the drain or leave the hose in the position to keep draining and plug the AC back. |
Why Portable AC Units Need Draining
Portable air conditioners remove moisture in the air and the water should be drained or the machine will turn off or leak.
Water condenses in the unit, and is collected in a reservoir (or drip pan). There is some of this water which is evaporated by some units and released through the hot exhaust, however, the surplus remains in the tank. Most of the units will stop when the tank is full in order to avoid overflowing. In case the water is not drained, it can flow out through the bottom.
The frequency of draining will be determined by the humidity in the room and the design of the AC. In arid climates, you may not see water at all, since some ACs are self-evaporative, i.e. re-evaporate most of the condensate. The tank may fill fast in humid regions or when the air conditioning is in dehumidifier mode.
Actually, there are portable ACs that gather a number of pints of water on a daily basis. Failure to take care of the drain causes a safety shut-off or a spill. The AC can be maintained by regular draining.
Preparation: Tools and Safety Measures
1. Disconnect and switch off the AC then open it.
2. The equipment you require:
- A hose which fits the drain port. A garden hose is used in many units, although you can also require a clear vinyl pipe of smaller diameter. Refer to what your manual suggests.
- A place where the water can drain such as a container or a floor drain.
- A towel or a rag to collect small spills.
3. Safety precautions:
Don’t Overpay for HVAC Services – Call 888-894-0154 Now to Compare Local Quotes!
- Set the AC on a flat stable surface.
- In case you decide to raise the unit, make sure that the platform will support its weight. Portable AC may be heavy and top-heavy, and therefore, it is important to provide steady support.
- Attach the hose to the drain port and point it to the drain or bucket. As soon as you open the drain, water will begin flowing, so get prepared.
- Allow the unit to stand few minutes then drain. This enables cooling of hot parts and balancing of pressure internally.
- Do not turn a full AC without maintaining it level. The spillage can occur when the unit is tilted.
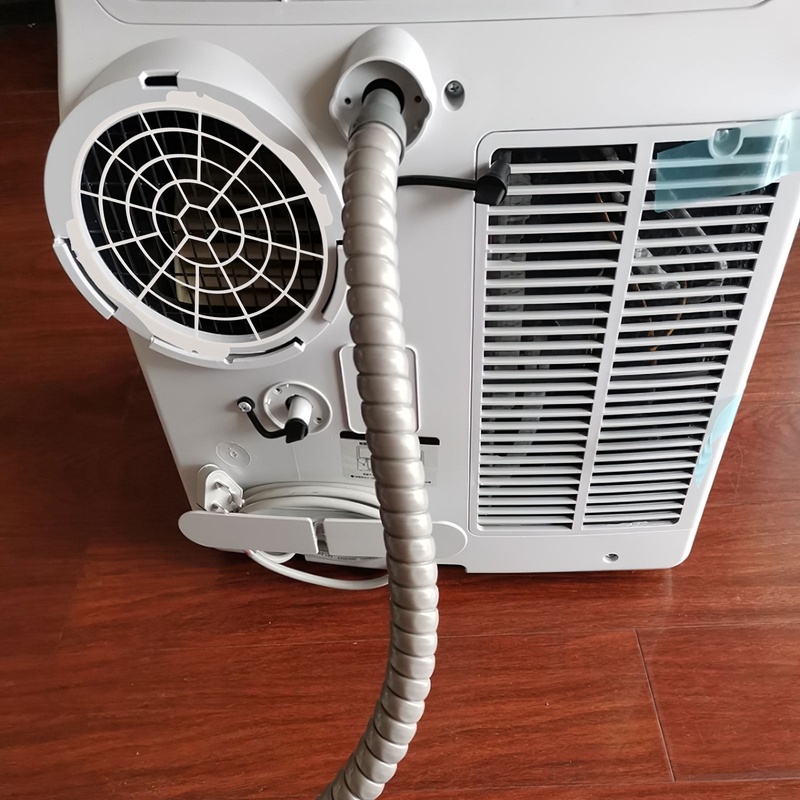
4. Find a drain port on your portable AC.
It is normally located at the backside, as the water is pulled down by the gravity. Others are two-drain models, with one drain at the bottom (to empty the whole unit, when storing it) and another higher up (to drain continuously during use). When you have a unit with an upper drain outlet, use it to drain continuously with a hose (commonly in dehumidifier mode or high humidity). In case there is a single drain it will most probably be at the bottom.
Check your manual in case of doubt and position the unit as near to the floor drain or wherever you intend to channel the water.
Step-by-Step: Draining a Portable AC With a Hose
Once you have all the tools and located the drain outlet on the air conditioner, you are set to drain it. Do this with a hose. The best part is to make the hose short and slanting downwards to allow the water to flow out due to the effect of gravity.
Switch off and disconnect air conditioner: Switch off and pull out the power cord. This prevents the motor and fan and electric shock or accidental starting as you drain the tank.
Place the AC close to a drain:
Place the air conditioner close to where the water can flow. In case your house has a floor drain, relocate the AC such that the outlet of the drain is near the drain.
When you are using a bucket or pan, elevate the AC slightly, by placing it on blocks or a low, steady table so that the drain is above the bucket or pan. The hose should always be lower than the drain outlet on the air conditioner so that gravity can do its work.
Attach the hose:
Slip the hose over the drain outlet, in case of a friction fit, or screw it on, in case of a threaded fitting, such as a garden hose fitting. Ensure that the hose is tight and fit. In case the drain is covered with a rubber stopper, take it out and keep it aside, you will replace it after draining.
Unscrew the drain plug or cap:
The drain hole on most air conditioners is covered by a cap and in some cases a rubber plug immediately inside the hole. With great caution, unscrew or pull out this cap or plug. Water will begin to flow immediately the hole is opened. When the hose is fitted correctly and the end of the hose is lower than the drain outlet, then the water will pass through the hose. In case no water flows out and you are sure that the tank is not empty, look at the kinks and ensure that the end of the hose is still lower than the drain port.
Drain the water:
Let all the water in the tank drain out. This could be a few seconds or few minutes depending on the fullness of the tank and the width of the hose. You may tilt the AC slightly back or sideways (not more than a few inches) in case your user guide instructs you to do so.
Lock the system and restart:
In case it is a one-time drain (e.g. at the end of the day or before storing), take out the hose and replace the drain cap or plug on tightly. Blot up any spilt water at the drain opening. In case you will leave the hose connected when the AC is on, ensure that the hose is still connected and the end of the hose remains in the drain or bucket. You can tie or tape the hose in order not to flip out of a shallow drain. Re-plug the air conditioner and switch it on. It is now supposed to operate without stopping to drain since the water flows out of the hose continuously. Observe the initial hour of operation to ensure that no leakage is observed at the hose connection and water continues to flow down the hose.
Troubleshooting Common Drainage Problems
You may have a good set up yet you may find water not draining well or leaking. These are the most widespread issues and the ways to solve them:
- The hose will not drain water. In case the tank is full, but nothing is coming out of the hose, then, firstly, make sure that the hose is not bent or elevated at any point. The entire hose must be sloping downwards. Remove also any inside plug (in some units there is a rubber stopper which has to be removed so that the hose may be used).
- Leaking of water around drain plug. This normally implies the loose connection of the hose or the drain plug is not closed. Make sure that the hose fits the outlet and is pushed in far enough (or the garden hose connector is screwed in the right direction). A slip-on hose may be secured with a clamp.
- The unit switches off when the hose is still attached. When your air conditioner switches off even when the hose is on, then water is not draining at a fast rate or at all. This may occur when the hose end is elevated too high (defeating the gravity) or when there is an air lock. The hose end should be below the drain without being in water. Also make sure that you are using the right drain outlet. Other units have two drains; the upper port is to be used to continuously drain, so in case you drained with the lower port using a hose, the water might not come to the hose until the base is very full. Reconfigure the hose system, drain the water in the unit and start operating.
- The hose drops or comes out. A hose that is not tightened properly may result in a huge mess in case it comes off during the draining. In case the hose is not fitted tightly, think of an adapter or another diameter hose that fits better.
- You detect musty smells or see moulds. With time, mold may develop as a result of stagnant water or moisture in the hose. When you realize there is a bad odour, then it is time to clean the drainage system. Switch off the unit, and remove the hose. To kill mold and rinse away slime, you can flush a solution of vinegar and water (a 1:1 ratio) through the hose and drain port. Soak it in some water and after a few minutes flush it with clear water. Be sure to save the runoff in a bucket. In case possible, dry the hose in the sun. Mold can be prevented by regular cleaning (every two weeks in the case of very humid weather).
- There is dripping of water somewhere on the unit.
The majority of the drainage problems may be resolved with the help of inspecting the hose arrangement and doing basic maintenance. With a steady process of removing kinks, clogs, and leaks, you will be able to get the continuous drainage and keep your floor dry.
Maintenance Tips for Continuous Drainage
Examine the hose once a week or two, particularly in case your house is humid. Search for kinks, tight bends and clogs. There will still be movement of water but small particles can accumulate. Unplug the hose and flush it out until it is clear. In case you notice algae or white spots, soak the hose in a light bleach solution (or vinegar as a less strong method) during 30 minutes. Wash the hose. Blow dry the hose and then reconnect or allow the water to complete the drying task by the AC.
Clean up the drain port when the hose is off. Clean the opening area with a cotton swab. This area is capable of collecting dust or molds. Look at the rubber drain plug (in case your unit has one when you are not draining). Keep it soft and clean; change it when it cracks so that it may remain water-tight.
Don’t Overpay for HVAC Services – Call 888-894-0154 Now to Compare Local Quotes!
Make sure the filter is clean. Dusty filter may cause the evaporator coils to freeze. The ice might melt and spill into the drain pan and block the system. A clean filter allows the AC to get rid of moisture with ease. Recommendation of the manufacturer: clean or change the filter approximately once in two weeks. Every two weeks or once per month is good.
Empty the AC completely before the season is over. Do not leave water indoors during winter. Empty the unit, and run it on fan-only mode to dry up any moisture, two hours. You can also open the unit and leave it to dry overnight. Take off the drain cap and allow the last drops to dry up. Wind up the hose and place it in a dry cool place. The drain port should be left open or checked until the next season as recommended by many manufacturers.

How to Get the Best HVAC Prices
- Firstly, keep in mind that installation quality is always the most important thing for residential HVAC project. So never sacrifice contractor quality for a lower price.
- Secondly, remember to look up the latest rebates as we talked above.
- Thirdly, ask for at least 3 bids before you make the decision. You can click here to get 3 free estimates from your local contractors, and this estimate already takes rebates and tax credit into consideration and filter unqualified contractors automatically.
Lastly, once you chose the right contractor, remember to use the tactics from this guide: Homeowners Tactics When Negotiating with HVAC Dealer to get the final best price.