
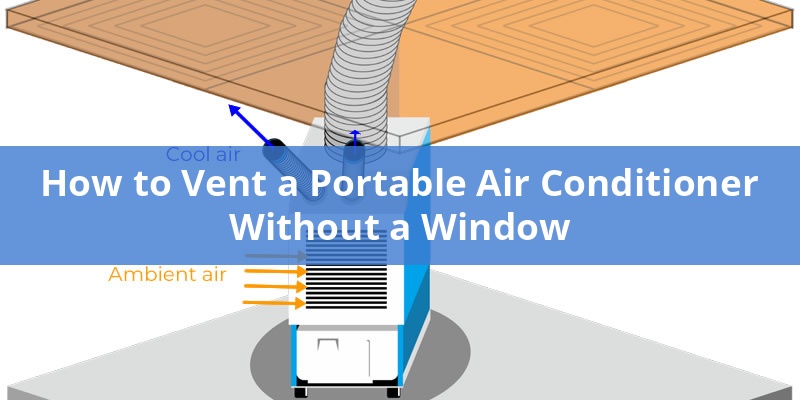
Portable air conditioners must have a way to vent out hot air and moisture, and it is usually through windows. Nevertheless, in rooms which do not have windows or where window venting is not possible, there are a number of alternative ways.
Whether it is venting through the walls, doors, ceilings or some creative DIY methods, windowless rooms can be effectively cooled with portable AC units provided they are well ventilated. This guide will discuss the viable options to window venting, their installation needs, and other factors to keep in mind to make sure your portable air conditioner is effective in any room.
| Venting Method | Difficulty Level | Permanence | Best For |
|---|---|---|---|
| Drop Ceiling | Moderate | Semi-permanent | Office spaces |
| Wall Venting | Difficult | Permanent | Dedicated spaces |
| Door Venting | Easy | Temporary | Renters |
| Dryer Vent | Moderate | Semi-permanent | Existing infrastructure |
| Sliding Door | Easy | Temporary | Rooms with patio doors |
Understanding Why Portable Air Conditioners Need Venting
Portable air conditioners work through removal of heat and moisture in the air. The cooling process generates hot air which has to be directed outside to ensure the cooling process. In the absence of ventilation, the unit would basically be circulating hot air in the same room, which would defeat its cooling properties.
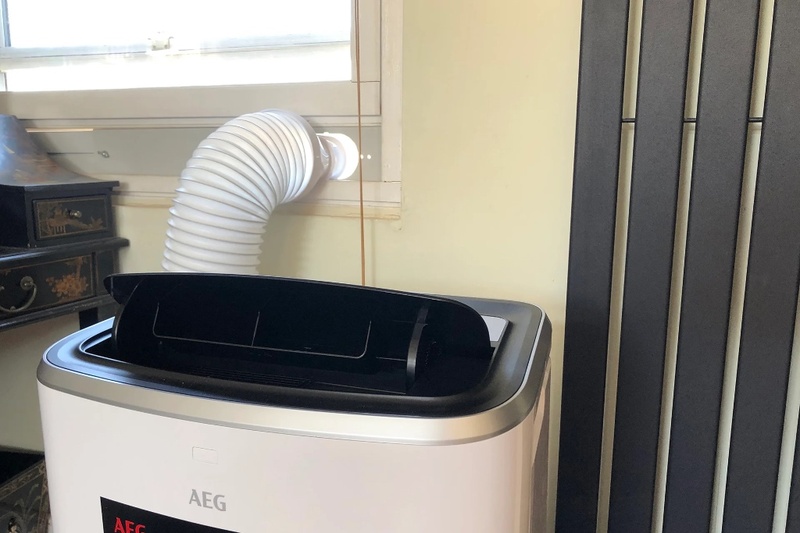
The portable AC has an exhaust hose that is meant to convey this hot air out through a window kit that forms a closed passage. This system also makes sure that the unit is able to constantly cool the room without re-using the same hot air that it is attempting to eliminate.
Standard window venting is effective since it offers a direct way to the outside, and it does not require many changes to your living area. But in case there are no windows, other forms of venting have to be used to accomplish the same thing: provide an avenue through which the hot air can flow out.
Single-Hose vs. Dual-Hose Systems
Portable air conditioners have one hose that is used to draw air into the room, cool it and expel hot air. This may cause negative pressure which may pull warm air in other parts of your house to the cooled room.
Dual-hose systems are those where the intake and exhaust hoses are separate. They use one hose to draw outside air to cool the compressor and the other to release hot air and thus produce less negative pressure and tend to be more efficient.
In the planning of alternative venting solutions, it is important to know the hose configuration of your particular unit. Both of them can be modified to non-window venting, however, the installation requirements can vary a bit, depending on the system you possess.
Alternative Venting Methods for Windowless Rooms
There are a few good solutions to rooms without windows and each has its advantages and disadvantages. The best venting technique will be determined by your personal situation such as whether you are a property owner or renter, the location of the room and your budget.
Quick Comparison of Venting Options
When comparing venting options, one should take into account such aspects as the complexity of installation, permanence, aesthetic effect, and efficiency. There are methods that need structural changes and there are methods that provide temporary solutions that can be adopted without making any permanent changes.
Don’t Overpay for HVAC Services – Call 888-894-0154 Now to Compare Local Quotes!
- Drop ceiling venting: Utilizes the space above suspended ceilings
- Wall venting: Permanently opens an exhaust opening through an outside wall
- Door venting: Adapts standard or sliding doors with special kits
- Dryer vent use: Re-uses the dryer vents when they are not in use
- DIY solutions: Custom-built venting using specialized materials
Every technique has various implications on energy efficiency. The less the vent path is long and straight, the better your portable AC unit will work. Exhaust paths that are longer or bent may decrease cooling and may also cause stress to the components of the unit.
Using a Drop Ceiling for Venting
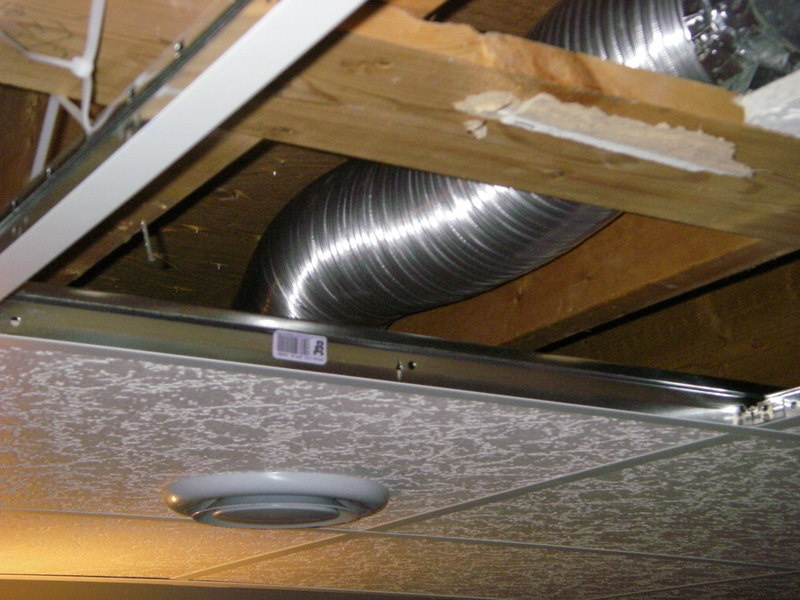
Suspension ceilings (drop ceilings) that are common in most offices and basement rooms provide a convenient venting route. The area between the drop ceiling and the real ceiling forms a plenum that may be used to pass the exhaust air.
Installation Process
You will have to remove one of the ceiling tiles that are close to an exterior wall in order to vent through a drop ceiling. Drill a hole in the tile which is the same size as your exhaust hose, and then fit a suitable vent collar to hold the connection.
- Select a ceiling tile near an exterior wall
- Remove the chosen tile and measure your exhaust hose diameter
- Make a hole in the tile with a utility knife or a suitable cutting tool of the right size
- Install a vent collar or flange around the hole
- Connect your AC’s exhaust hose to the vent collar
- Replace the modified tile in the ceiling grid
To make it more permanent, run flexible ducting to the ceiling tile and out to an outside wall and put a proper exterior vent cover on to keep out the weather. This method needs more materials, however, looks more finished and performs better.
Considerations for Drop Ceiling Venting
Make sure that the plenum above your drop ceiling has a proper way to the outside before installing this solution. The building codes usually do not allow venting of hot, humid air into enclosed ceiling spaces because this may encourage the growth of molds and weaken the structures.
Also, make sure that this method does not contravene any building fire regulations because ceiling plenums are usually used as a fire protection system of a building. Ask your building manager or local code enforcement in case you are not sure.
Venting Through Walls or Doors
Wall Venting Solutions
One of the most effective and lasting solutions is to create a special vent through an external wall. Wall venting provides a direct route to expel hot air, and it helps your portable AC to perform its cooling job to the maximum.
This is usually done by drilling a hole in a wall, usually an exterior wall, and fitting a wall vent kit (with an exterior hood or louvered cover) and fitting the exhaust hose of your portable AC into the inside part of the kit.
Professional installation is recommended for wall venting as it requires:
- Locating and avoiding electrical wiring, plumbing, and structural elements
- Proper sealing against weather and insect intrusion
- Appropriate sizing and positioning for optimal performance
- Compliance with local building codes and possibly permits
The common diameter required is 4-6 inches depending on the model of your AC. Wall vents are a permanent solution, once installed they are unobtrusive and will not disrupt normal room operations.
Door Venting Kits and Adaptations
Door venting is a non-permanent solution to renters or people who cannot alter the walls. Special door vent kits are like window kits except they fit into the space under or alongside a door.
Sliding door vent kits employ adjustable panels to seal the incomplete opening of a sliding glass door and give a hole to your exhaust hose. Such kits normally come with weatherstripping to provide a decent seal around the edges.
For standard hinged doors, several options exist:
- Under-door vent plates which carry the exhaust hose under the door
- Door panels that have in-built hose ports that temporarily replace the door
- Adaptable fabric door seals with zipper access and hose ports
With door venting solutions, you should know that they can interfere with security and weather sealing. They are most effective in interior doors that open to rooms that are well ventilated on the outside or when temporary cooling is required.
Dryer Vent Method for Portable AC Units
Portable air conditioners can occasionally be vented using existing dryer vents. This method utilizes infrastructure that has been designed to push air out of your house.
Compatibility and Safety Considerations
There are some important factors that should be considered before one tries to use a dryer vent:
- The dryer vent should never be used at the same time as the AC unit
- The diameter of the vent should be suitable with your AC exhaust hose
- Before using the vent, it should be cleaned of lint and debris thoroughly
- The AC and the vent should be less than the distance recommended by the manufacturer
Drying two appliances with the same dryer vent is extremely dangerous and can cause fire and carbon monoxide hazards and must never be done. This is a good solution in laundry rooms or the nearby areas where the dryer is not used when the AC is on.
Adaptation Process
To connect your portable AC to a dryer vent:
- Disconnect the dryer from its vent
- Clean the vent thoroughly to remove all lint
- Buy an adapter which fits your AC hose and the diameter of the dryer vent
- Fix the adapter on the wall vent using suitable clamps or tape
- Connect your AC exhaust hose to the adapter
- Ensure all connections are tight and sealed
In case you want to switch between dryer and AC use occasionally, you may want to install a Y-connector with shut-off dampers that will enable you to redirect airflow between the appliances without having to disconnect hoses every time.
Using Sliding Glass Doors for Venting

Sliding doors may also act as windows when it comes to ventilation. Special sliding door vent kits offer a panel system that is adjustable and fills the gap of a sliding door partially and fits the exhaust hose.
Don’t Overpay for HVAC Services – Call 888-894-0154 Now to Compare Local Quotes!
Sliding Door Kit Options
These kits typically consist of:
- Adjustable height panels that extend to fill the vertical opening
- A locking mechanism to secure the panel in place
- Pre-cut holes or adapters for exhaust hose connection
- Weather sealing materials to prevent air leakage
Installation is usually simple, the panel simply slides into the door track and opens up to cover the opening. The majority of kits are tool-free installation and can be easily removed when they are not in use.
Security and Insulation Considerations
Sliding door vents should be accompanied by extra security because these kits do not allow the door to close fully. You can also install a security bar or a special lock that can be used with the partial opening of the door.
To achieve improved thermal efficiency, seek kits that are made of a double-wall construction or kits that have insulative materials. Other high-end models have reflective surfaces inbuilt which aid in minimizing the heat transfer through the panel itself.
When there is extreme weather, check the seal around the kit to see whether there are any drafts or water penetration. Additional weather stripping can be required to ensure the insulation and avoid wasting energy.
Creating a DIY Venting Solution
Materials and Tools Needed
Custom venting solutions may be developed using materials that are readily available to people who feel comfortable with light construction projects. A DIY solution can be made to fit your exact space constraints and be cost-effective at the same time.
Essential materials for a basic DIY vent include:
- Rigid foam insulation board (1-2 inches thick)
- Reflective HVAC tape or aluminum foil tape
- Weatherstripping or foam gaskets
- Vent adapters matching your hose diameter
- Utility knife and straight edge
- Measuring tape
Step-by-Step DIY Guide
To create a basic custom vent panel for various openings:
- Take a measurement of the opening in which you want to place your vent (doorway, transom, etc.)
- These are the dimensions of the foam insulation board to be cut (slightly oversized to fit tight)
- On the board, trace the diameter of your exhaust hose and cut the hole
- Install a proper vent flange or collar around the hole
- Apply weatherstripping around the panel’s edges
- Secure the panel in your chosen opening
- Connect the AC exhaust hose to the vent collar
- Seal any gaps with HVAC tape
To enhance the look and to make it last longer, you may want to cover the foam board with cloth or paint it to fit your decor. More sophisticated DIY products may include hinges to make them easy to open or adjustable parts to suit the seasons.
Professional Installation Options
When it comes to permanent solutions, which involve structural changes, professional installation is a peace of mind and usually has better outcomes. HVAC specialists are able to design unique venting systems that can fit perfectly into your house without compromising energy efficiency and aesthetic principles.
Finding Qualified Installers
When seeking professional help, look for:
- Licensed HVAC contractors with experience in portable AC installations
- Contractors who provide detailed written estimates
- Professionals familiar with local building codes and permit requirements
- Installers who offer warranties on their work
Ask references and check insurance cover prior to hiring. A well trained professional is able to evaluate your particular case and advise the most effective venting system to your specific area.
Cost Considerations
The cost of professional installation is highly variable, based on complexity, location and materials:
- Simple wall vents: $200-500
- Complex installations requiring extensive ductwork: $500-1,200
- Custom solutions for challenging spaces: $1,000-1,500+
Although professional installation is a big investment, it can be a better solution in terms of performance and durability than temporary solutions. Better cooling efficiency and comfort are reasons enough that many homeowners are willing to pay the initial cost.
Important Considerations for Alternative Venting
Energy Efficiency Impacts
Any venting process influences the performance of your portable AC. The best vent route should be short, straight and well sealed to reduce resistance and loss of conditioned air.
Don’t Overpay for HVAC Services – Call 888-894-0154 Now to Compare Local Quotes!
Key factors affecting efficiency include:
- Vent hose length: Each additional foot reduces efficiency
- Kinks in the vent hose: Every bend may cut airflow by 5-10 percent
- Air leaks: Even small gaps can significantly impact performance
- Insulation: Uninsulated hoses lose cooling power in hot spaces
When you have exposed sections of your exhaust hose, you may want to consider wrapping it with duct insulation wrap, particularly when you have to run through hot attics or crawl spaces. This is a very simple addition that can enhance efficiency by avoiding the transfer of heat back into the hose.
Building Code and Rental Restrictions
Ensure that any regulations are checked before installing any permanent venting solution. Most communities have restrictions on exterior alterations and may not be allowed without a permit, and poor venting may be against building codes or insurance policies.
In the case of renters, structural changes are normally prohibited by the lease contracts. The alternatives that will not jeopardize your security deposit are non-permanent solutions such as door kits or portable vents.
In case of doubt, you can refer to your landlord, building manager or local code enforcement office. There are buildings that have certain demands on HVAC alterations, especially in multi-unit buildings where the venting may impact the adjacent areas.
Condensation and Water Management
Portable air conditioners dehumidify the air, which produces condensate water that should be disposed of properly. The majority of the modern units are self-evaporating, meaning that the moisture is pushed out via the exhaust hose, although some moisture may still be left inside.
When using alternative venting methods, ensure that:
- The exhaust hose is kept at a slight downward position to the outside
- Any custom vent installations include proper drainage considerations
- Condensate collection tanks remain accessible for units that use them
In humid conditions, you might have to empty internal collection tanks more often or you might want to install a condensate pump to allow constant drainage in windowless rooms.
Maintaining Your Windowless AC Venting System
You can maintain your alternative venting solution properly to make it effective in the long term. This is because regular inspection and cleaning will help you avoid losses in efficiency and prolong the life of your venting system as well as your AC unit.
Regular Maintenance Tasks
Incorporate these checks into your routine maintenance:
- Inspect all vent connections monthly for secure attachment
- Check weatherstripping and seals for wear or damage
- Clean or replace air filters according to manufacturer recommendations
- Make sure that the exterior vent covers are not blocked by debris, insects, or vegetation
- Examine vent hoses for kinks, tears, or compression
In the case of wall or ceiling vents, they should be cleaned once a year using a vacuum and vent brush to get rid of dust and enhance airflow. Good maintenance does not only enhance cooling efficiency, but also saves energy and eliminates early failure of equipment.
Troubleshooting Common Issues
When you find that the cooling is not as good as before, look out for the following issues:
- Restricted airflow due to crushed or kinked exhaust hoses
- Air leaks at connection points
- Debris blocking interior or exterior vent openings
- Excessive exhaust hose length reducing efficiency
- Condensation buildup in the hose creating water traps
In case of DIY installations that are not working, think of replacing them with more permanent parts. Flexible dryer hose is convenient but can wear out more quickly than rigid ducting and can leak performance.
In case of efficiency problems that cannot be resolved through troubleshooting, call an HVAC professional to check your installation and suggest the changes.

How to Get the Best HVAC Prices
- Firstly, keep in mind that installation quality is always the most important thing for residential HVAC project. So never sacrifice contractor quality for a lower price.
- Secondly, remember to look up the latest rebates as we talked above.
- Thirdly, ask for at least 3 bids before you make the decision. You can click here to get 3 free estimates from your local contractors, and this estimate already takes rebates and tax credit into consideration and filter unqualified contractors automatically.
Lastly, once you chose the right contractor, remember to use the tactics from this guide: Homeowners Tactics When Negotiating with HVAC Dealer to get the final best price.