
")
When your air conditioner condenser fails to start, it may easily interfere with your comfort at home.
Knowing some of the most common signs, the causes of the problem, and troubleshooting measures may help you detect the problem early, save money on energy bills, and possibly prevent costly repairs.
This guide gives a clear guideline to diagnose and fix the condenser startup issues
Signs of a Non-Functioning Condenser
Among the most obvious signs is an increase in the temperatures inside the house even though the AC system seems to be switched on. The indoor blower can be switched on but the vents only blow warm air. An exterior silent or motionless unit also proves that the condenser is not functioning.
In other cases, the homeowner will observe that there is no low humming sound that is normally associated with normal condenser startup.
Sometimes there can be partial engagement, when the fan is attempted to be spun or the unit clicks as it attempts to start. A clicking sound or a buzzing sound may indicate electrical issues or a dying motor. It is also useful to observe the vibration of the outdoor unit or the smell that is unusual. Every sign eliminates the possible causes, and helps to take troubleshooting steps.
7 Causes and Troubleshooting of AC Condensor Failure
The failure of an AC condenser to work properly also interferes with the whole process of cooling and leaves the homeowners with uncomfortably high indoor temperatures. Whether it is power outage or refrigerant imbalance, there is a list of reasons that may stop the condenser. 7 of the most frequent reasons why the AC condenser fails are discussed in the following sections, together with the troubleshooting steps that can be taken in each of the cases
1. Power and Electrical Interruption
Central air conditioning systems require steady voltage to drive condenser fan motor and compressor. In case of circuit breaker tripping, fuse blowing or failure of the disconnect switch at the outdoor unit, the condenser cannot be switched on. In the older houses, the current flow may be interrupted due to improper wiring or corrosion of the terminals.
The easiest first test is to make sure that the dedicated AC breaker is on and that the disconnect box close to the condenser is not open or damaged.
In cases where the problems continue, it might be required to measure the voltage at the contactor or the input terminals through a multimeter. When a large decrease or no voltage is observed, then a wiring fault is probable. Competent technicians occasionally discover that rodents have chewed wires or that moisture has entered the disconnect box and corroded it. Proper repair involves replacing any bad connections and making sure that the panel and disconnect are weather proof.
Don’t Overpay for HVAC Services – Call 888-894-0154 Now to Compare Local Quotes!
2. Capacitor Failures
Capacitors are used to store and discharge electric energy to assist the compressor and fan motors to start and run without any trouble. The dielectric material in the capacitor may degrade over time due to heat exposure, voltage spikes or due to normal aging. In case of a capacitor failure, the condenser fan motor or compressor will have difficulties starting.

One of the indicators is a slight humming or buzzing sound with no physical movement of the fan.
The condition of the capacitor can be determined by checking it to see whether it has bulges, leaks or burnt terminals. Measurement of capacitance using a special meter will verify that it is within the specification marked on its case. In case the reading is way off, the part must be replaced.
It is necessary to choose a capacitor with the right value of voltage and microfarad. Putting in the wrong component may cause recurring failures or overloading other system components. A well-operating capacitor will guarantee a stable start-up, less motor load, and steady condenser performance.
3. Contactor or Relay Issues
A low-voltage signal is sent to a contactor or relay when the thermostat calls to cool, which closes the power supply to the motors on the condenser. When the contactor coil burns out or the contacts get pitted the circuit stays open and the condenser never gets the full line voltage to start. Common warning sounds of failing contactor components include frequent humming, a chattering relay or repeated clicks.
In troubleshooting, technicians ensure that the coil is getting the right low-voltage signal by the thermostat. They can also take continuity between the contact points as they press the contactor manually. In case the contactor does not pass these tests, it is best to replace it. Contactors of good quality manufactured by a reputable company do not arc and have a longer life than cheaper ones. By having the contactor rating to be in line with the current requirements of the compressor and the fan motor, overheating and subsequent breakdowns are avoided.
4. Thermostat Wiring Errors
A condenser will sit idle even when the breaker and the disconnect are in working condition in case the thermostat is not able to transmit the correct control signals. The usual wiring errors happen during thermostat upgrade or component replacement. A misplaced Y or C wire may cause the 24-volt circuit to be broken which causes the outdoor unit to have zero response.

Also, a defective thermostat that fails to read the indoor temperatures correctly may even fail to initiate the cooling cycle.
Checking the wiring diagram of the thermostat will make sure that all the wires are connected to the right terminal. It is prudent to check continuity of each wire between thermostat and the control board and contactor coil using a multimeter.
In cases where there is a problem with the calibration of the thermostats or the settings, the problem can be solved by reconfiguring the temperature differentials or by making sure that the device is in the cool mode. In other instances, all it takes is to change an old or faulty thermostat and the condenser is back in business.
5. Refrigerant Pressure and Safety Switches
The modern systems have in-built safety switches and pressure sensors that prevent damage to the compressor in case the refrigerant pressures are too far out of safe limits. A low-pressure switch can prevent the condenser to start in case the refrigerant charge is considerably low, which is a sign of a potential leak. Likewise, a high-pressure switch might be tripped in an overpressure condition and power to the system might be shut down to prevent disastrous failures.
The process of identifying whether a pressure switch is inhibiting the start of a condenser is by gauging the pressure of the refrigerant on the low and high side. When the reading is close to zero on the low side, then there is a leak. The remedy may include fixing the leakage, followed by refilling with the refrigerant that is specified by the manufacturer.
In the meantime, a high-pressure shutdown can be caused by blocked condenser coils, non-operative condenser fans, or too much refrigerant. Restoring the cause and re-setting the switch usually restores the condenser to service without damaging the compressor.
6. Dirty or Damaged Condenser Coils
The condenser coils are outdoor and they flourish on the free airflow to release the absorbed heat. Dirt, pollen or grass clippings build up like insulation and increase the pressure inside the system and cause the compressor to work harder. In case the coils get too clogged, the system can shut down as a precaution against overheating. Buildup is indicated by visible grime around the fins, or a significant temperature difference between coil sections.

Residue can be dissolved by cleaning the coils with a garden hose or a coil cleaner and normal heat transfer is restored. It should be sprayed inside out where possible, to prevent further pushing of the debris into the coil. Bent or broken fins may be straightened out with a fin comb.
In case of serious damage or corrosion, the repair or replacement of the coil may be the most appropriate option. Clear coils ensure that the pressure of the condenser head is maintained and the possibility of undesired shutdowns is reduced.
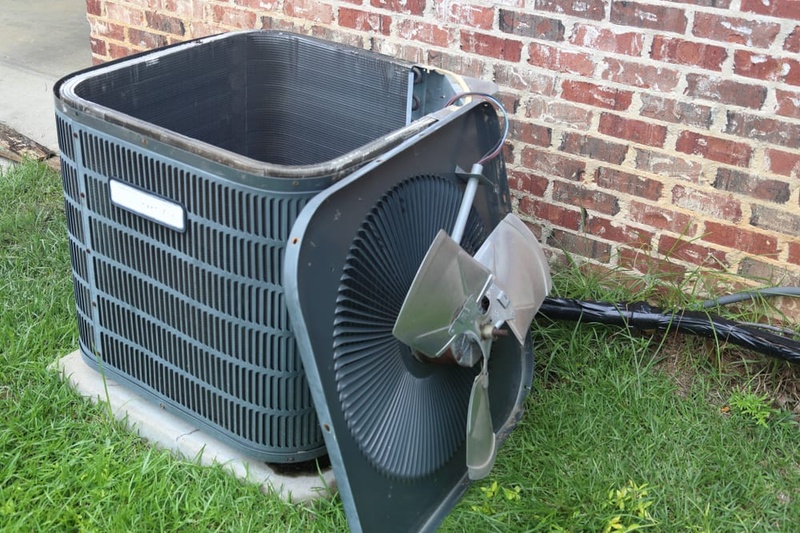
7. Condenser Fan Motor Problems
The condenser fan motor maintains a continuous airflow through the coil. When the fan motor has burnt windings, seized bearings, or has internal electrical shorts, the condenser will be silent or will suddenly shut down. The fan blade seems to move a little and then it stops because of insufficient starting torque. Internal motor protectors can also be tripped by overheating and the motor will stop until it cools.
Open or shorted windings can be sensed by testing motor continuity with a multimeter. When the motor case is too hot or smells like it is burnt, then the only solution is to replace it. Nevertheless, it is crucial to make sure that the new motor has the same horsepower and RPM needs as the system to have the right airflow.
The fan blade is usually checked by the technicians to ensure that it is aligned and balanced to prevent vibrations which reduce the life of the motor. A well-sized and healthy fan motor increases the life of the compressor by maintaining the operating pressures.
Comparing Different AC System Configurations
Other AC systems have different parts or special designs which change the way the condenser is activated. As an example, a heat pump may reverse refrigerant flow during winter, and depends on extra sensors or valves. Air handler split systems in the attic may bring in complexities of long refrigerant lines, increasing the possibility of leaks or pressure imbalances. Packaged units, however, store most parts in a single cabinet.
Don’t Overpay for HVAC Services – Call 888-894-0154 Now to Compare Local Quotes!
It is important to mention the design of the system in order to identify peculiar vulnerabilities. A defrost control board in a heat pump may lock out condenser operation in case it suspects coil icing. Split systems may experience line set issues or incompatible indoor and outdoor coils, which causes inconsistent pressures.
The knowledge on how the different designs activate the condenser is used to guide the troubleshooting process. Special diagnostics that simplify repairs can be found in the technical documentation of the unit.
Preventive Measures to Avoid Condenser Malfunction

Regular checks are important in averting abrupt failure of condensers. Airflow is maintained by clearing yard debris, keeping a two-foot clearance and washing condenser coils at least once a year. Occasional inspection of the electrical connections, especially in older systems, may show corrosion or fraying before it cuts the current path.
Aging run capacitors and contactors can be replaced on a scheduled basis to prevent emergency breakdowns.
The replacement of the indoor air filter also helps the condenser to work. With a clean evaporator coil, the pressures of the refrigerant are kept in the safe range, and the outdoor unit is not overworked. Professional tune-ups in the spring enable technicians to test pressure switches, check refrigerant charges, and test motor performance.
This preventive measure detects minor problems way before they develop into a condenser that fails to start.
Evaluating Repair vs. Replacement
In cases where a condenser fails to switch on, then replacement of parts can restore it to life. But when the unit is towards the end of its normal 10-15 year life cycle, then repeated failures may indicate that other parts are also near their expiry date. A new system that has a greater SEER (Seasonal Energy Efficiency Ratio) can reduce monthly utility costs significantly and usually has new safety features and warranties.
The choice between repair and replacement depends on the comparison of costs and estimated savings. A significant compressor replacement or frequent motor failures can creep up on the cost of a new system. The replacement of an old unit with phased-out refrigerants such as R-22 can also be more feasible than incurring high expenses of acquiring rare refrigerant.
Other homeowners discover that the up-front cost of a modern replacement is worthwhile because of the steady reliability and performance improvements.
Choosing a Professional HVAC Technician
Some of the troubleshooting procedures are easy but a more advanced electrical or refrigerant problem requires a skilled technician. Motors can be tested, pressures checked and slight wiring faults detected using specialized meters, gauges and diagnostic equipment that are available to licensed professionals. They also observe safety measures that reduce chances of injury or damage of equipment.
Checking the credentials of a contractor means searching the state licensing, general liability insurance, and certifications like NATE (North American Technician Excellence). Reputation counts as well: client reviews or recommendations by neighbors can tell a lot about the quality of work and fair prices of a technician.
Not only does a professional HVAC expert solve the current issue, but he or she can also provide recommendations on preventative measures and conduct comprehensive tests that maintain the condenser in the best condition.
How to Avoid Being Ripped Off and Get a Fair Repair Price
It is not easy to find a good AC repair specialist, some of them will offer the lowest prices since they are inexperienced or they have bad reputations, and some will charge a lot of money to do the same job. That is why the best thing to do to get good repairs at a reasonable cost is to compare estimates of the best-rated local pros. Visit each of them, get to know their history, and the experience of technicians who will do the job.
Select a contractor that has experience in repairing AC at fair prices. You may accelerate this process with the help of our Free Local Estimates service.
After completing a short form and submitting it, you will shortly receive a call by three of the best AC repair and installation companies in your area. They are pre-screened in terms of experience and they are all licensed and insured to protect you. Click below to start and secure your home and wallet now.
Don’t Overpay for HVAC Services – Call 888-894-0154 Now to Compare Local Quotes!

How to Get the Best HVAC Prices
- Firstly, keep in mind that installation quality is always the most important thing for residential HVAC project. So never sacrifice contractor quality for a lower price.
- Secondly, remember to look up the latest rebates as we talked above.
- Thirdly, ask for at least 3 bids before you make the decision. You can click here to get 3 free estimates from your local contractors, and this estimate already takes rebates and tax credit into consideration and filter unqualified contractors automatically.
Lastly, once you chose the right contractor, remember to use the tactics from this guide: Homeowners Tactics When Negotiating with HVAC Dealer to get the final best price.