
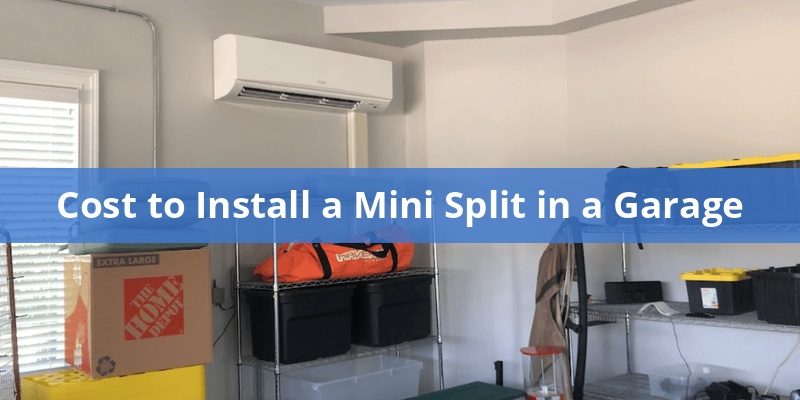
A mini split air conditioner can be installed in a garage and turn it into a comfortable and usable place all year round.
The average price of a mini split installation in a garage is approximately 3,500 dollars in the case of a single zone system among the American homeowners. But the real cost of installing mini split in a garage is usually between 2000 dollars on the lower side and 9000 dollars or more in complicated cases.
The overall cost will be determined by the type of mini split (single zone or multi-zone or ducted), the size of the garage, the labor costs and any additional work such as electrical wiring or insulation.
| Scenario | Typical Cost Range |
|---|---|
| DIY Installation | $800 – $3,500 |
| Professional Installation | $2,000 – $9,000 |
| Single-Zone Mini Split | $500 – $5,000 |
| Multi-Zone Mini Split | $1,400 – $12,000 |
| Ducted Mini Split System | $5,000 – $15,000 |
| 1-Car Garage (~250 sq. ft.) | $1,500 – $3,000 |
| 2-Car Garage (~500 sq. ft.) | $2,000 – $5,000 |
| 3-Car Garage (750+ sq. ft.) | $3,000 – $7,000 |
| Low-Cost Region (South/Midwest) | $1,500 – $4,000 |
| High-Cost Region (Coastal/NE) | $2,500 – $6,000 |
National Average Garage Mini Split Installation Cost
At the national scale, the price of installing a mini split in a garage is usually in a wide range. In a normal situation, most homeowners spend between 2000 and 9000 dollars in total to install a garage mini split.
The average cost nationally is about $3,000 to 3,500 on a typical single-zone ductless system in a two-car garage. This average is based on a mid-range system professionally installed and with no significant additional upgrades.
A number of factors will determine the point at which your project cost will fall on this range. The lower end (approximately 2,000 dollars) may be a smaller one-car garage with a simple unit, and the higher end (more than 5,000 dollars) may be a bigger three-car garage or a high-capacity premium system.
In more severe situations, e.g., when it is necessary to install several zones or perform a lot of preparation work, the sum might be up to 10,000 dollars and more. When you are estimating your budget, it is important to take into consideration your particular garage size, climate requirements and any adjustments that will be necessary.
Remember that these prices cover the mini split system as well as the average labor costs. They also presuppose that the installation is made in compliance with the code by a licensed HVAC specialist.
When you choose to do it yourself (more on that below), you may end up paying less out-of-pocket since you will primarily be paying the cost of the mini split kit. Nevertheless, having the system installed professionally can be worth the extra expense to many homeowners because the system will be installed properly to operate safely and efficiently.
Cost Comparison by Unit Type
The kind of mini split system; whether single-zone, multi-zone, or ducted vs. ductless system, is a major factor in cost. In general, the less complex systems that have one indoor unit are cheaper whereas more complex systems that have multiple zones or ductwork raise the cost. The cost is broken down below in terms of the effect of the unit type:
Don’t Overpay for HVAC Services – Call 888-894-0154 Now to Compare Local Quotes!
Single-Zone vs. Multi-Zone Systems
The most popular garage option is single-zone mini splits (one outdoor compressor and one indoor air handler). They are also the cheapest since they only serve a single space. The cost of a single-zone ductless mini split system to a garage is approximately 1500 to 5000 dollars depending on the brand and BTU capacity. This takes care of the requirements of a single location (your garage) with a special unit.
Multi-zone mini splits are systems that have a single outdoor unit to serve two or more indoor units (heads) in various zones. In a garage situation, you may want to look at a multi-zone system in case you want to heat/cool the garage and a nearby workshop or room or you have a very large garage and you want to have even cooling with two indoor heads. The multi-zone systems are more expensive to install.
The cost of the initial installation of a 2-zone system may begin at about 3,000 to 6,000 dollars and each extra zone (indoor unit) may cost about 1,000 to 3,000 dollars. As an example, a three-zone mini split system may be easily installed at the cost of $5,000 to 10,000 or more.
Briefly, the more zones, the more equipment (additional air handlers) and labor is required to install refrigerant lines in the various zones.
Ductless vs. Ducted Mini Splits
The majority of the mini split installations in garages are ductless, which implies that the indoor unit is mounted on the wall or ceiling and directly cools or heats the area without air ducts. Wall-mounted, ceiling cassette, or floor-mounted (ductless) systems are usually easier to install and fit in the price ranges described above.
An example is that simple wall-mounted ductless head is among the cheaper types, and it can help reduce the cost of the entire project.
Ducted mini split has an invisible air handler and is linked to ductwork that delivers air via vents. This method may be applied in case you desire a less visible appearance or to enable one mini split to heat/cool several zones through short ducts. Nevertheless, installation of ductwork normally makes the installation more complex and expensive.
A ducted mini split system may be about 1,000 -2,000 dollars more expensive than a similar ductless system of the same capacity. As an example, a ductless 18,000 BTU system to heat a large garage would cost about 4,000 dollars, a similar ducted 18,000 BTU system would cost 5,000 to 6,000 dollars because of the additional duct materials and labor.
The ductless units in garages are typically chosen by homeowners due to their ease of use, but it is better to be aware of the difference, a ducted mini split can be used in case you want to condition several adjacent areas or want the equipment to be hidden.
Labor Cost Breakdown: DIY vs. Professional Installation
Labor is an important component of the total cost. There are basically two ways that homeowners can go: either do it yourself or call in a licensed HVAC contractor. They both have different breakdowns of costs and considerations:
- Do it yourself Mini Split Installation: A DIY option may help you avoid most of the labor costs, and you will only be paying a significant amount of money to the mini split unit or kit itself. Mini split kits that are DIY friendly (like the MRCOOL DIY series) can range in price between 1,000 and 3,000 dollars depending on the BTU and features. You can save the usual 500-2000 dollars that would be paid to the professional labor by installing it yourself.
- Certain kits are already charged with refrigerant and quick-connect lines so that DIY is possible. Remember that electrical work can still be dangerous and require a licensed electrician (at 50-100 dollars an hour) to be safe and to pass code. In other cases, the manufacturer may void the warranty when the product is installed by the owner unless it is a product that is specifically rated to be installed by the owner.
- Professional Installation: Professional installation is more costly in the short term but guarantees professional installation. The cost of professional labor to install a garage mini split will be between 300 to 2000 dollars of the total cost of the project. The average HVAC technician will cost you approximately 50-100 dollars an hour, and a typical single-zone installation in a garage will take 4-8 hours.
- This involves installation of the units, connection of refrigerant pipes, evacuation and charging of the system (where not pre-charged) and electrical connections. It costs you more (labor can be 20-50% of the total cost), but you have the advantage of having the refrigerant handled properly (which is required by law in many jurisdictions), having workmanship guaranteed and keeping the full manufacturer warranty in place.
- A professional is also able to draw any permits required and make sure that the installation complies with the local building codes. The quote given by the contractor will in most instances combine the cost of the unit and installation.
Hint: Other homeowners choose a hybrid solution: they perform the simple preparation tasks (such as mounting brackets or drilling the hole in the wall) themselves and then call a professional to do the technical part. This can save a couple of hundred dollars in the labor cost and still make sure that the critical steps are taken right.
Cost by Garage Size
The cost of installation is greatly determined by the size of your garage. Bigger garages need mini splits of higher BTU (cooling/heating capacity) or even more than one, which raises the equipment and installation prices. The approximate guide to the size of garages and the anticipated expenditure is given below:
| Garage Size | Recommended Mini Split Size | Estimated Installed Cost |
|---|---|---|
| 1-Car Garage (approx. 200–300 sq. ft.) | 6,000–9,000 BTU (¾ ton) | $1,500 – $3,000 |
| 2-Car Garage (approx. 400–500 sq. ft.) | 12,000 BTU (1 ton) | $2,000 – $5,000 |
| 3-Car Garage (600–800+ sq. ft.) | 18,000 BTU (1.5 ton) or dual-zone | $3,000 – $7,000 |
*BTU recommendations assume the garage is reasonably insulated. Poor insulation or very high ceilings might require a higher BTU unit within the size range.
As it can be seen, a typical single-car garage may only require a small 3/4-ton mini split (approximately 6k to 9k BTUs) and this keeps the costs at the lower end. The price of a two-car garage is in the middle range because it requires a 1-ton (12k BTU) unit to cool and heat the garage.
A three-car or equivalent size workshop will require a larger 1.5-ton (18k BTU) mini split or even a dual-zone system. The cost is pushed to the upper end of the scale by this larger capacity equipment and additional materials (longer line sets, additional refrigerant or a second indoor unit).
In case your garage is somewhere in the middle (such as a two-car garage that is too large or a three-car garage that is too small), then the price will be adjusted accordingly. It is also worth mentioning that in case a single mini split unit cannot easily cover a large garage with air, an installer may suggest two smaller units, which are placed at opposite ends of the garage rather than a large one. That will make it more comfortable, but it will also add to the overall cost of the project (it will become a multi-zone installation in essence).
Regional Cost Variations
The price of installing a mini split in a garage may also differ according to the place you are living. Regional price differences are determined by labor rates, climate and local market conditions. These are some of the local considerations:
- Coasts and Northeast: In cities and states where living is more expensive, such as the Northeast (New York, Boston) or West Coast (California, Seattle), you will probably pay on the high end of the scale to have it installed. The labor rates of HVAC in these areas may be 10-20 percent higher than the national average.
- A mini split garage installation that may cost $3,000 in some other place may cost $4,000 or even more in a big coastal city. Also, the cost of permits and licensed contractor is higher in these regions.
- South and Midwest: The general cost is cheaper in most of the states in the South, Plains, or Midwest. The labor costs in these areas are usually cheap and there is a lot of competition between the contractors which may push the prices down.
- It is not unusual to find quotes that are a few hundred dollars below the national average of the same garage set up. As an example, a simple single-zone installation that would cost you 3,500 dollars on the West Coast may cost you around 2,500-3,000 dollars in a smaller city in the Midwest.
- Climate Factors: Harsh climates may also affect the prices. In extremely cold areas in the north, homeowners may opt to install a mini split model that is specifically made to operate in low temperatures (also referred to as a cold-climate heat pump), which may cost a little more than the regular models.
- Very hot regions might require a unit with a greater capacity or efficiency rating to deal with the heat, which might add to the cost of the equipment. Although such climate-related upgrades increase the initial cost, they make the system work efficiently in the conditions of your region.
- Rural vs. Urban: In case you are in a rural area, the pricing may be influenced by the availability of qualified installers. There is a possibility that some contractors will have a travel fee to get to your location and there will be less competition of HVAC companies.
- Conversely, the urban and suburban markets are more competitive in terms of service providers and the overall price (excluding the fact that labor is more expensive in the expensive metropolitan areas).
Brand and Model Pricing Comparison
The price will also be affected by the brand of mini split you will select. Brands that are premium are likely to be more expensive whereas DIY-oriented or less well-known brands may be less expensive.
The table below compares some of the more popular brands of mini split and their estimated prices of the equipment:
| Brand | Single-Zone System | Multi-Zone System |
|---|---|---|
| Mitsubishi (Trane) | $1,200 – $4,000 | $2,600 – $7,800 |
| Fujitsu (Rheem) | $1,100 – $3,900 | $2,300 – $8,300 |
| Daikin | $900 – $4,700 | $2,500 – $7,600 |
| LG | $900 – $4,200 | $2,000 – $7,600 |
| Panasonic | $950 – $2,900 | $2,200 – $6,000 |
| MRCOOL (DIY) | $700 – $2,400 | $2,200 – $5,900 |
| Gree | $750 – $3,200 | $1,950 – $6,000 |
*Ranges above are for typical mini split unit prices. Single-zone refers to one outdoor unit with one indoor unit; multi-zone refers to packages with multiple indoor units. These are equipment costs; adding professional installation will increase total project cost.
Don’t Overpay for HVAC Services – Call 888-894-0154 Now to Compare Local Quotes!
Mitsubishi (and its rebranded partner Trane) and Fujitsu are usually regarded as premium brands. They are very efficient and reliable but at a premium cost. These systems are on the high end of the price scale and homeowners should anticipate paying at least on the high side of the scale, such as a Mitsubishi single-zone installed could cost a homeowner upwards of $4,000. These brands also offer varieties that are meant to work in very cold weather and this may increase the cost.
Other established brands include Daikin and LG which are relatively priced at the middle range. Their units tend to be good in efficiency and quality and at moderate prices. A LG or Daikin system may be slightly cheaper than Mitsubishi on the same specs, a few hundred dollars perhaps.
MRCOOL, on the lower end of the price scale, is famous with DIY installation kits that are sold to the end-user. MRCOOL units are comparatively cheap (as depicted in the lower ranges above) and can save you money provided they are installed without the services of a professional. The cost can also be reduced by using competitively priced systems that are offered by Gree and some of the other emerging brands.
Although these cheaper alternatives can be effective, they can be less warrantied or need more precise Do-It-Yourself. It is prudent to do some research and read reviews and availability of support or parts of less popular brands.
It is important to note that most HVAC contractors install brands they like. When you employ a professional, he/she may suggest a particular brand (which may be the one he/she is a certified dealer of). Sometimes, the contractors receive a better price on specific brands and this may reduce the price gap.
Whichever brand you select, make sure that the model you select fits the size of your garage and what warranty and support is available as these are also part of the value equation in addition to the initial cost.
Hidden and Additional Costs
Other than the installation labor and the basic unit, other costs can be incurred during the installation of a garage mini split. These are some of the additional expenses that homeowners ought to plan:
- Electrical Work: A lot of mini splits need a 220-240V dedicated circuit. In case your garage is not already wired to the unit, you will require an electrician to either install new wiring or a new circuit breaker. This will cost you about 500 to 1500 dollars (or even more in case your electrical panel requires an upgrade). Safe electrical work is proper electrical work and may be code required.
- Insulation or Weatherproofing: In case your garage is not insulated or has air leakage, then you may consider investing in insulating walls, ceiling, or the garage door. Although insulation is not a strict component of the AC installation, it enhances the efficiency of the mini split tremendously.
- The cost of garage insulation will vary between approximately 1,000 dollars to 5,000+ dollars depending on the materials and size. Even the installation of some weatherstripping on the garage door or the sealing of the gaps (at a significantly lower price) can keep the conditioned air.
- Concrete Pad or Mounting Bracket: The outdoor compressor unit should be placed on a solid surface. In case you do not have an appropriate place, you might require a small concrete pad to be poured or a bracket that is mounted on the wall.
- A prefab condenser pad or wall bracket is not very expensive (about 50-200 dollars of materials). In case a special concrete pad is required, it may be slightly more expensive in terms of labor, but in most cases, it is a small part of the budget.
- Condensate Drain & Pump: The indoor unit will generate condensation (water) when it is in cooling mode. Installer typically will install a drain line out of the garage or into a floor drain. In case gravity drainage can not be used, you may require a condensate pump, which costs an extra $100 -$300 in parts and installation.
- It is a minor addition, but it is needed to automatically eliminate water in the unit.
- Line Set Accessories: Standard installation includes a given length of refrigerant line set (between the indoor and outdoor units). In case you need a longer line or special routing (such as when the units cannot be back-to-back) there may be a small additional cost to add more tubing or longer electrical conduit.
- Also, cosmetic line set covers (decorative PVC channels to cover the pipes on your exterior wall) may cost you $50 -150 in materials in case you want to add them to make it look cleaner.
- Permits and Inspection Fees: Forget not local permit fees. A permit to add an HVAC unit may cost 100-300 dollars in most places (more in certain cities). In case of wiring, an electrical permit may be required, which would be an additional cost of $50 -$200.
- These charges are highly dependent on the municipality, but in most instances they are compulsory and therefore included in the actual cost of the project. Permits (we will talk more about permits in the next section.)
- Miscellaneous & Unexpected Problems: No two garages are the same and occasionally unexpected work is required. As an example, when cutting into a wall, the installers may find mold or structural problems, or the location of the unit may need carpentry to construct a frame or enclosure, which increases expenses.
- It is prudent to allocate a small contingency budget (maybe 10 percent of the project cost) to any surprises.
Permits and Code Compliance
The process of installing a mini split in a garage is usually subject to the local building codes and permits. Permit skipping is not a good idea: it may result in fines, difficulties with selling your house, or even safety issues. The following is what you need to know about permits and code compliance:
Permits: The installation of a new HVAC device such as a mini split will require a permit in most jurisdictions. This could be a mechanical or HVAC permit and in the case of new electrical wiring being run an electrical permit also.
The permit fees are location-specific, but you can count on paying at least around $100 and as much as $500 in total on a project of this scale (usually in the $200-300 range on the HVAC permit, and perhaps a smaller fee on the electrical). When you contract a professional installer, he/she will typically take care of drawing the required permits and add the cost of the permits to your quote.
DIY installers are advised to take the initiative of inquiring with the building department of the city or county regarding the permits. Once installed, an inspector might have to sign off the work in order to close the permit.
Code Requirements: The electrical and mechanical codes that apply to a garage mini split installation are the same as those that apply to any other HVAC install, this is to ensure safety. The main ones are the proper gauge electrical wire and circuit breaker size to the unit, a shut-off disconnect switch to be installed near the out-door unit (electrical code requirement), and the units should be mounted according to the manufacturer specifications (clearances to the ceiling, walls, etc.).
Penetrations through walls (of the line set) must be sealed and firestopped where necessary. Notably, the work with refrigerant lines must be performed by the EPA-certified technicians; it is illegal and hazardous to vent or release refrigerant. Although a DIY kit does not involve open handling of refrigerants, any alteration to the design of the kit would involve a pro.
When you code, you make the system safe (no overheating wires or leaks) and keep your homeowner insurance in effect.
In short, consider the cost of factor permits and some time to inspect your project in your project plan. A good contractor will ensure that your new garage mini split is up to all the codes. When you are doing some of the install yourself, do not skimp on permit paperwork or code specs, the immediate cost savings are not worth the long term hassles.
Don’t Overpay for HVAC Services – Call 888-894-0154 Now to Compare Local Quotes!
Cost-Saving Tips for Homeowners
Your garage mini split is an investment, and there are a few methods of cutting down the cost without compromising the quality. The following are some of the tips that you can follow to save money on your garage mini split installation:
- Off-Season Plan Installation: HVAC companies are the busiest during the hot summer months and the coldest winter months. Ideally, you should have your mini split installed during the off-season (e.g. late fall, winter, or early spring). The off-season discounts may be offered by the installers or they are more likely to negotiate the price when they are not in demand. You will also get faster scheduling.
- Obtain Several Estimates: The prices may differ considerably among contractors. Whenever you need to hire a licensed HVAC professional, at least two or three quotes are always necessary. Ensure that all quotes are on the same scope of work (same BTU size, similar equipment) to enable you to compare apples to apples.
- You may save hundreds of dollars on a lower bid and you may also use quotes to negotiate a better price with your favorite installer.
- Do Preparatory Work: Although the actual installation of the mini split should be left to the professionals (or a special DIY kit), you can reduce the amount of paid work by doing some of the preparatory work. As an example, you may pour a small concrete pad where the outdoor unit will go ahead of time, clear out clutter and make the installation area easy to access, or even pre-drill the hole through the wall, in case you have experience using masonry drills.
- Likewise, you can pre-insulate and weather-strip your garage to make it more efficient and possibly enable a smaller unit. By doing the simple chores, you will save the number of hours that an installer will bill you.
- Select the Appropriate Size (Do not Oversize): You should select a mini split with the output that suits the size of your garage. Large units are not only expensive to purchase, but they are also capable of short-cycling and wasting energy.
- Follow the BTU suggestion of your contractor or online sizing calculators. When your garage is on the border of the sizes, it is better to choose a smaller one in case it is well-insulated. This will reduce the cost of equipment and you will not be paying more than you are using.
- Think Long-Term Savings: Energy Efficiency Energy Efficiency Energy Efficiency Energy Efficiency Energy Efficiency Energy Efficiency Energy Efficiency Energy Efficiency Energy Efficiency Energy Efficiency Energy Efficiency Energy Efficiency Energy Efficiency Energy Efficiency Energy Efficiency Energy Efficiency Energy Efficiency Energy Efficiency Energy Efficiency Energy Efficiency Energy Efficiency Energy Efficiency Energy Efficiency Energy Efficiency Energy Efficiency Energy Efficiency Energy Efficiency Energy Efficiency Energy Efficiency Energy Efficiency Energy Efficiency Energy Efficiency Energy Efficiency Energy Efficiency Energy Efficiency Energy Efficiency Energy Efficiency Energy Efficiency Energy Efficiency Energy Efficiency With time, a good unit will save you money in your utility bills.
- In some cases utilities or governments provide rebates or tax credits on energy-efficient heat pump systems. Look to see what incentives may be available in your area, a few hundred dollar rebate or a federal tax credit can be a good way to cut your installation cost.
- Seek Promotions or Package Deals: There are HVAC installers who offer seasonal promotions, e.g., a price reduction on the installation or a free thermostat upgrade upon purchase. And, in case you have other home improvement requirements (such as electric vehicle charger in the garage or a new garage door opener), you may be able to find a contractor who will offer a package deal discount.
- There is no harm in asking whether bundling of projects can be used to save on the total costs.
Pros and Cons of Installing a Mini Split in the Garage
Pros
- All-Season Comfort: A mini split can cool you down in summer and warm you up in winter (assuming that you select a heat pump model). This implies that your garage can be a cool working place or a gym all year round, rather than sweltering hot or chilly cold.
- Effective, Specific Climate Control: Ductless mini splits are highly efficient and since they are zoned, you only cool or heat the garage when you want to. This focused system may be less costly to operate than expanding your main HVAC or installing ineffective space heaters or window air conditioners.
- No Ductwork or Major Construction: A mini split is a comparatively small renovation. The lines only need a small hole in the wall, there is no need to extend ducts and make major structural modifications.
- It is a relatively fast (usually done in a day) and usually less invasive process than retrofitting a garage with traditional HVAC.
- Saves Your Property: Maintaining the garage at a comfortable temperature can save tools, equipment, and stored items against the extremes of temperature and humidity. As an example, your car, power tools and lawn equipment will not be exposed to scorching heat or wet cold, which may prolong their life.
- Quiet Operation: Mini split systems have a reputation of operating quietly, in comparison to portable AC units or noisy garage fans. The compressor is the noisiest part (it is placed outside) and the indoor unit is low-noise. This is excellent in garages that have been converted to workshops or hobby rooms where you need quiet.
- Creates Useable Space: By making the garage comfortable, you essentially get more living or working space. Regardless of whether you need to use the garage as a home office, home gym, or entertainment space, a mini split allows such use. This has an indirect value addition to your home in terms of space.
Cons
- High Initial Investment: A mini split is a major investment compared to a regular fan or space heater. It may not be worth spending a few thousand dollars on a garage climate system when you use it only occasionally. The high initial cost is a big deterrent to most homeowners.
- Higher Energy Costs: Using any air conditioner or heater will increase your energy costs every month. Although mini splits are energy efficient, when you begin to use them to cool your garage on a regular basis, your electric bill will increase.
- It is a recurring expense to keep in mind, but it should be reasonable in the case of occasional use and significantly lower than in the case of conditioning the space with less efficient solutions.
- Firstly, keep in mind that installation quality is always the most important thing for residential HVAC project. So never sacrifice contractor quality for a lower price.
- Secondly, remember to look up the latest rebates as we talked above.
- Thirdly, ask for at least 3 bids before you make the decision. You can click here to get 3 free estimates from your local contractors, and this estimate already takes rebates and tax credit into consideration and filter unqualified contractors automatically.

How to Get the Best HVAC Prices
Lastly, once you chose the right contractor, remember to use the tactics from this guide: Homeowners Tactics When Negotiating with HVAC Dealer to get the final best price.