

For spaces of about 400–500 sq ft, a ductless mini split is an efficient and flexible cooling and heating solution.
The best contenders in this size range offer easy enough DIY installation that you can set them up without calling in a pro.
Here is an expedited rundown of the leading single-zone mini-split systems parting around 9,000 to 12,000 BTUs, which makes them suitable for cooling and heating spaces of around 400 to 500 square feet.
We found them all to be extremely DIY-friendly, relatively easy to install, and very energy efficient. The systems we’ve highlighted range widely in terms of their DIY-friendly features, energy efficiency, and value.
| Product | BTU (Coverage) | DIY Install | Efficiency & Features |
|---|---|---|---|
| MRCOOL DIY 12,000 BTU | 12,000 BTU (~500 sq ft) | Pre-charged Quick Connect | ~20 SEER2, Energy Star, WiFi App |
| Pioneer 12,000 BTU | 12,000 BTU (~500 sq ft) | Standard (Vacuum Needed) | ~19–20 SEER, Quiet Operation |
| Senville LETO 12,000 BTU | 12,000 BTU (~500 sq ft) | Standard (Vacuum Needed) | 20.8 SEER2, Alexa-Enabled Smart |
| Klimaire DIY 12,000 BTU | 12,000 BTU (~500 sq ft) | Pre-charged Quick Connect | 19 SEER2, -13°F Heating, WiFi |
| Perfect Aire DIY 12,000 BTU | 12,000 BTU (~500 sq ft) | Pre-charged Quick Connect | ~19.5 SEER, WiFi, No HVAC Needed |
| Cooper & Hunter 12,000 BTU | 12,000 BTU (~500 sq ft) | Standard (Vacuum Needed) | 20.8 SEER2, 115V, Quiet & Reliable |
#1 MRCOOL DIY 12,000 BTU Ductless Heat Pump (Easy Quick-Connect Install)
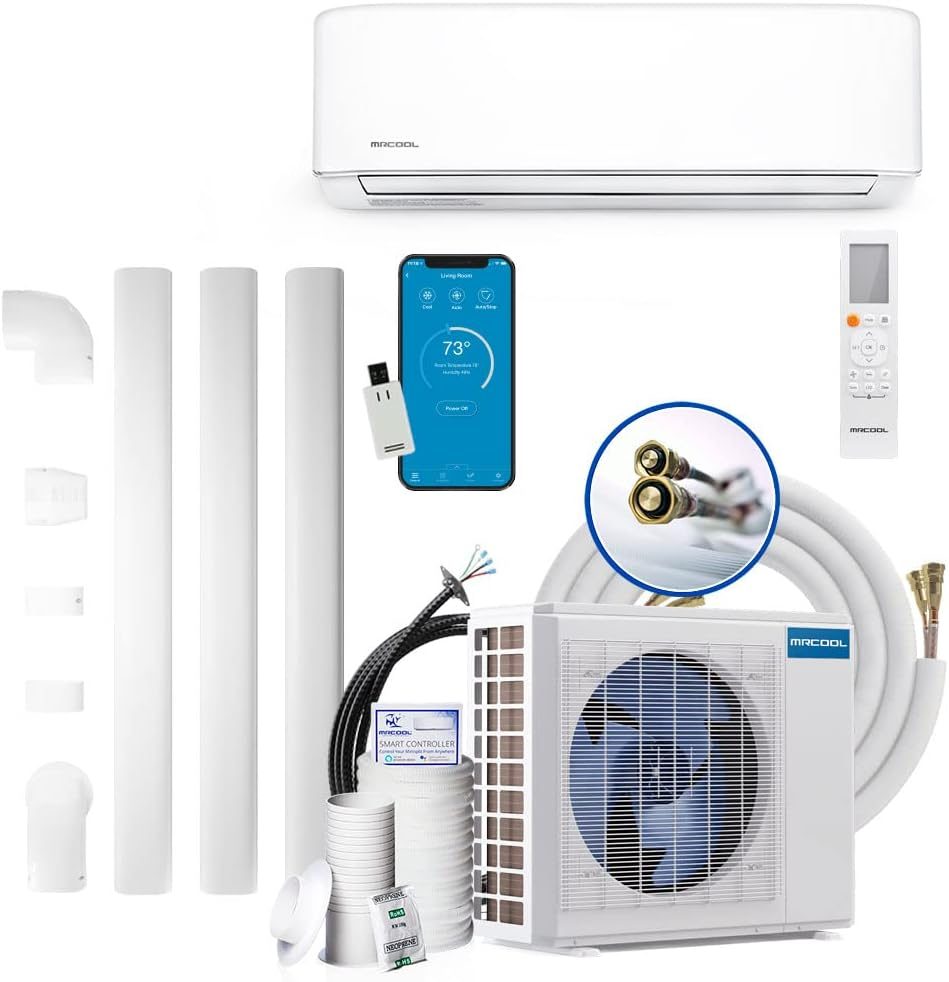
MRCOOL is a brand that focuses on providing easy-to-install heating and cooling systems.
The DIY 12,000 BTU Ductless Heat Pump is one of their most popular units, with good reason. Its key selling point is that, unlike most mini-split systems, this one can be installed without hiring a professional.
The MRCOOL DIY 12,000 BTU mini split is a top choice for DIY enthusiasts cooling ~500 sq ft spaces.
It comes with a pre-charged line set and patented quick-connect fittings, so no vacuum pump or special tools are required. Homeowners can mount the indoor air handler, connect the lines, and simply open the valves to release refrigerant.
This 4th generation MRCOOL model is energy star rated with a high ~22 SEER (around 20 SEER2), meaning that it is extremely efficient for both cooling and heating.
It’s a full heat pump system, providing cozy warmth in winter (rated to heat down to ~5°F). It also includes built-in WiFi smart control via the MRCOOL app, plus it is Alexa and Google Assistant compatible for convenient voice or phone control.
#2 Pioneer 12,000 BTU Inverter+ Mini Split (Budget-Friendly Classic)

A longtime best seller due to its low price and solid performance, the Pioneer 12,000 BTU ductless mini-split is an inverter-driven heat pump that cools and heats a space of about 450 square feet (up to about 500 square feet in moderate climates).
It has an acceptable SEER rating of around 19 to 20 (if you look at it according to the old way of calculating SEER, it’s more like 17.5 SEER2).
Because of its decent efficiency, the Pioneer will save you a lot of energy and money compared to old A/C units and space heaters. Its indoor air handler is absurdly quiet.
User reports say it runs as low as 23 decibels in its quiet mode, so it’s great for bedrooms, offices, or workshops where
#3 Senville LETO Series 12,000 BTU Mini Split (Smart Home Enabled)
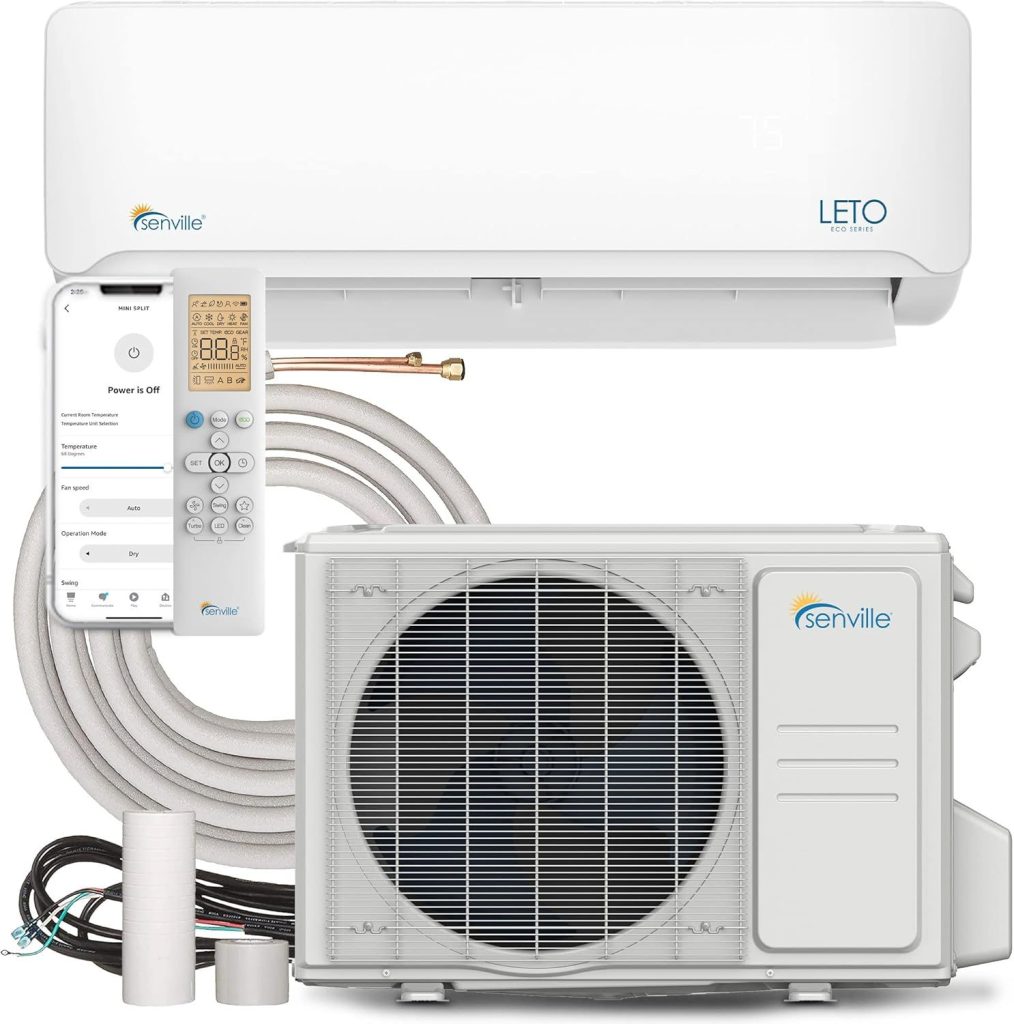
The mini split Senville LETO 12,000 BTU distinguishes itself with its intelligent characteristics and all-season efficiency, making it a fantastic option for cooling and heating a space around 400–500 sq ft, like a bedroom or small apartment.
This unit is outfitted with a high-efficiency inverter compressor with a SEER2 rating of 20.8, which is roughly equal to a 21 or 22 SEER.
A big plus of the Senville LETO is its out-of-the-box Alexa compatibility, which allows the user to give voice commands or to use the mobile app to control the temperature and settings from anywhere, which is obviously the kind of intelligent interface you want when you’re chilling in a room in 90°F heat and don’t want to move to warm up or cool down the place.
#4 Klimaire DIY 12,000 BTU Quick-Connect Mini Split (115V Plug-and-Play)
The DIY 12,000 BTU mini split kit from Klimaire is intended for simple installation and reliable year-round comfort in spaces of up to about 500 sq ft.
Its pre-charged line set of 25 ft and innovative plug-in wiring harness make for a true do-it-yourself system, allowing you to handle the indoor and outdoor components without vacuuming the lines or dealing with refrigerants either before or after installation.
And if you’re worried about not having 220V service in your home: the indoor and outdoor units run off standard 115V power, so you can hook everything up with the electrical service already available to most U.S. homeowners (no additional circuits needed).
If for some weird reason you’re in the market for an air conditioner capable of running in very low temperatures, the Klimaire DIY mini split unit is for you.
With a heat pump that maintains robust performance down to 13° below zero, it can warm your uninsulated feats of engineering (a garage, loft, or sunroom) toasty enough to make them habitable come January and February.
#5 Perfect Aire 12,000 BTU DIY Mini Split System (Quick Setup with WiFi)

The Perfect Aire DIY 12,000 BTU mini split serves an efficient function of cooling and heating spaces of about 450-500 sq. ft.
This single-zone ductless system is set up for easy installation by non-professionals.
We found it had all the necessary ingredients to getting started with everything unboxed and out of the way.
This system uses pre-charged line sets and quick-connect adapters, which essentially means that this installation shouldn’t require any refrigerant charging or vacuuming of the system itself.
#6 Cooper & Hunter 12,000 BTU Ductless Mini Split (High Efficiency 115V Option)
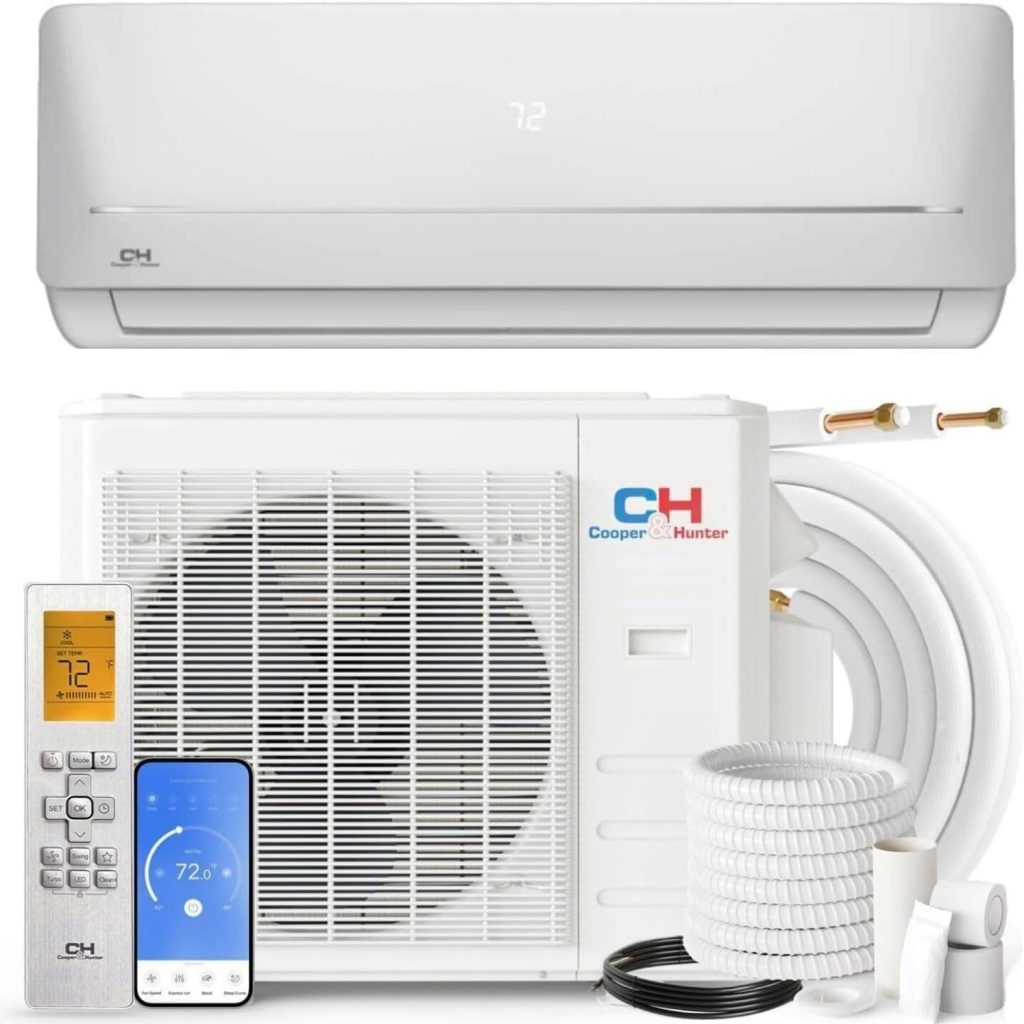
Cooper & Hunter 12,000 BTU mini split systems have built a solid reputation for quality and performance, making them a feasible option for the cooling and heating of midsize rooms (400-600 sq. ft.).
The company offers a model in that class, called the Mia series, that runs on 115V.
For DIYers, this makes the installation a lot easier, because you can just plug it into a standard, dedicated 115V outlet.
The efficiency rating for the outdoor unit is around 20-21 SEER, which is pretty remarkable; if the unit can really achieve those numbers, then you should expect to see significant electricity savings with it compared to running a standard window or portable air conditioner.
Buying Guide: Choosing a Mini Split for 400–500 Sq Ft
When it comes to choosing the best mini split for a 400 to 500 square foot space, you’ll want to take a few key considerations into account.
In this guide, we’ll cover how to size your system, what makes a unit friendly for DIY installation, and other factors like efficient operation, required voltage, features, and warranty that are crucial when making your decision.
Armed with this info, you can go forth and make a choice that will have you enjoying comfortable, efficient heating and cooling in your space for years to come.
Sizing Your Mini Split (BTU Capacity for Room Size)
Getting the right BTU capacity is crucial for efficient cooling and heating.
For a room or open area of ~400–500 sq ft, you’ll generally need a mini split in the 9,000 to 12,000 BTU range.
This corresponds to about 3/4 ton to 1 ton of cooling capacity.
In many cases, 12,000 BTU (1 ton) is the safe choice for up to 500 sq ft; it ensures the unit isn’t running at max power constantly, especially in hotter climates.
On the other hand, avoid going significantly oversized; a much larger BTU unit will short-cycle (turn on and off frequently), which can lead to uneven cooling, higher humidity, and wear out the compressor faster.
All the products recommended above are properly sized for this square footage.
DIY-Friendly Installation (Pre-Charged vs. Standard Systems)
For many buyers, a key consideration is whether the mini-split can be installed without a pro.
Almost all manufacturers make a mini-split system that has the outdoor unit pre-charged with refrigerant. For these systems, the line set—the refrigerant lines—must first be evacuated of air and moisture before it can be filled with refrigerant and put to work.
This process requires a vacuum pump, gauges, and some HVAC know-how to do right, and that’s why professional installation is often recommended.
But several manufacturers have introduced kits that allow guilt-free DIY installation while skipping the subsequent charge and the pro who would normally do it.
These kits feature pre-charged line sets that are sealed at the factory; quick-connect fittings that either snap-together or tighten with a wrench (to safely and worry-free open the line); and some truly remarkable helper features that make it as close to plug-and-play as possible.
Brands like MRCOOL, Klimaire, Perfect Aire (and others like DIY versions of Pioneer or Senville, if those are available) provide these pretty friendly solutions.
A DIY mini-split system can save you a significant chunk of change on installation costs (frequently over $1000).
If you’re game, the process typically requires mounting the air handler unit on a wall (with necessary brackets); drilling a hole for the appropriately-sized line set (boring a hole through concrete? for that, you might consider a hammer drill); placing the outdoor condenser on a pad (or up a wall bracket); and connecting the refrigerant lines and wiring.
A couple downside considerations for this technology: if you do self-install an impractical system (like most standard mini-splits), you’ll probably void the warranty; and if you don’t achieve or maintain a proper torque on all the line set fittings, you’re kinda asking for a sizable leak.
Efficiency Ratings (SEER and SEER2 Explained)

Mini split systems are highly energy efficient, and their efficiency is rated using numbers like SEER and the newer SEER2. SEER stands for Seasonal Energy Efficiency Ratio, and in simple terms, it’s the amount of cooling produced divided by the amount of energy consumed over the typical cooling season (a higher SEER number means the unit is more efficient).
Beginning in 2023, SEER2 is an updated standard using a slightly different testing procedure with more realistic external static pressures.
SEER2 numbers are about five percent lower (so a 21 SEER unit might be about a 20 SEER2 unit).
All of the mini splits recommended for 400 to 500 square feet in this article have very high efficiency ratings, typically in the 19 to 22 SEER (17 to 21 SEER2) range.
Heating Performance (Heat Pump Benefits and Cold Climate Considerations)
One of the great advantages of mini splits is that most are heat pumps, meaning they can heat as well as cool. For a 400–500 sq ft area, a 12,000 BTU heat pump can serve as the primary source of heating in milder winter conditions and as a very effective supplemental heater in colder regions.
Look at the heating specifications when choosing a mini split.
Check the HSPF (Heating Seasonal Performance Factor) or the newer HSPF2. Also check the lowest ambient temperature at which the unit can provide heat. In this list, the Klimaire DIY, for instance, provides heat down to -13°F.
If you plan to rely on your mini split for heating in a place with severe cold, choose one known for its low-temperature capabilities.
In moderate climates, any of the listed models will handily survive winter.
All the models we discussed have built-in defrost cycles for winter (to clear ice from the outdoor unit) and many have low-ambient controls to ensure stable operation in the cold.
115V vs 230V (Electrical Considerations)
Mini splits in the 9k-12k BTU range often come in two voltage variants: 115V (110/120V) or 230V (208/230V).
Both will perform the same cooling/heating, but the difference matters for installation.
A 115V unit can typically be wired into a standard household circuit (most likely a dedicated 15- or 20-amp circuit). Some smaller 115V mini splits even come with a power cord and plug that can go into a standard outlet (though often you’ll still hardwire it to a disconnect switch).
The advantage of 115V models is that if your breaker panel is already near capacity or you don’t have 240V available in the area you’re installing, you can potentially DIY the electrical part more easily. For example, MRCOOL’s 115V 12k unit can be plugged in (it draws around 13-14 amps at max, so it needs a 15A circuit). Cooper & Hunter’s Mia series 115V is similar.
Always check the manufacturer’s requirements; some 115V units specify a dedicated 20A circuit and include a power whip rather than a plug, meaning you’ll wire it to a disconnect just like a 230V unit but using one hot leg instead of two.
The 230V units need a two-pole circuit breaker and appropriately gauged wiring. That usually means a 15A 2-pole breaker and 14/2 or 12/2 with ground cable (the difference depending on how many amps the circuit really delivers) if you are working in the USA and doing what the NEC says to do.
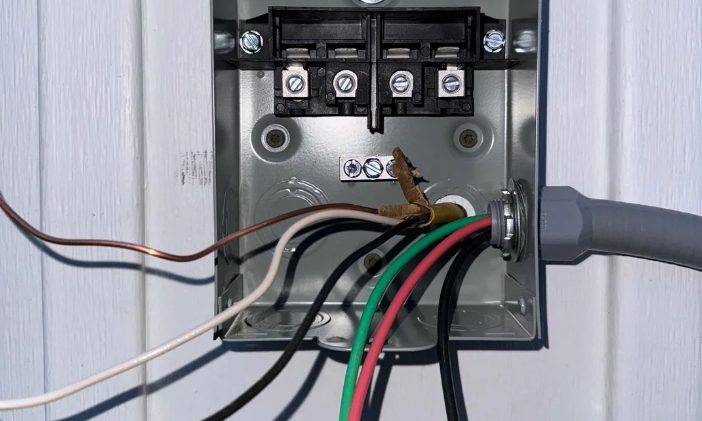
That’s the National Electrical Code for you non-electrical types. If you are not a fan of electrical work, you might need an electrician to help you with this part. You might also repurpose an existing 230V circuit if you have one hanging around, but unused in your place, from a previous project or appliance.
When planning your do-it-yourself installation, take care to comply with all local electrical codes. Most provide for the installation of a local service disconnect box, mounted right next to your outdoor unit. Pretty much any installation kit you purchase will include the appropriate hardware to successfully complete this step. And don’t worry — these local service disconnect boxes are designed for you to install without the help of a licensed electrician.
You will also need to use the right gauge of wire, and run it through a conduit that’s sufficiently weatherproof. This is also covered in most installation guides, and the DIY kits themselves usually provide the necessary wire and conduits.