

A ductless mini split has the ability to make a hot or cold garage a comfortable working or storage space, even without being a professional HVAC installer.
This guide discusses the best single-zone mini split systems to unconditioned, detached garages that can be addressed as DIY projects.
We specialize in systems that have pre-charged refrigerant lines or easy to install kits so you do not have to get HVAC certified.
The table below is a brief comparison of our best choices, after which we will have a detailed buying guide and reviews.
| Mini Split System | Capacity (BTU) | Voltage | SEER2 / HSPF | Coverage (up to) | DIY-Friendly Features |
|---|---|---|---|---|---|
| MRCOOL DIY 4th Gen 24,000 BTU | 24,000 BTU (2 Ton) | 230V | ~18-20 SEER2 / 10 HSPF | 1,200–1,500 sq ft | Pre-charged 25ft quick-connect line set, WiFi Smart Kit |
| Klimaire DIY 12,000 BTU | 12,000 BTU (1 Ton) | 115V | 19 SEER2 / 9.5 HSPF | ~500–600 sq ft | Pre-charged 25ft quick-connect lines, Alexa WiFi app |
| Senville LETO Series 12,000 BTU | 12,000 BTU (1 Ton) | 115V or 230V | 20.8 SEER2 / 9 HSPF | ~450–550 sq ft | Full installation kit (16ft lines) – vacuum pump needed |
| Pioneer Diamante 12,000 BTU | 12,000 BTU (1 Ton) | 208/230V | ~19 SEER / 9.5 HSPF | ~500–600 sq ft | Complete install kit (16ft lines) – vacuum pump needed |
| DELLA Alexa-Enabled 12,000 BTU | 12,000 BTU (1 Ton) | 115V | 19 SEER2 / 9 HSPF | ~450–550 sq ft | WiFi + Alexa voice control, 16ft kit – vacuum pump needed |
| Cooper & Hunter Hyper Heat 12,000 BTU | 12,000 BTU (1 Ton) | 230V | 22 SEER / 12.7 HSPF4 | ~500–600 sq ft | Low-temp heating to -22°F, 16ft install kit – vacuum needed |
Key Features When Choosing a Garage Mini Split
Heating and Cooling Capacity (BTUs)
The size of the mini split must be equivalent to the size of your garage and the climate. The capacity is rated in BTUs: e.g. 12,000 BTU (1 ton) is usually adequate in a 1-car garage (~450550 sq. ft.), whereas a 2-car garage (~8001,000 sq. ft.) may require 18,00024,000 BTU.
When your garage is not well insulated or it is in a very harsh climate, you may want to size up to ensure that it is well heated during winter and cooled during summer. A unit that is too small will not be able to keep up with comfort and a unit that is too large can short-cycle and use excessive energy. The majority of mini splits are also heat pumps, and they can cool and heat you down, so make sure that the heating BTU rating of the unit is sufficient to meet your winter requirements.
Garage Insulation and Climate
Remember the quality of insulation of your garage. A garage without insulation and drafty doors will lose heat and cool air very fast and you might require a higher BTU or better insulation to get the best results.
In cold climates, seek mini splits that promote low ambient heating capacity (some can run down to 0F or even -13F with the help of sophisticated compressors and freeze protection ). In case you intend to heat your garage in subzero temperatures, a “hyper heat” or low-ambient model (such as the Cooper & Hunter unit) is worth considering, because it can maintain heating at -22 o F. On the other hand, in extremely hot climates, make sure that the system is able to cope with high outdoor temperatures to cool.
Voltage and Electrical Requirements
Mini splits are available in 115V or 230V. The advantage of a 115V unit is that it can be connected to a normal household circuit (although it will usually require a special 15-20 amp breaker). This is convenient to DIY in garages where there is no 230V line.
Nevertheless, the 115V models tend to have a maximum of 12,000 BTU. Units with a higher capacity (18,000 BTU and more) need 208/230V power and a special circuit with a disconnect switch. Electrical work: you might need an electrician to run a new 230V circuit to your garage, and you will need to plan this. Never use more than the local electrical codes allow and consider adding a correctly sized breaker and surge protector as suggested by the manufacturer.
DIY-Friendliness (Pre-Charged Linesets)
To make a DIY installation easier, seek models with the label of DIY mini splits, which have pre-charged, quick-connect refrigerant lines. These systems are supplied with the refrigerant sealed in the outdoor unit and lines and therefore you can connect the indoor and outdoor unit without using refrigerant or vacuum pumps.
As an example, MRCOOL and Klimaire provide kits that have pre-charged line sets that can be screwed together, no vacuum evacuation is required . This will save much time and will not require special tools or an EPA certification. In case you select a traditional mini split (such as Senville, Pioneer, etc.), the system will only be pre-charged in the outdoor condenser. During installation, you will still have to vacuum the lines, and charge the refrigerant into the system.
This semi-DIY can be accomplished with a vacuum pump and manifold gauges, but most enthusiasts rent the equipment or contract a technician to do the last step. Full DIY-friendly models with quick-connect lines eliminate that obstacle entirely.
Energy Efficiency (SEER/HSPF Ratings)
The most important thing is efficiency in case you will use your garage AC/heater regularly. Consider the SEER2 rating (Seasonal Energy Efficiency Ratio) on cooling and HSPF2 (Heating Seasonal Performance Factor) on heating.
The greater the numbers the more efficient the operation and the less the energy bills. The most efficient mini splits to use in garages will be those with SEER2 ratings of ~18 to 20+ SEER2, which is much more efficient than the old window units or space heaters. To give an example, our best options are approximately 19-22 SEER, and a typical window AC is ~13 SEER. This efficiency gap can be converted to significant savings in the long run . A high-efficiency mini split does not waste electricity even in a garage that is used occasionally.
Also think about such features as inverter compressors (all modern units have them, they adjust speed to save energy) and modes such as Eco or Sleep mode to save even more when you do not need full power.
Controls and Smart Features
A lot of garage mini splits are now WiFi enabled and smart. This will allow you to control temperature or program the schedules using your phone, which is convenient in case you need to pre-cool or pre-heat the garage before you begin working.
Some of our suggested models (such as the Senville and Della) are also compatible with Amazon Alexa or Google Assistant to be controlled by voice. Units come with an IR remote at least, but WiFi apps offer greater flexibility including programming timers, tracking energy consumption, and automating the unit into smart home routines (e.g. turning on the AC when your garage door opens).
These features are not necessary but they are convenient, particularly in case your garage is separate, you will not need to go outside to change the thermostat.
Pros and Cons of Installing a Mini Split in a Garage
There are many benefits of installing a mini split in your garage, and some considerations as well. So what are the big pluses and minuses:
Benefits of a Garage Mini Split
- All-Season Comfort: A ductless mini split will cool and heat your garage so it can be used during summer heat waves or winter freezes. It provides powerful, uniform cooling/heating in the space unlike space heaters or portable ACs.
- Energy Efficiency: Mini splits are among the most energy efficient HVAC systems. They do not use much energy to keep the house comfortable because they have high SEER2 ratings and no duct losses . This may imply reduced bills as opposed to using electric heaters during winter or ineffective window air conditioners during summer.
- Simple Installation (No Ducts): They are ductless, so the installation is simple, mounting the units and drilling a 3” hole through which the line set is installed, much easier than extending ductwork out of the house. It is also possible to install within a weekend without significant renovation due to DIY friendly kits.
- Quiet Operation: Mini splits are very quiet, in comparison to portable AC units or loud gas heaters. The compressor is external and the indoor air handlers tend to be at library level noise at low fan speeds (30-40 dB). This is excellent in case you use your garage as a workshop or a gym, you will not be overwhelmed by noise.
- Keeps Vehicle and Tool Healthy: A mini split can keep tools rust-free, classic cars condensation free, or stored materials warp-free by regulating humidity and extreme temperatures. It is not only about personal comfort, but it saves your investments in the garage.
- Zoning & Control: The garage mini split is not connected to the HVAC of your home, so you can only use it when necessary. This zoning implies that you do not have to waste energy cooling or heating the garage when it is not in use. You could also put it on a maintenance temperature (such as 45-50F in the winter) to keep everything above freezing without having to heat it up to room temperature.
Potential Drawbacks
- Installation Cost and Effort: A mini split is a big investment, although it is less expensive than central air installation. DIY models do not involve labor costs, however, you will still have to buy the equipment (usually 700-2000+ dollars depending on BTU). You might have to hire assistance in some steps in case you are not comfortable with electrical work or drilling through walls.
- Electrical Requirements: It can be complicated by adding a 230V circuit (larger units) or even a dedicated 115V circuit. A small electrical service or bad wiring may be dangerous. This is not a plug and play appliance unless you select a 115V one and even then it ought to be a dedicated circuit.
- Performance in Lowly Insulated Areas: In case your garage is not insulated, the mini split will be forced to work extra hard to keep the temperature. It may not perform well in very hot or cold days unless you also invest in simple insulation (e.g. insulating garage doors, sealing gaps). When there is no insulation, part of the efficiency is lost because heat can easily pass through walls.
- No Fresh Air Ventilation: Unlike all ductless systems, mini splits recirculate indoor air and do not provide outside fresh air by default . This implies that in a garage, car fumes or chemical fumes must be controlled by opening a window or door at some intervals. The mini split will clean the dust and dehumidify, however, it will not exchange air as a ventilator does.
- Look and Space: You will be having an indoor air handler unit on your garage wall (usually high). This is not a big deal in most garages but it is something that can be seen. In addition, the condenser unit will occupy some ground space or wall-mount space outside. Be sure to have a place to put it where it will not be obtrusive (many of them mount it on an outside wall or on a pad at ground level).
- Maintenance Requirements: Mini splits do not require much maintenance (and are described below), but they do need some maintenance such as cleaning filters. Failure to maintain may cause inefficiency and short life. Therefore, having one implies having to deal with those routine tasks, although they are not challenging.
DIY Installation Tips for Garage Mini Splits
The fact that a mini split can be a DIY project is one of the major attractions of these systems because all you need is the right kit. These are some tips and tools suggestions to make the installation easy:
- Pre-plan Your Mounting Sites: The indoor unit should be placed high on the garage wall, in the middle of the garage, so that the air can be distributed well. Make sure that there are no studs, plumbing or electric lines where the 3 hole will be cut through the wall. The condenser must be mounted on a solid pad or a few inches off the ground when mounted against a wall (so that it is not in the snow or puddles). Ensure that there is the necessary clearances around the unit to allow airflow (typically 12-24” away from walls, check the manual).
- Prepare the Right Tools: You will require basic hand tools (drill, hole saw or masonry bit to drill the hole in the wall, screwdrivers, level, wrench set). Positioning can be assisted by a stud finder and measuring tape. Otherwise, you will need a vacuum pump and HVAC gauge set, as well, to evacuate the lines, in case you are not using a pre-charged line set.
- In the case of quick-connect DIY units, you will not require the vacuum, but you will require two adjustable wrenches to tighten the connections of the refrigerant lines. Flare nuts are recommended to be tightened using a torque wrench in case your unit is using flared connections.
- Install the Indoor Unit and Line Set: Installation of the indoor unit and line set should be done carefully by following the template to drill the hole through the wall at the correct position behind the indoor unit. A helper is usually the easiest: one person feeds the copper line set, drain hose and cable through the hole and the other person mounts the indoor air handler on its bracket.
- Handle the line to be set gently so as to prevent kinks. Most DIY kits are supplied with pre-bent copper – do not re-bend tightly.
- Refrigerant Line Connections: It will be plug and play (threaded couplings) in case of a pre-charged quick-connect system. Nevertheless, recheck the instructions, most of the time you will be removing caps and hand tightening, and then tightening with wrenches.
- When the refrigerant is connected fully, it releases automatically. Apply leak detection solution or soapy water to connections to make sure that there are no bubbles (leaks). In non-quick-connect units, you will connect the flared lines and then vacuum pump the system to approximately 500 microns and then open the service valves to vent the refrigerant.
- Electrical Wiring: Whenever working on the electrical hookup, cut the power at the breaker. Mini splits normally require a special disconnect box close to the outdoor unit.
- You will also have a power whip that will run between the disconnect and the condenser (the MRCOOL DIY, as an example, has an electrical whip already wired). Connect also the signal cable of the indoor unit to the outdoor unit as directed (the numbered wires must correspond at both ends).
- You may not feel confident about high-voltage wiring, in which case it would be worth employing an electrician to do this section, as it is important to safety.
- Test Run and Calibration: After installation, make a test run in cooling and heating modes. It is normal that a mini split has a delay of 3-5 minutes before the compressor starts to work.
- Make sure that cool air is released inside when the mode is AC and warm air when the mode is Heat. Check to see that there are no strange vibrations or noises (if the unit is rattling, it may require remounting more tightly or on vibration pads). Make sure also that the condensate (water) is draining out to the outside through the drain hose.
In general, be patient with every step. The DIY-oriented units have rather detailed installation instructions, which should be adhered to.
Pulling a vacuum on non-DIY units is also necessary to remove moisture and non-condensables in the lines (although some kits such as Pioneer KWIK-E-VAC are available to make this easier without a pump ). Safety first: wear eye protection during drilling and working with refrigerant lines and make sure to check all electrical connections twice.
Maintenance and Longevity
A little regular maintenance is necessary to ensure your garage mini split continues to work well in the long term (possibly 10-15+ years):
- Clean or Replace Filters: The indoor unit has filters which can be washed or replaced. They can become dirty quicker in a garage because of sawdust, exhaust particles of vehicles, etc. It is also prudent to remove them and wash them out once in a month (or at least after every 2-3 months) depending on usage. A dirty filter decreases the airflow and makes the unit to strain.
- Maintain a Clear Outdoor Unit: Make sure that the condenser outside is not covered with debris, leaves or snow. The outdoor coil should be periodically (e.g. before summer and before winter) inspected. It is possible to wash it off with a garden hose (with power off) by spraying it gently. Do not seal the unit in a tight manner, the unit requires air circulation.
- Check Refrigerant Lines and Insulation: Inspect insulation of the refrigerant lines once a year. The foam insulation on the copper lines can be degraded by sun and weather; when it is coming apart replace or wrap it to keep it efficient.
- Also ensure that the connections do not have any oil stains or any other evidence of refrigerant leak.
- Professional Tune-Ups as Required: After 5+ years you may want to have a professional check-up even on DIY units. They are able to determine the level of the refrigerant and make sure that the system is still well charged and lubed.
- But when everything is running smoothly and you look after it, mini splits do not usually require the regular tune ups of a car, just keep them clean and they will usually purr along.
- Winter Preparations: When you live in a place where it freezes in winter and you are not going to use the mini split to heat the garage, it is a good idea to run it in fan-only mode periodically or to use any crankcase heater feature (some units have this) to keep the compressor oil warm.
- The majority of the modern heat pump mini splits will automatically defrost during the winter when heating. Make sure that the defrost condensate can drain or drip safely (some folks put a small pan heater in or direct the drain so that it does not ice up).
This is how you can make sure that your mini split is operating at optimal levels. The most important ones are the filters and coils a clean system does not only work more efficiently but also keeps the air quality in your garage healthier since the dust and other pollutants are trapped.
Regarding the lifespan, such brands as Pioneer and Senville can serve more than 10 years, and MRCOOL and Klimaire provide long warranties (5-7 years) on compressors that also indicates their life expectancy. Take care of the unit and you will have a well conditioned garage through many seasons.
Safety Considerations
These safety considerations should be put into consideration when installing and operating a mini split in a poorly insulated or detached garage:
- Safe Fixing: Make sure that the indoor unit is well mounted on the wall studs or solid surface with the mounting plate and screws provided. A non-level or loose unit may fall at some point. The outdoor condenser must also be mounted on a solid platform or wall bracket with a weight rating (vibration pads may be used to reduce movement).
- Electrical Wiring: The correct gauge wire and breaker size should be used as indicated by the manufacturer (i.e. a 20-Amp circuit on a 12k BTU 115V unit, or a dedicated 30-Amp 230V circuit on a 24k BTU unit, etc.). Put a shut-off/disconnect box in line-of-sight of the outdoor unit.
- Do not ever use extension cords or undersized wiring, which may overheat or lead to fire. In case you are not sure, you should employ a licensed electrician to connect the power.
- Refrigerant Handling: In case your system is the DIY pre-charged one, you will not be handling refrigerant directly, which is safer. In the case of systems that need to be charged, do not vent refrigerant: it is illegal and dangerous.
- Do it using the right procedures or leave it to a professional. Refrigerant is odorless; sudden loss of cooling and oily residue on connections may be a leak: in this case, switch off the unit and have it serviced.
- Fume Ventilation: It is important to remember that fumes can be produced by running cars or working with solvents/paints in the garage, and the mini split will not be able to extract these fumes (no fresh air intake). Watch out on carbon monoxide- do not run a vehicle in the closed garage even when the mini split is on.
- In cases such as painting where there is overspray or flammable vapors, it may be wise not to use the mini split when such activities are going on so as not to pull vapors through the unit. When fumes are introduced, the space should always be ventilated separately.
- Drainage: The indoor unit condenses (water) in cooling mode. Make sure that the drain hose is directed correctly to the exterior or to a floor drain. Make sure that the drain is not clogged periodically (a clogged drain may spill water into your garage).
- When it is cold, and you warm the garage and the drain is outside, then you should not allow the end of the hose to freeze up so that you can use it, you might have to insulate it or run it to a warmer place.
- Weight Limits: Mini split outdoor units are heavy (50-150 lbs). When mounting the condenser on the wall, ensure that you use a bracket that has the right weight rating and fix it on the wall studs or masonry and not on the siding.
- Avoid injury by getting a friend to assist in lifting it into position. Similarly, it is also easier to lift the indoor unit to its bracket with two people, particularly when the unit is large.
Following these safety tips, you will not only have a successful installation but also safe operation in years. The safety instructions in the manual should always be read.
Although mini splits are very safe HVAC systems, in general, and do not involve combustion, it is important to treat the electrical and refrigerant parts with care. In case of doubt, call a professional, even the most dedicated DIYer understands when it is time to have a second pair of skilled eyes on a job.
Warranty and Support
It would be prudent to know the warranty of your mini split before you buy it, particularly because you intend to do the installation yourself. The policy of DIY installations and warranties is particular to many manufacturers:
- DIY-Compatible Brands: Some brands, such as MRCOOL and Klimaire, actually warrant their systems to be installed by the DIYer without losing coverage . As an example, the DIY line of MRCOOL normally has a standard 7-year compressor and 5-year parts warranty when registered, even when you installed it yourself.
- They even tend to provide a small labor warranty within a year (as it is observed in the MRCOOL kit which has a 1-year labor warranty bonus ).
- Semi-DIY Brands: Pioneer, Senville, and others offer good warranties (typically 5 years compressor, 2-3 years parts is typical), but they do not recommend self-installation.
- Senville, to give an example, provides 5 years on parts and compressor, but mentions that it needs professional installation (they actually mention it in their listing). Practically, this implies that in case you have a problem, the manufacturer may request evidence of professional installation in order to pay a warranty claim.
- These brands are still popular among many DIYers who prefer to fix problems on their own or pay the money themselves in case of something. It is a grey area in a way that some sellers may still accept claims provided that it is obvious that the failure was not caused by an installation error.
- Technical Support: Take into consideration the support. MRCOOL and Klimaire are DIYer friendly, so they can talk you through a troubleshooting process over the phone.
- The smaller budget brands (or foreign sellers) may be less supported. Pioneer and Senville have the reputation of having support and replacement parts located in the U.S. and easy to obtain should you ever need a new control board or remote in the future.
- Klimaire is a smaller company and they mention that they have customer support of their DIY series. Reviews will help you to know how responsive the company is in case of problems.
- Return Policy: When you purchase using Amazon or a good dealer, you typically have a 30-day return policy in case the unit is DOA or you have a change of heart.
- They are heavy units and shipping them back may be expensive, therefore, test and check the parts as soon as you get them. In case something appears to be broken during transportation, report it at once. It is simpler to replace an indoor unit or a compressor before all the things are mounted in the wall.
- Extended Warranty or Local Installer: When you are not sure whether you want to do it yourself or not, remember that in some cases, a licensed HVAC pro can extend your warranty or make claims easier. Certain brands may provide registration extensions (e.g. a 5 year standard can turn into 10 year when installed by a certified pro).
- Compare the price of an installer with the comfort of a more extended warranty. A lot of DIYers are happy to repair small problems (such as replacing a capacitor or a fan motor) themselves, which can also be the reason to do it alone and not being so concerned about warranty.
To conclude, in case warranty is one of the main concerns to you, the safest option is to choose a DIY-oriented system such as MRCOOL or Klimaire to be fully covered.
When you choose a Pioneer, Senville, or other unit that is not officially a DIY, you should be ready that you may be left to yourself in case of any major repairs during the warranty period unless you engage a professional.
With that said, these systems are mostly reliable and when installed and maintained properly, major problems are not prevalent. Simply take a well-known brand and save your records.
Product Reviews: Top DIY Mini Splits for Your Garage
And now it is time to take a closer look at the reviews of our favorite models. All these possess their advantages that make them appropriate to be used in the garage and to be installed by the DIY.
We will discuss what is in the box, main features, advantages and disadvantages and why we have chosen it to this list.
#1 MRCOOL DIY 4th Gen 24,000 BTU Ductless Mini Split Heat Pump
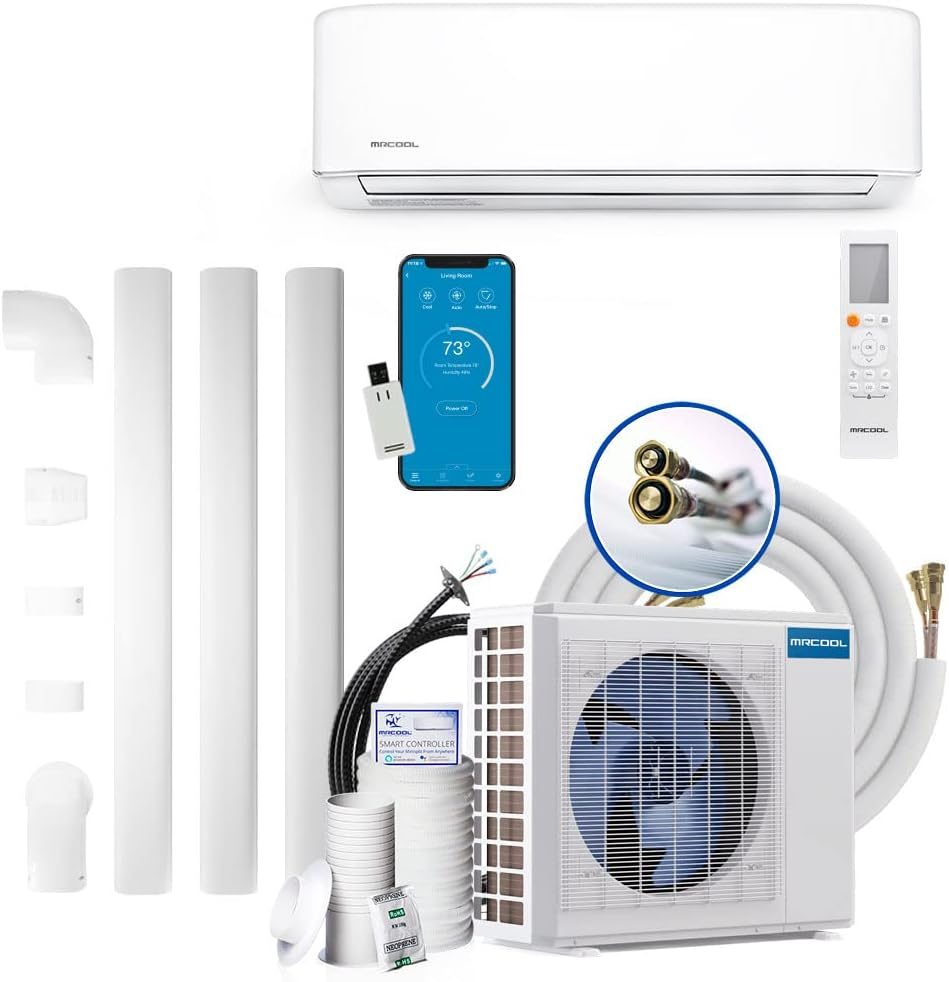
Best Overall DIY Garage Mini Split The MRCOOL DIY series is more or less synonymous with DIY mini split, and this 24k BTU 4th Generation model is a good example of why. It is a strong 2-ton system that can easily cool or heat a big garage or workshop (up to approximately 1500 sq. ft), but it is designed in a way that an enthusiastic homeowner can install it without special tools.
The kit is complete: it has a 24,000 BTU outdoor condenser, a wall-mounted indoor air handler, a 25-foot pre-charged quick-connect line set, control cables, and even some extras such as a line set cover and WiFi smart controller.
It is easy to install as opposed to the traditional units. The patented quick-connect line set is pre-loaded with refrigerant, so you literally connect the fittings and you are done, no vacuum pump is required . MRCOOL has clear step-by-step instructions, and there are a lot of tutorial videos (even on the Amazon listing) both by the company and other DIYers.
The most difficult aspect to many was the drilling of the 3.5 hole and hoisting the indoor unit into position, the rest is just tightening of connections and wiring of the 230V. MRCOOL calculates that you will save hundreds of dollars in labor and according to user reviews, most people install it in a day.
This unit is excellent in terms of performance. It is Energy Star rated and has an approximate SEER2 of 20, so it is cost-effective considering its size. It really shines in heating, as it can be rated to heat down to -13 oF outside, with its low-ambient inverter compressor.
The MRCOOL DIY will not leave you out in the cold, even in winter, should you want to use your garage during this time of year (as a home gym or to tinker with your car). Some of the users particularly mentioned that it heated their work area during cold spells when temperatures dropped to almost zero.
Other features: the WiFi smart kit enables controlling the system through the MRCOOL app or smart home systems, thus you can check and change the climate remotely. The indoor unit is very quiet (about 34-45 dB at different fan speeds), which is quite quiet enough, you can talk or listen to music without any problems when it is on.
MRCOOL also has a good warranty – it is officially 7 years on compressor and 5 years on parts, and they even include 1 year labor warranty in this package, which is unusual.
Pros: Extremely DIY-able, no vacuum required; high 24k BTU capacity covers big areas; great heating to -13F; has WiFi and line set cover; good efficiency and low noise. Cons: It is more expensive than some of the budget brands (you are paying to be convenient); the 25ft line set might be too long to use in some garages (you need to coil up the excess length unless you do not need the full length, in which case you can buy shorter pre-charged lines separately).
It is also a 230V unit and you will have to wire up a suitable 230V circuit unless you already have one. On the whole, MRCOOL is the best option to get the simplest possible installation on a large-capacity device, and climate-controlling your garage becomes a simple DIY task.
#2 Klimaire DIY 12,000 BTU Mini Split Heat Pump
Best DIY Mini Split in a 115V Package – Klimaire DIY series is a secret weapon of garage owners that need an easier installation, particularly in the case when you do not have access to 230V wiring. It is a 12,000 BTU unit, which runs on 115V, so you can connect it to a normal household circuit (preferably a dedicated one) and save the electrician expense of installing a 230V line.
Although the voltage is lower and the capacity is a little bit smaller, it is still powerful enough to comfortably cover up to ~500 square feet, which makes it ideal to use in a single-car garage, shed, or workshop.
Similar to the MRCOOL, the Klimaire DIY includes a pre-charged 25 ft quick-connect line set, no vacuum pump or gauges are needed. Klimaire points out that it can be installed by yourself and that warranty will not be voided, which is a comforting position (they cover it with 5 years parts and 7 years compressor ).
It is quite similar to the installation process of MRCOOL: mount the indoor air handler, run your lines, connect the refrigerant couplers, and hook up power. Most users remark that the directions are easy to follow and that everything needed, such as wall bracket, communication cable, drain, etc. is in the box (even a convenient hole saw bit in some models!). Allow a couple of hours of setup; it can be done with simple tools.
The area where Klimaire excels is its performance in cold climates and smartness. It is rated to heat at outdoor temperatures as low as -13 o F which is extraordinary in a 115V unit. They do it by using a high efficiency inverter and what they term as Goldish Fin coating on the coils, which prevents corrosion and frost.
Basically, this unit will not surrender in the middle of winter in case you are in a cold region. It also comes with a lot of operating modes: cooling, heating, dehumidify, fan-only, turbo (fast cooling/heating), sleep mode and even an I-Feel mode where the remote is used as a thermostat to control the temperature where you are.
And the WiFi module that comes with it allows you to operate it through the Smart Life app or Alexa/Google, so yes, you can say to Alexa to cool your garage before you walk out there.
Efficiency wise, this Klimaire with 19 SEER2 is very efficient as a 1-ton system, which means that electric consumption is low. According to users, it cools a garage in a very short time and in a very silent manner.
The noise levels are about 34 dB on low as per specifications, which is basically a whisper when the fan is set to lower modes. The indoor unit is small and clean looking and the outdoor unit is also fairly small as far as a heat pump goes which is good when you are going to mount it against the side of a garage or on a small pad.
Pros: Actual DIY installation, pre-charged lines; 115V (no special wiring beyond a dedicated outlet/circuit); high heating capability in cold climates; smart home compatible; excellent warranty with DIY permitted.
Cons: 12k BTU only, which is not enough to heat very large garages; 25ft line set may be more than required to heat a small garage (but you can not shorten pre-charged lines, you must neatly coil the excess). Also, Klimaire is a small brand thus not as tried and tested in the industry as say Mitsubishi (though it is much cheaper than the big brands). To date, the response is good concerning reliability.
Klimaire DIY 12k is one of the best options in case you need both the convenience of DIY and the possibility to use a regular wall plug circuit in a garage mini split project.
#3 Senville LETO Series 12,000 BTU Mini Split

Best Budget Mini Split with High-End Features (Semi-DIY) – Senville LETO series is one of the most popular mini splits on Amazon, and it is not without a reason, as it is a great combination of performance, features, and price.
This 12,000 BTU model is available in both 110/120V and 230V, providing the flexibility of various garage installations. It is not a pre-charged DIY kit, but still, a lot of do-it-yourselfers prefer Senville due to its reputation and price.
You still receive a complete installation kit (16 ft copper lines, wiring etc), however, please note that Senville suggests professional installation or you will have to vacuum the lines yourself.
Provided you are prepared to go the extra mile and install it yourself (or pay someone to do the final vacuuming), you will be rewarded with a great mini split that is cheaper than some DIY-branded products.
The LETO 12k is a smart device. It comes Alexa enabled out of the box – simply connect to WiFi and you can use the Senville app or Alexa to control temperature and modes hands free. It is excellent in a garage; you can tell Alexa to turn on the garage AC when you are still in the house collecting tools.
The unit is also a 4-in-1 system: air conditioning, heat pump (operational down to 5 o F/-15 o C), dehumidifier and fan mode. It has a very high cooling efficiency rating of 20.8 SEER2 and heating rating of 9 HSPF.
It is rated to operate in outdoor temperatures as low as 5 o F as a heater- which is sufficient in most climates except the extreme north. Their hyper-heat line is -22F, and is called the AURA series (Senville), but those are more expensive. An average winter will not be a problem, LETO will manage it just fine, going into defrost mode every now and then when necessary.)
Customers often commend the Senville as being very quiet and efficient. The inside unit is smooth and stylish in appearance, and the display is clear to read (though you can disable it should bright lights be a nuisance to you).
At maximum, noise is about low-40s dB. According to user reviews, it can cool a 500 sq ft garage down to 75F in a few minutes when it is 90F outside, the Turbo option really pumps up the cooling when you need fast results.
Heat is also powerful; one customer reported that it heats a 500 sq.ft area effectively and maintained a two-car garage at 20F without any additional heating. The remote control is very functional with an energy saving mode (Eco) and a programmable timer.
The only downside to DIY people is that you will have to either suck a vacuum on the lines or pay an HVAC tech an hour to commission the system. The unit is pre-charged to 25 ft of line which is more than the 16 ft line set included with some extra in case of need.
Simply remember that the vacuum step should not be omitted because it may cause inefficiency or moisture in the system. According to Senville, any change in the length of line-sets or inappropriate installation necessitates alteration of refrigerant levels and can nullify the warranty . With that said, Senville units are successfully installed by many handy people. In case you decide to do this, pay attention to the manual.
Advantages: Good value of the features; very efficient cooling and heating; WiFi/Alexa smart control built-in; solid performance (Senville is a well-established brand); decent support and warranty (5 years compressor).
Cons: Not a complete DIY kit, will need to vacuum and more HVAC knowledge to install; warranty technically requires professional installation (though it is not always enforced); 16ft line set may be limiting to placement depending on your garage layout (extensions are possible but then definitely a pro should be involved to add refrigerant).
To sum up, Senville LETO 12k is an ideal choice of a budget-conscious consumer who desires to have a quality feature-rich mini split and is either comfortable with a semi-DIY installation or is ready to receive some assistance with the installation. It will make your garage a connected cool place without costing you a fortune.
#4 Pioneer Diamante Series 12,000 BTU Mini Split
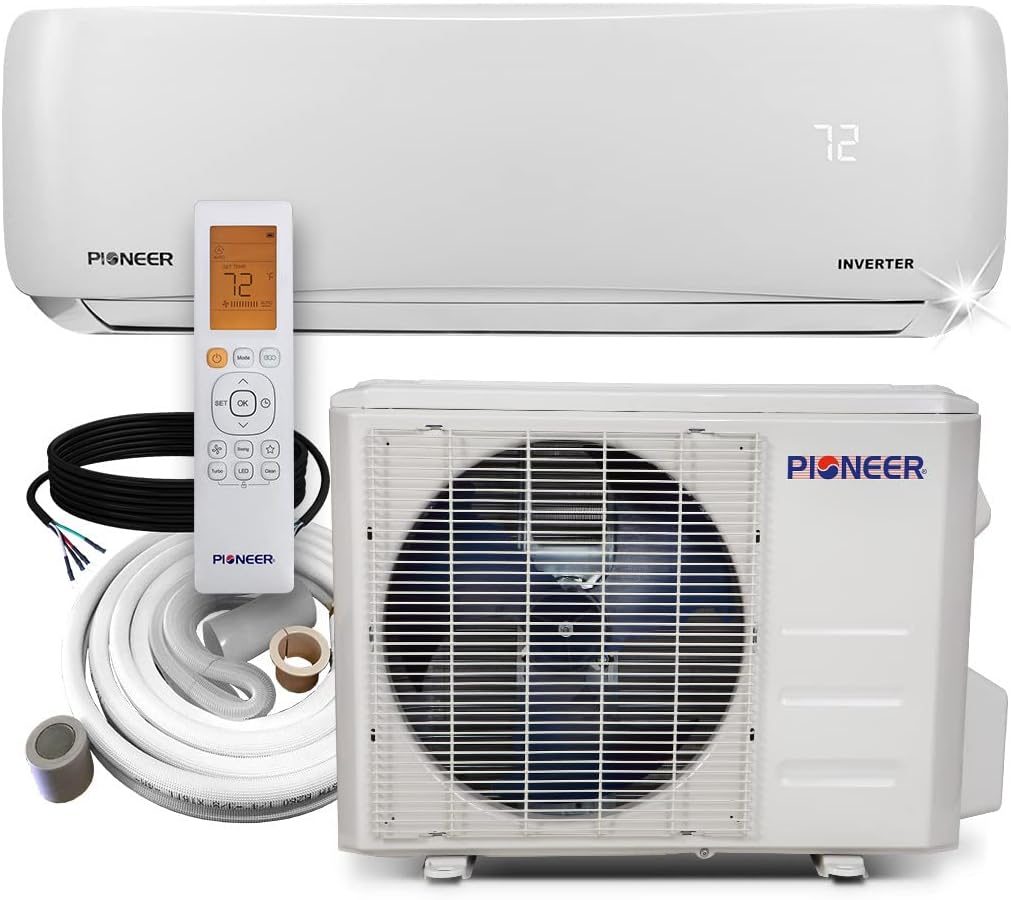
Most Trusted Brand to DIYers – Pioneer is one of the first (no pun intended) to bring mini splits to the U.S. market to the homeowner, and their systems have earned a following of loyal customers because they are sturdy and well-supported.
A good example is the Diamante series 12,000 BTU: it is a high efficiency (~19-20 SEER) unit that provides dependable cooling and heating of up to approximately 500 sq ft. Although it is not sold as a DIY kit, a lot of garage owners prefer Pioneer because of the price-performance ratio and the availability of tech support in the U.S.
The Diamante 12k is supplied with a full installation kit: indoor unit, outdoor unit, 16ft copper line set, control cable, drain hose and wall sleeve. Basically all you need to do it but not the electrical whip and breaker.
Installation is just like the Senville- you have to vacuum the lines and then you have to release the pre-charged refrigerant in the outdoor unit into the system.
Pioneer does mention professional installation in their warranty, but they also offer a rather interesting accessory called the KWIK-E-VAC Line Set Flushing Kit to those who want to do it themselves without a vacuum pump . The kit is used to flush the air and non-condensable gases out of the lines with a special pressurized canister and is an alternative to pulling a vacuum.
It is still the case that many users prefer simply to do a proper vacuum, but it is good that Pioneer recognizes the DIYer and provides solutions. Pioneer manuals are quite detailed, so, in case you are doing it yourself, you can be guided by their customer service in case you get stuck.
The Pioneer will perform better or at least to the expectations of most people. Cooling is strong and stable; the unit has a DC inverter compressor that is modulated smoothly.
In a garage, you will probably find it useful that it will cool the place down fast when you switch it on (particularly, with the optional WiFi smart controller, you could switch it on before you go out to the garage). This model is also rated at 5F low ambient heating just like Senville, so it should be able to heat in the winter, but not as well as the newer Pioneer Ultra series hyper-heat models, which can go down to -13F, but again that increases the price.
Most of the users in the continental US are satisfied with the standard Diamante handles when it comes to their winter garage requirements provided the garage is not very drafty.
Pioneer units are considered to be quiet and durable. The fan inside also has a number of speeds and on the lowest you can hardly hear it. The outside unit also has a quiet compressor, you will hear it running, but it is not loud (usually quoted as 50 dB at 3 feet).
Since Pioneer has been in existence, spare parts or accessories are easily available. They also possess a large number of service dealers in case you require repair. The 12k Diamante is standard with a 5 year compressor, 2 year parts (professional installation). Most users claim that their Pioneers can run solid 5, 6, 7+ years with only routine maintenance.
Advantages: Established reputation and construction; high performance and low noise; comprehensive (various modes, optional WiFi); great customer service and availability of parts; good value considering a well-known brand.
Cons: Not as simplified to install, needs HVAC tools or pro to install; warranty technically requires pro install; the length of the included line set (16ft) may need extensions to be purchased should your install require a longer reach, which again involves more handling of refrigerant.
The indoor unit design is also utilitarian, too, though that is not a big deal in a garage (it is a plain white box, after all, which is good in utility spaces). In general, Pioneer is one of the best options in case you appreciate reliability and support. You might spend a bit more than the lowest priced off-brands but you have the assurance that your garage climate control will be in good hands in years to come.
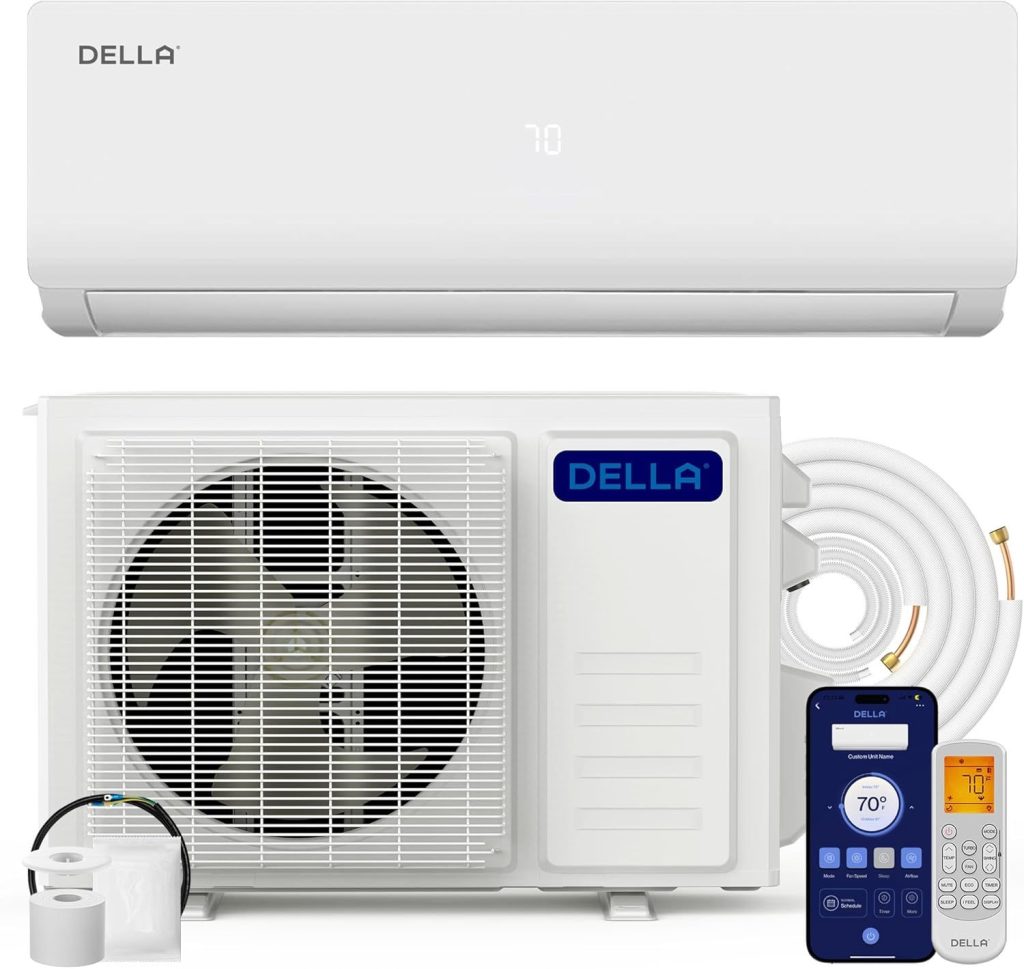
#5 DELLA 12,000 BTU WiFi Mini Split AC/Heat Pump

Best Value Mini Split with Smart Controls – In case you want to go even cheaper (one of the cheapest 12k BTU units on Amazon) but still have access to newer features such as WiFi and Alexa control, this Della 12,000 BTU mini split is a good choice.
Della is a well-known online retailer that manufactures various home appliances, and their mini splits have received hundreds of positive reviews because they offer decent performance at a reduced price. This is a 19 SEER2 rated, 115V system which is pre-charged with refrigerant and has 16.4 ft installation kit.
The major feature of the Della (which is also called the Motto Series or simply the WiFi Enabled) is the smart integration. It is compatible with a mobile app and voice commands through Alexa similar to more expensive competitors.
You are able to program schedules, change modes and check the temperature wherever you are. In the case of a garage, this would allow you to turn it on remotely or even connect it with a smart garage door opener (you could have it turn on cooling when you open the garage door on a hot day, which is easily possible with Alexa routines).
The system offers good cooling to spaces of ~550 sq ft and heating too. It is rated to operate in climates as low as 5F in heating mode, which means it has a respectable low-temperature performance (it is not rated to work in extreme subzero cold, but it should be fine in most moderate winter conditions).
Performance review shows that the Della, although cheaper, is efficient in providing comfortable temps. The users are satisfied with the speed of cooling a hot garage and the quietness of its operation.
The noise level of the indoor unit is rated at about 42 dB , a little louder than others on low fan, but not too loud to be used in a working environment. The quality of build is mostly good, but maybe slightly less heavy than more expensive brands, some have pointed out that the plastics of the indoor unit are lighter, but this does not affect performance.
The remote that comes with it is simple and allows you to switch modes, fan speeds, time, etc.
On the other side, Della clearly mentions in the manual that this is not a DIY install unit and that line-set vacuuming is necessary . Therefore, just as Senville and Pioneer, you will have to deal with the refrigerant side correctly.
Other buyers got the final commissioning done by HVAC technicians and did the mounting themselves to save costs. The latter can be effective, too, you do the heavy work and electrical, and then pay a tech an hour or two to vacuum and check the charge. It is a cheap method of having it up and running with a peace of mind.
Advantages: Extremely affordable 12k BTU heat pump; WiFi and Alexa compatible; can be used in 115V (no special wiring other than a dedicated circuit); reasonable efficiency and cooling capacity; excellent customer reviews regarding performance.
Cons: Warranty service may be slightly more complex in case of self-installation (it is a low-end brand, and support is not as developed as in the case of Pioneer or MRCOOL); the installation is not simplified, you will probably need a professional to commission the refrigerant; there are complaints that the installation manual is not very detailed (however, the process is the same as in case of mini splits).
And, although it is long-lasting to most, maybe not as long-term tested as larger brands (don t expect too much at this price). To sum up, the Della 12k is a good deal to garages, particularly, when you are a tech-savvy person with a limited budget. All you need is to be ready to install semi-DIY or hire a bit of professional assistance in order to make sure it is installed correctly.
When it is up and running it gives the same final result, a cool garage (or a warm garage), but without a huge hole in your wallet.
#6 Cooper & Hunter 12,000 BTU Hyper Heat Mini Split (Sophia Series)
Most Suitable in Cold Climates – In case you are in a place that experiences very harsh winters and you want your garage to be warm, Cooper & Hunter has a mini split that is suited to such a situation, the Hyper Heat.
Their Sophia series 12k BTU is specifically designed to provide full heating capacity in extreme cold, this one is rated to work down to -22F! It is a more specialized option (and generally a bit more costly), but it is perfect in detached garages that are also used as workshops in such states as Minnesota, Alaska, or high-altitude regions where regular heat pumps may fail.
The C&H unit is a ready-made kit with a 16ft installation bundle just like other non-DIY units. Installation will be done by the normal vacuum and start up procedure.
Cooper & Hunter, just like Pioneer and Senville, will require professional installation to be done to warrant the product.
However, as an end-user, when it is in, you will have a garage heater/AC that can actually handle anything that Mother Nature can dish out. Most owners testify that these hyper heat models continue to blow hot air even when the outdoor temperatures are well below zero a capability that few mini splits can accomplish without the addition of electric heat strips.
When in cooling mode, it is a standard 12k BTU, 22 SEER efficient air conditioner, which is more than enough to cool a two-car garage during the summer.
It also has the contemporary accessories: it is WiFi ready (you can add a WiFi dongle to operate it through an app), and it has a Follow Me remote function where the system will adjust depending on the temperature at the remote location.
The quality of the construction of C&H units is good; they are in fact produced by a large HVAC manufacturer and frequently re-labeled by others. Sophia series indoor unit is smooth and coated with golden-fin coating on coils to make it durable.
It is not loud (about 28-30 dB on quiet fan). It is basically a high-end unit that is efficiency and low-temp oriented.
Advantages: Excellent heating capabilities in subzero temperatures; excellent efficiency throughout the year; well constructed and very quiet; can be used in 4-season climates where less powerful units may not perform in the winter.
Cons: More expensive to purchase; not a DIY install (unless you are an HVAC pro); C&H warranty usually requires pro install (and they have been known to make you do so, according to some reports). Also, it is a 230V unit so make sure you have the power to run it.
In case your garage has to be a year-round refuge in a very cold region, then this unit is worth it. Otherwise, in case of milder climates, its abilities may be excessive. However, we added it to address those edge cases and it is one of the few that can say it will reliably heat to -22 degree Fahrenheit.
Cooper & Hunter are building a name in the HVAC industry and their Hyper Heat series is their response to the Hyper-Heating systems of Mitsubishi, but at a more affordable price range.
Conclusion: Equipping your garage with a mini split may be a game changer and transform it into a comfortable part of your house.
No matter whether you are a do-it-yourselfer who wants to save some money by using a pre-charged kit or someone who does not mind hiring a professional to spend an afternoon to get the best of the best performance, there is a solution above that will suit you.
Just watch out on sizing, insulation and installation needs, and you will soon have the best of both worlds, a tough garage that is as comfortable as any living room.
The right mini split will allow you to actually turn your garage into a year-round usable space, all the while increasing the value of your property and convenience in your everyday life.