

The ductless mini splits are highly popular due to their energy saving and flexibility. There are a lot of homeowners who prefer a model that they can install by themselves, thus they do not have to pay a high price to a professional.
These mini splits are DIY friendly and have simple-to-use kits and inbuilt features that simplify the process of installation. You will be able to save on the labor costs.
This guide takes a look at the best DIY mini split air conditioners and heat pumps. We emphasize models that are easy to install, power-saving and stable.
Best DIY Mini Split Systems (Reviews)
#1 MRCOOL DIY 12,000 BTU 22 SEER Ductless Heat Pump
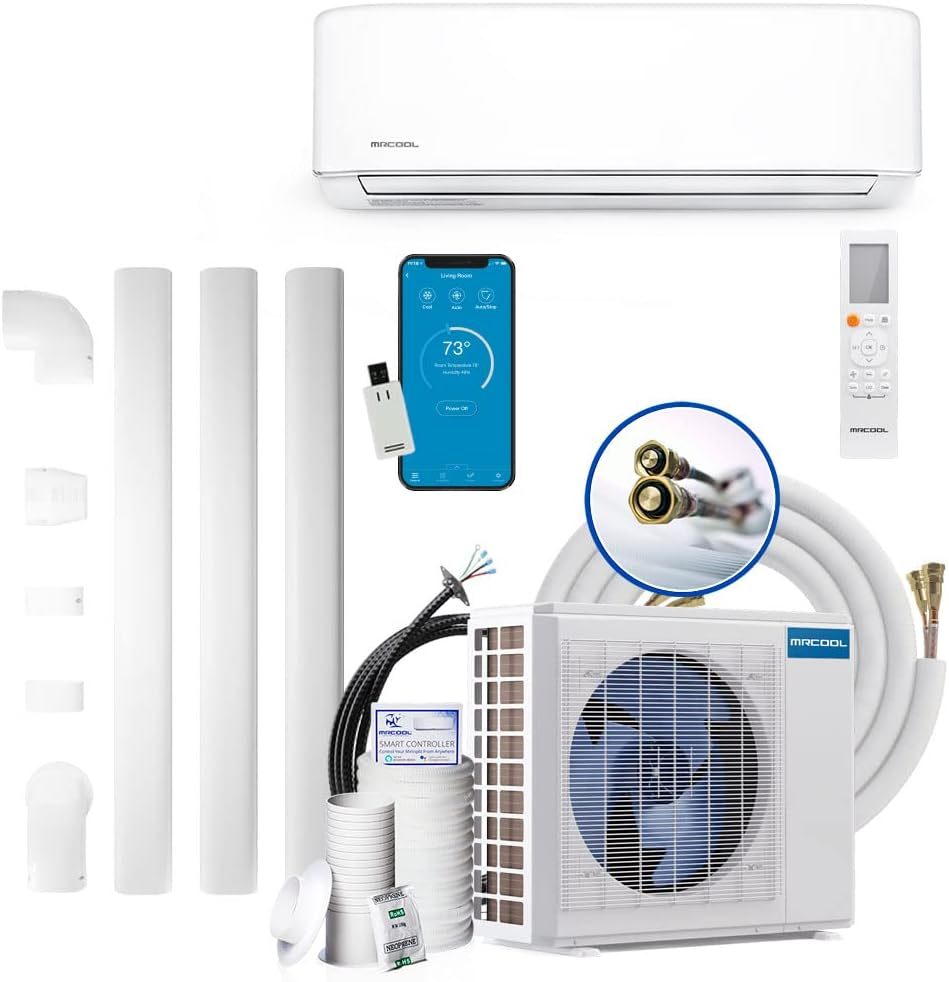
The DIY series of MRCOOL is known as the most effortless mini split systems to install.
The MRCOOL DIY 12k BTU unit has a precharged 25-foot quick-connect line set, and you do not have to vacuum or work with refrigerant. Setup is easy even in the case of small HVAC experience, as all the necessary materials (mounting hardware, control cable, etc.) are provided. The model provides a high 22 SEER (approximately 20.5 SEER2) performance, which makes it Energy Star rated to reduce the running costs. It is also a heat pump and it cools and heats spaces of about 450-500 sq. ft.
MRCOOL has smart functionality such as WiFi connection. SmartHVAC app allows you to operate the unit via phone or, via Alexa and Google Assistant.
The users claim that the unit cools the rooms fast and can be effective even in bigger rooms. The indoor air handler is silent and nonobtrusive, and the system can restart and re-set automatically after a power outage.
The warranty is another impressive characteristic: MRCOOL offers 7-year compressor and 5-year parts warranty (limited lifetime compressor warranty option available) without the need of professional installation. The primary disadvantage is the increased initial price in comparison with non-DIY brands, yet most people consider the ease of installation and excellent customer service worth the money.
In general, MRCOOL DIY is one of the best options to consider when you need a really simple DIY mini split that does not affect the performance and efficiency.
#2 Klimaire DIY 12,000 BTU 19 SEER2 Ductless Mini Split
Another system that is meant to be installed by the owner is the Klimaire 12k DIY mini split.
It, like MRCOOL, has a factory pre-charged outdoor condenser and a 25-ft refrigerant line with quick-connect fittings, meaning that homeowners can connect it without vacuuming or special equipment. Klimaire offers a complete installation set (mounting bracket, line set, control cable, etc.), so even a person with basic DIY skills can cope with the process. Klimaire is also a more affordable do-it-yourself option to MRCOOL, which is why it is selected by many users. It continues to provide heating and cooling (heat pump) and has an excellent ~1920 SEER efficiency rating, and can be used in medium-sized rooms of up to approximately 500 sq. ft.
This device is also equipped with in-built WiFi. The Klimaire app allows you to monitor and regulate settings on your smartphone. It also has a “Follow Me” feature on the remote (which is called I Feel) where the temperature sensor on the remote aids the system to adapt to make the space around the remote to the desired comfort level. Other convenient modes are Dry Mode that can be used to dehumidify and Turbo Mode that can be used to cool or heat a room quickly. Regarding reliability, Klimaire DIY systems have a 7-year compressor and 5-year parts warranty, which is equal to MRCOOL. The customers mention that it is easy to install and the directions are clear, even the first-time users have managed to install this unit within a weekend. As with any DIY mini split, it is important to read the manual and take your time and follow every step to ensure best performance.
The Klimaire DIY 12,000 BTU is commended on its ease of installation, modern features, and value and is one of the best choices of DIYers on a budget.
#3 Pioneer 12,000 BTU Inverter+ Wall Mount Mini Split
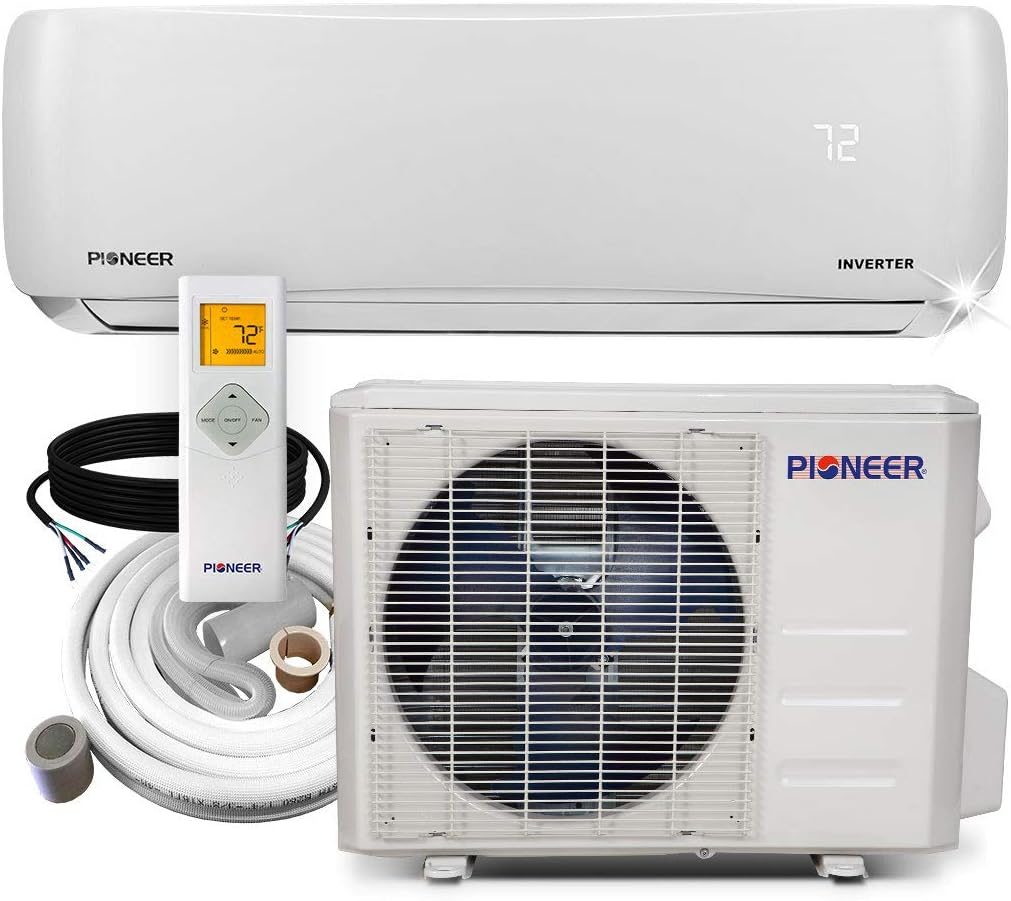
Pioneer is a household name in the mini split industry. It has a 12,000 BTU Ductless Inverter+ model (230V) that is popular with do-it-yourselfers due to its good performance and quietness. The unit is rated at about 20.5 SEER that implies that it is highly efficient and can reduce cooling expenses.
The indoor air handler is as quiet as 23 dB(A) on the low setting, quieter than most libraries. This silent quality is a big plus to many users particularly in bedrooms and offices.
Pioneer model is supplied with a complete installation kit (16 ft copper line set, control wires, drain hose, etc.) and an instruction manual. Although it is not a quick-connect system, handy homeowners usually install it themselves using guides and even renting a vacuum pump to blow out the lines. According to one Amazon reviewer, “it is easy to install! It has been running nearly four years…” and continued that the customer support of Pioneer assisted in replacing a part covered by the warranty even after the official time. This demonstrates the reputation of the brand in terms of good customer service and reliability. The unit has all the common modes (cooling, heating, dehumidify, fan-only) and a programmable remote control with such settings as sleep mode and timers.
The negative is that it is not WiFi-enabled (no smart app control) by default, a WiFi adapter is available as an option. Also, similar to most brands, the warranty of Pioneer technically needs professional installation to be fully covered. However, Pioneer is nevertheless a popular choice among DIYers due to its reputation; so long as you do a good installation, these units will give you years of efficient trouble-free use.
The Pioneer 12k is a great option to those who want a tested mini split system that is quiet in operation.
#4 Senville LETO Series 12,000 BTU (Smart Mini Split)
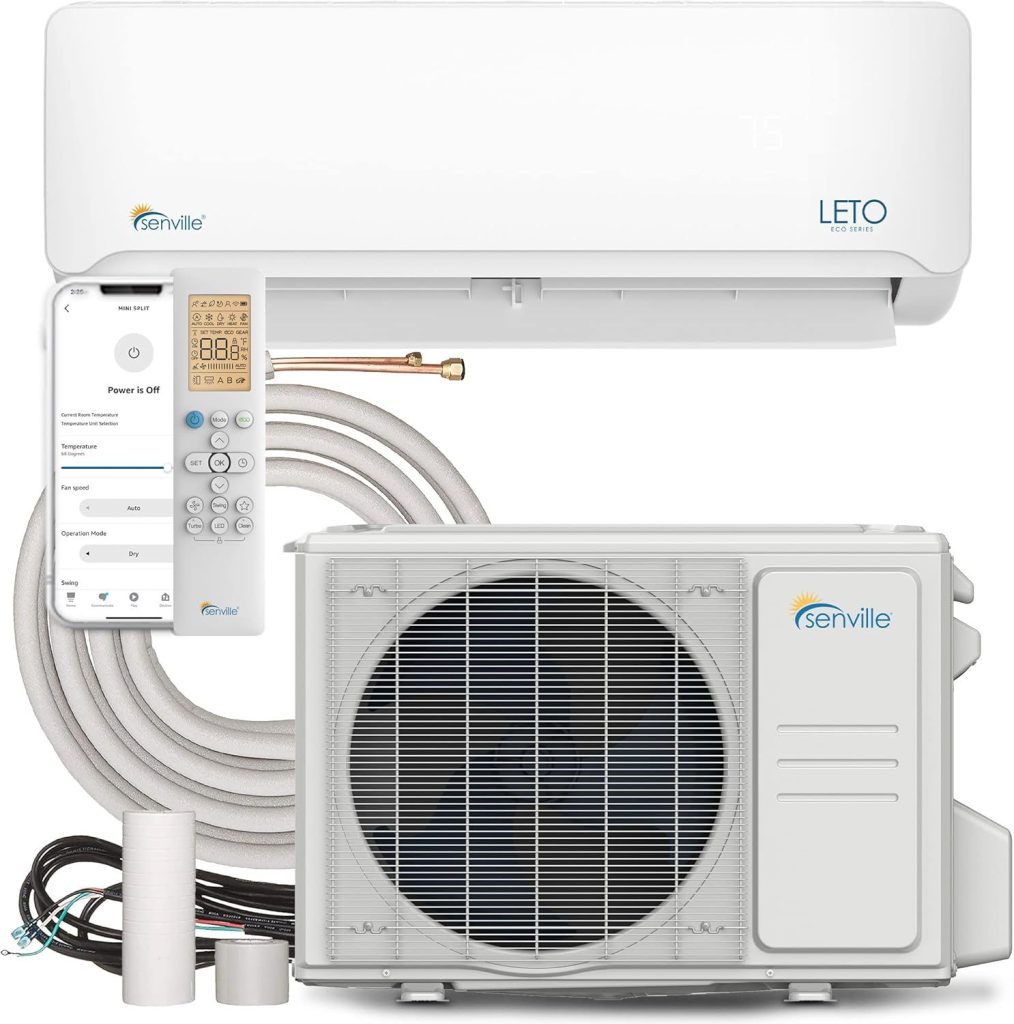
The LETO Series 12k BTU mini split by Senville is a good combination of intelligent technology, good performance, and a DIY design. This 1 ton unit is available in 115V and 230V. The inverter compressor of the 115V model reaches approximately 18-20 SEER (up to ~20.8 SEER2), which makes it very energy-efficient in its category.
This system is liked by people as it provides year-round performance: it cools the home in summer and acts as a heat pump in winter, down to 5 °F in some models. Senville sells the series as Alexa Enabled, thus it comes with a WiFi smart controller that allows you to connect it to Amazon Alexa to control it and schedule it using voice commands. You can change temperature and modes anywhere through the Senville app or Alexa, so pre-cooling the house or checking energy consumption is very convenient.
Senville mini splits do not have quick connectors pre-charged such as MRCOOL. Rather, a standard installation is filled with refrigerant in the condenser. The kit contains lines, wires and brackets.
A lot of homeowners have successfully installed LETO series units, many of them by using the instructions provided by Senville and watching videos on the Internet. The package goes as far as to include such considerations as line insulation and wrapping tape. The system is also operationally silent and has several settings, including turbo mode in case of rapid cooling, sleep mode, and others. People review it positively because of its cooling power and efficiency, one of the reviews says that it saves much energy and is easy to control remotely through Alexa. On the support front, Senville provides 5-year compressor and 2-year parts warranty, (5 years on parts with professional installation). Although they may be installed as a DIY project, most people say that customer service at Senville is helpful when there is a problem with troubleshooting or parts.
Senville LETO 12,000 BTU is an intelligent, energy-saving mini split that can be installed by a skilled DIYer. This is a particularly appealing choice to people who desire built-in home automation capabilities at a mid-range price.
#5 Cooper & Hunter MIA Series 12,000 BTU (115V)
Cooper & Hunter (C&H) is an international brand of HVAC systems whose mini splits have become popular in the United States due to their good performance at affordable costs.
The C&H MIA Series 12k BTU is especially attractive to the DIY installer, as it is a 115V system – that is, it can be plugged into a regular household 110-120V circuit (it still requires a 20A breaker, but you may not have to run a new 230V line). This model has a rating of ~20.8 SEER2 and it is very efficient. It is already charged with R410A refrigerant up to 16 feet of line and the installation kit (copper lines, communication cable, drain, etc.) is provided. Numerous users remark that the installation is very easy and it is like other DIY mini splits but remember that it has conventional flare connections, so you will have to vacuum the lines unless you buy optional quick-connect adapters as well.
When installed, the C&H MIA 12,000 BTU does a great job. It can cool or heat up to approximately 450-600 sq. ft. so it is good to use in a large room or studio. The indoor unit is very quiet, about 26-42 dB, depending on the fan speed, and one of the customer reviews noted that the indoor unit is somewhere between a whoosh and a whisper and even the outdoor compressor is so quiet.
It has an add-on WiFi USB dongle (sold separately) in case you want to control the system using apps; otherwise, it comes with a remote. C&H is also known to use quality parts (their units are commonly constructed using Toshiba/GMCC compressors or the like). The greatest number of reviewers compliment the high efficiency and easy installation of this model. The warranty terms are one of the things to be aware of: C&H provides a 5-year compressor, 2-year parts warranty, however technically it needs a professional installation to be eligible to the warranty (some users reported that the product is sometimes advertised as a do-it-yourself one even though self-installation may void the warranty). In case that is an issue, you could employ a technician or an electrician to do some of the steps and still save on the total expenses. In short, Cooper & Hunter 12k MIA is one of the best candidates, particularly in case you want a 115V mini split that has powerful cooling capacity and is very quiet.
It is comfortable and not too DIY-unfriendly to people with some technical expertise.
#6 DELLA 12,000 BTU Mini Split (Vario Series, WiFi)

The DELLA 12,000 BTU (Vario Series) is a good choice in case you want an inexpensive DIY mini split that has modern features.
This unit, which can be seen in the list of products under the Works with Alexa by DELLA, provides about 19 SEER2 efficiency, which is rather decent considering the price. It has an in-built WiFi and is compatible with Alexa, which means you can control it using voice commands or using a smartphone app. Most of the entry-level mini splits are not smart, yet the DELLA Vario provides convenience comparable to the higher-end brands. It is a heat pump system, which gives cooling (in about 450-550 sq. ft. spaces) and heating as and when required. Remarkably, there are variants of DELLA 12k that are sold as Hyper Heat versions that can operate in temperatures as low as -13 oF to suit colder regions.
Installation wise, DELLA comes with a full 16.4 ft line set, cables and accessories included in the box. The unit comes charged with refrigerant of that length of line, so a do-it-yourself installer only has to mount the indoor air handler, position the outdoor condenser, connect the flare fittings, evacuate the lines, and then release the refrigerant (according to the manual).
Several customer reviews attest to the fact that individuals have managed to self-install this mini split, but you will probably have to borrow or rent a vacuum pump to do it right. One reviewer said that he had no issues with the installation (you will require vacuum pump) and it is very quiet to run. In fact, the users are usually amazed to discover that such a cheap unit can be so quiet and efficient.
The DELLA works at low noise and possesses such features as Sleep mode and Turbo mode. The remote control is well lit and user friendly, but some users have complained that the backlight of the remote does not turn off and consumes batteries rather fast, which is a minor inconvenience.
Regarding reliability, DELLA is not as proven as Pioneer or Mitsubishi, but most of the purchasers state that their performance and comfort are satisfactory. It is supported by a 5 year compressor warranty and 3 year on parts. At its competitive price, the DELLA 12k has been called a best value option many times: it offers smart home integration, good efficiency, and decent build quality at a price that won t break the bank.
It is a perfect option to the do-it-yourselfers who desire the benefits of the more expensive ones at a smaller budget.
#7 ROVSUN 12,000 BTU WiFi Enabled Mini Split

ROVSUN 12k BTU mini split is one of the cheapest DIY options you can purchase. It retails at under 500 dollars but still possesses much of the features that you desire. It provides 12,000 BTU of cooling capacity (which is suitable in rooms of up to approximately 750 square feet) and has a Wi-Fi module, which means that you can control it via your phone or using voice commands via Alexa. The single zone inverter system has a surprising efficiency of approximately 20-21 SEER at its price. The outdoor condenser is shipped with refrigerant in it and the typical installation kit comes with 16 feet of line set. It is not a tool-free quick-connect system, but is installed by many cost-conscious owners themselves. The mounting of the indoor unit and drilling the line-set hole are examples of tasks that are assisted by clear instructions as is the case with other kits.
After the installation, the ROVSUN provides comfort features like a smart app that provides remote control. The indoor unit has a digital display which indicates the set temperature, a good feature in a low-priced model. People also tend to commend its cooling ability relative to the cost: the air flow is cold and it cools the room fast. Being a heat pump, it is also able to supply heat during cooler months, but extreme cold can be restricted, as with most low cost mini splits (best in mild winter areas or as supplemental heat). The indoor fan is of average noise of this size.
With any low-cost brand there are certain trade-offs. The build quality and life span might not be as high as the premium units and the warranty is typically less, typically one year on parts and a few years on the compressor. Nevertheless, the high sales volumes and numerous positive reviews indicate that the ROVSUN 12k BTU is a good choice among people who require a cheap and simple to install mini split. It allows cost-conscious DIYers to experience mini split comfort and efficiency without having to break the bank. The 12k BTU is available on the official site of Rovsun.
The best way to get the most bang out of this bargain mini split is to do a good vacuum when you install it and triple check your connections. The key is correct set up.
#8 Confortotal 12,000 BTU 110V Mini Split (WiFi)
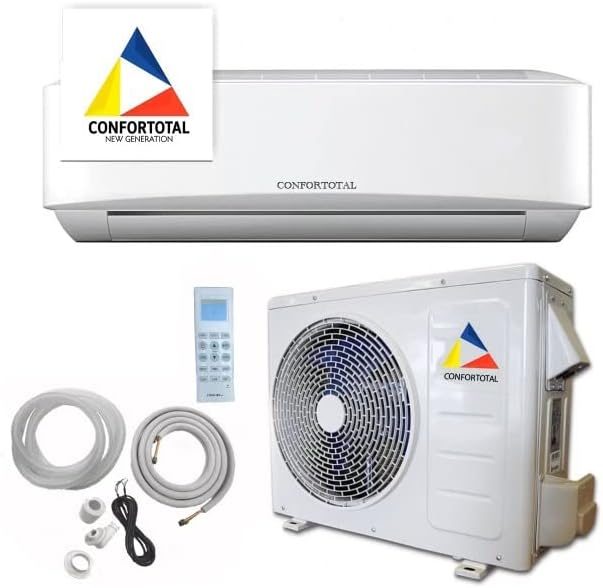
Another low-cost mini split that has become a best-seller on Amazon is the Confortotal 12k BTU mini split, selected by the DIYers who prefer the most cost-effective 1-ton system.
It is a 110V/120V model and that implies that it operates on normal household voltage. This is a handy feature in case you do not need to wire 230V circuit. The unit claims to be WiFi compatible and Alexa compatible, so you can attach it to your smart home with the appropriate app or accessory and use voice control and remote adjustments. Regarding efficiency, Confortotal has a ~17 SEER (Seasonal Energy Efficiency Ratio) that is pretty good but not as good as the best models, nonetheless, it will be much more efficient than any window AC unit of the same power.
The Confortotal is installed like other non-quick-connect mini-splits.
You will get the indoor air handler, the outdoor condenser (already charged with refrigerant) and an installation kit consisting of copper lines and wiring. Due to the fact that this brand is sold as DIY-friendly, a large number of consumers install it themselves. This will be done by flaring the line set connections (which are already flared in the kit), connecting everything, vacuuming the system and finally releasing the refrigerant.
Confortotal does not have the brand recognition of Pioneer or Senville, but its appearance in numerous lists of best sellers implies that many of them are getting these installed successfully. When it is on, it provides powerful cooling, 12,000 BTU is enough to cool a medium-sized room (400-550 sq. ft.). The users report that it blows cold air and warms well in winter relative to its size. It is also provided with a simple remote control and simple LED display on the indoor unit.
It is not too loud, but maybe a bit louder than more expensive models at full fan speed (still, much quieter than a window AC). Remember, these off-brand units might not have much after-sale support and warranty, usually one year or two, so a DIY installer must be ready to fix any small problems or troubleshooting on his own.
Taken all in all, the Confortotal 12k is a very low-entry point to mini split ownership. It will be most appropriate to the person who does not mind a little bit of work and would like to save on the unit and the installation. When correctly installed, it may be a very cheap means of cooling and heating your area without any professional interference.
DIY Mini Split Buying Guide
Determining the Right Capacity (BTUs)
The capacity is measured by the manufacturers in BTUs (British Thermal Units) per hour.
Single-zone systems normally range between 9,000 BTU (3/4 ton) to 24,000 BTU (2 ton) with small rooms and wide open spaces respectively. A good guideline is that 20-25 BTU per square foot of your space is required, depending upon insulation and climate.
To take an example, a 12,000 BTU (1 ton) unit typically services 450-550 sq. ft. that is suitable to a mid-sized room or a studio apartment. You might require a little extra capacity in case your room or apartment is open floor plans or high ceilings. In comparison, a well insulated basement or room can do with a little less.
Neither oversize nor undersize. A mini split that is too small will not be able to achieve the desired temperature during hot or cold days, and will be in constant operation, and last shorter. A unit that is too large may short-cycle-cooling the room too fast to spend sufficient time dehumidifying, resulting in a clammy feeling.
The appropriate sizing makes the system operate at a steady state, where mini splits inverters are most effective. Most manufacturers provide coverage estimates (e.g. cools up to 750 sq. ft.), which can help you. As an example, Cooper & Hunter 18,000 BTU model is recommended to 800-1,000 sq. ft. When you are in between sizes consider sun exposure (a sunroom or south facing room will be hotter) and use (kitchens with ovens will require more cooling, etc). It is normally safer to oversize slightly rather than undersize, but not too much.
In the case of multiple rooms, you can choose a multi-zone mini split that has two or more indoor units as opposed to one large unit that blows air to other rooms.
Energy Efficiency (SEER and HSPF Ratings)
Mini splits are energy-saving and their efficiency is rated by such indicators as SEER and HSPF.
SEER (Seasonal Energy Efficiency Ratio) tells you the amount of cooling you will get during a normal season per watt of electricity consumed.
In 2023, SEER numbers have been modified as SEER1 to SEER2.
A mini split having the same SEER2 rating will be a little lower, but the new test is more realistic to the real life. Most of our DIY-compatible mini splits are rated between high teens or low 20s in Seer (e.g. 20 SEER on Pioneer, ~22 SEER on MRCOOL). A typical new window AC may be ~13 SEER and hence a 20 SEER mini split is highly efficient. It may save 20-40 % of cooling expenses in a hot summer.
The heating performance is gauged by HSPF (Heating Seasonal Performance Factor) or HSPF2.
The greater the HSPF, the more heat the heat pump removes out of the outside air. In case you intend to use the mini split as a primary winter heater, you should seek a model with a high HSPF (812 range, or HSPF2 78 newer models). Other mini splits are so-called hyper heat units and continue to operate when the outdoor temperature is below freezing (e.g. some DELLA and Klimaire models claim to be able to heat down to -13 o F). Remember that every air-source heat pump loses some efficiency and some heating capacity in extremely cold weather. Additional heat might be necessary in case you live in an extreme climate.
When comparing models, keep in mind that a few SEER points difference can not make much of a difference in your electric bill unless you use the AC a lot. Nevertheless, efficiency normally implies improved technology such as variable-speed (inverter) compressors and improved heat exchangers. Each of the units on our list of best DIY is inverter-based and is much more efficient than its predecessors that were fixed-speed HVAC systems. Strive to achieve maximum efficiency that you can afford.
Most homeowners should be happy with any mini split with 18 SEER (=17 SEER2) or higher. It will reduce the utility expenses and indicates that the system is well designed.
Installation Requirements and Challenges
By selecting DIY mini split, one will learn about the installation. Although mini splits do not require ductwork (a major advantage), its installation is not as simple as connecting a window air conditioner.
An average installation consists of the following steps:
- Install the indoor evaporator unit on a wall
- Make 3-4 hole through the wall to take the line set and wires
- Mount the outdoor condenser on pad or on the wall bracket
- Install the refrigerant pipes and drainage of condensate
- Connect electricity
- Commission the system (air and moisture evacuate the lines and refrigerant release)
When you purchase a real DIY kit, it is less difficult to do certain steps. Refrigerant lines are pre-charged and special fittings screw together without leaking so there is no need to vacuum pump or charge refrigerant. This is time saving and it requires less specialized equipment.
Connection of the refrigerant lines is the most difficult process in other mini splits.
The manufacturers fill the outdoor unit with sufficient refrigerant to cover the line length included (e.g. 16 ft). You then join the pipes (normally by flared fittings) and with the aid of a vacuum pump, you suck the line set and indoor unit of air out and then open the service valves to vent out the refrigerant. In case you are not comfortable with it, you might as well hire an HVAC technician to only perform the vacuum and leak check at the end. Others install the indoor and outdoor and wire them and pay a pro to do a speedy one hour job. This is usually done by many handy homeowners who have the necessary tools. The equipment you require is a vacuum pump and manifold gauge set HVAC, and a torque wrench to tighten flare nuts.
It needs the basic DIY skills. You must feel free to drill through walls, use anchors or mounting brackets and simple electrical work. According to one DIY HVAC professional, the installation of a mini split is not difficult as long as you have some basic electrical wiring and basic construction experience. You will have to run a dedicated electrical circuit to your breaker panel to power the outdoor unit (most 12k+ BTU minisplits need 20-amp or higher dedicated circuits; smaller 115V units can usually be plugged in, but are typically hard-wired with a disconnect switch). Use local electrical regulations, most areas need an outdoor disconnect box and a breaker of the correct size. Consider where to put the indoor and outdoor units. Better air distribution and good drainage should be ensured by placing the indoor unit at a high position on a wall. The outdoor unit must be located in an open space having 12-24 inches of free space around it to allow airflow and preferably not in direct sunlight. It may be placed on a concrete or plastic pad on the ground or it may be mounted on the wall with brackets.
The other factor is drainage.
When cooling, the indoor unit forms water and this has to drain out. Majority of the kits are based on gravity; you just run the flexible drain hose and the line set and it should be on a downward slope. The location of the hole should be planned such that the drain hose has a downward slope. In case the indoor unit is lower than the exit point, you may require a condensate pump (an additional device, which pumps water up to a drain). This should be avoided to be simple.
The installation will take some hours.
The first-timers may spend the better part of a day (or two) to mount, wire, and seal everything up. Do not hurry the vacuuming process, provided your unit needs it; a deep vacuum is a sure way to get all the air and moisture out and this saves your compressor in the long term. The process is rewarding and empowering to many DIYers as they acquire new skills. Safety first: when in doubt about the electrical connection or refrigerant, please check with a professional or at least a friend who knows what he is talking about. Properly installed mini split will provide you with efficient comfort, however, an error (such as a refrigerant leak or improper wiring) can be expensive. A DIY mini split installation can be done by the patient and willing to learn people with the proper preparation.
Basic DIY skills are required for any mini split installation. You should be comfortable drilling through walls, using anchors or mounting brackets, and doing basic electrical work. As one DIY HVAC expert puts it, installing a mini split “is not hard if you have some basic prior experience with electrical wiring and basic construction skills”.
115V vs 230V: Which to Choose?
Mini splits may be powered by 115V (or 110 or 120V), or 208/230V.
The voltage determines the wiring that the system should have. The smaller units (usually 9,000 or 12,000 BTU) may be manufactured to 115V to enable them to be operated off a normal domestic circuit. All you require is a dedicated outlet or disconnect on a 20A 120V circuit which most homes already have. As an example, the Cooper & Hunter 12k we have talked about is powered by 115V and can cool 550 sq. ft. Easily.
An installation may be easier with a 115V unit since an electrician may only need to connect it to an existing sub-panel, or to an outlet circuit by replacing the outlet with a hardwired disconnect. Even some 115V mini splits are supplied with a power cord and plug (most are hardwired to a disconnect to be safe).
Higher capacity (18,000 BTU and up) mini splits, as well as most 12,000 BTU ones, are only offered in 208/230V.
These will take 2-pole circuit breaker and adequate gauge wiring run to your panel. You may require the services of an electrician to install an appropriate 230V circuit in case you do not have one. There are however some advantages of 230V units: they can carry higher BTU loads and in some cases they are more efficient. Operation on 230V divides the amperage load between two hot legs, so each leg will be carrying half the current-this may cause less voltage drop, and may extend compressor life on larger units.
Practically, 12k BTU 115V mini split and 12k 230V mini split will cool the same, but the 115V will use about twice the amps. As an example, it may draw ~12 amps on 115V circuit as opposed to ~6 amps on 230V.
In case you are replacing an old central AC or electric furnace circuit you may already have a 240V line you can reuse. Otherwise, consider how comfortable you are with electricity.
Summing up, 115V is a good option when your cooling requirements are not that high and you feel that you would like to have an easier electrical connection, but do not hesitate to use 230V when you need the extra capacity. When installed correctly both voltages will work equally well. Most DIYers will run their own disconnects, but will always shut off power at the main panel and go by NEC rules. When new cable is run through walls or to the outside unit, then the correct gauge of wire (typically 12 AWG for 20A circuits) and weatherproof conduit should be used as necessary.
Key Features and Extras to Consider
Smart Controls:
A lot of mid-range mini splits are WiFi enabled.
You may adjust temperature, program schedules or communicate with Alexa or Google Assistant using an app. Search units with the label of WiFi Enabled or Works with Alexa. Senville LETO and DELLA Vario already have this feature, whereas Pioneer and Cooper & Hunter allow you to upgrade the option. Smart controls are more expensive, but they are able to save energy. You may save money by choosing a system that does not have WiFi in case you are not interested in it.
Heating Performance:
All mini splits can heat but not all will perform well during very cold weather.
When the winter nights tend to be below 20 F, seek units labeled as low-ambient or hyper heat. These systems are more powerful in their compressors or special inverter programming to warm you up at sub-freezing temperatures. See the spec sheet on the lowest heating temperature. Other models are, “completely functional in all 4 seasons” and cool to -13 o F. A lot of budget units have only a 32 o F (freezing) heating capacity. Even in cold climates you might have to add some additional heat source during the coldest weeks, but a higher quality heat pump will serve you through most of the winter. This is not so important when your primary objective is cooling and you only occasionally require heat.
Noise Levels:
The noise is provided in dB. Indoors the low fan is in the low 20s dB and the high fan is in the mid 40s dB. A library with a whisper-quiet level is 30 dB, and the normal conversation is 50 dB. Pioneer 12k has a low 23 dB on low. Review or specs are required in case you require very quiet operation, particularly in a bedroom or a study. The outdoor units are more noisy, approximately 50-60 dB, less than a central AC compressor.
There are units with silent or night modes that decrease noise and decrease cooling power.
Dehumidification:
Others also possess a Dry mode which lessens the humidity without excessive cooling. This comes in handy in very wet areas. The reviews of the customers tend to refer to the quality of dehumidification. As an example, the Senville unit was commended in terms of its control of humidity. Any mini split will turn off the compressor when the desired temperature is achieved, however, inverter types can continue to operate at a low speed to dehumidify. This is better than window ACs which can only switch on/off.
Remote and Settings:
Note the remote control. The majority of remotes allow you to establish mode, temperature, fan speed, and air swing. Others include an LED display toggle, turbo (fast-cool) button or a Follow Me sensor which is a thermostat that uses the position of the remote. The Pioneer and Klimaire remotes are very adjustable and timed. Less complex brands can possess less complex remotes. In case you want to control manually, ensure that the indoor unit has at least an on/off button (most of the units have it hidden in case of emergencies).
Warranty and Support:
Warranties vary. A lot of manufacturers demand that the full warranty is maintained through professional installation.
MRCOOL and Klimaire do not: they target the do-it-yourselfers and continue to offer 5-7 years compressor and 2-5 years parts coverage, no pro required. Others such as Pioneer, Senville and Cooper & Hunter have 5 years compressor and 2 years parts when installed by a licensed HVAC tech. The warning of some brands is that DIY installations will result in the warranty being voided, although parts have been supplied to many owners as a goodwill gesture.
In case warranty is a determinant factor, read the small print and do your homework. Support is also to be taken into consideration. A reviewer observed that a unit that was advertised as DIY had warranty denied when self-installed. In this instance, there has to be a trade off between savings and risk. There are still a lot of DIYers who install without the warranty and are satisfied since they know that the money saved at the time of the purchase is worth more than the possible repairs in the future.